Difference between revisions of "Journal"
From Roll20 Wiki
Richard Z. (Talk | contribs) m |
Richard Z. (Talk | contribs) (→External Journal Access) |
||
| Line 69: | Line 69: | ||
[[File:Journalexss.png|600px|center]] | [[File:Journalexss.png|600px|center]] | ||
| − | This is great for checking up on things in-between gaming sessions without the hassle of loading up the whole tabletop. You can also keep the external Journal open in a separate tab or browser window, or even on another screen. The external Journal updates in real-time. So if a change is made to a character’s bio, you don’t need to reload, you’ll see the change right away. This really enables you to use the external Journal as a play aid during your Roll20 games. | + | This is great for checking up on things in-between gaming sessions without the hassle of loading up the whole tabletop. You can also keep the external Journal open in a separate tab or browser window, or even on another screen. |
| + | |||
| + | The external Journal updates in real-time. So if a change is made to a character’s bio, you don’t need to reload, you’ll see the change right away. This really enables you to use the external Journal as a play aid during your Roll20 games. | ||
== Link Between Journal Entries == | == Link Between Journal Entries == | ||
[[Category:Docs]] | [[Category:Docs]] | ||
Revision as of 06:16, 6 December 2013
The Journal is a feature which allows you to create Characters and Handouts which you can choose to keep private or share with your players. It serves as a central repository for information about your Campaign.
Contents |
Characters
Characters are intended to represent either PCs or important NPCs in your Campaign. Each Character has a name, an avatar which represents the Character, Attributes, Abilities and a Bio and a GM Notes section.
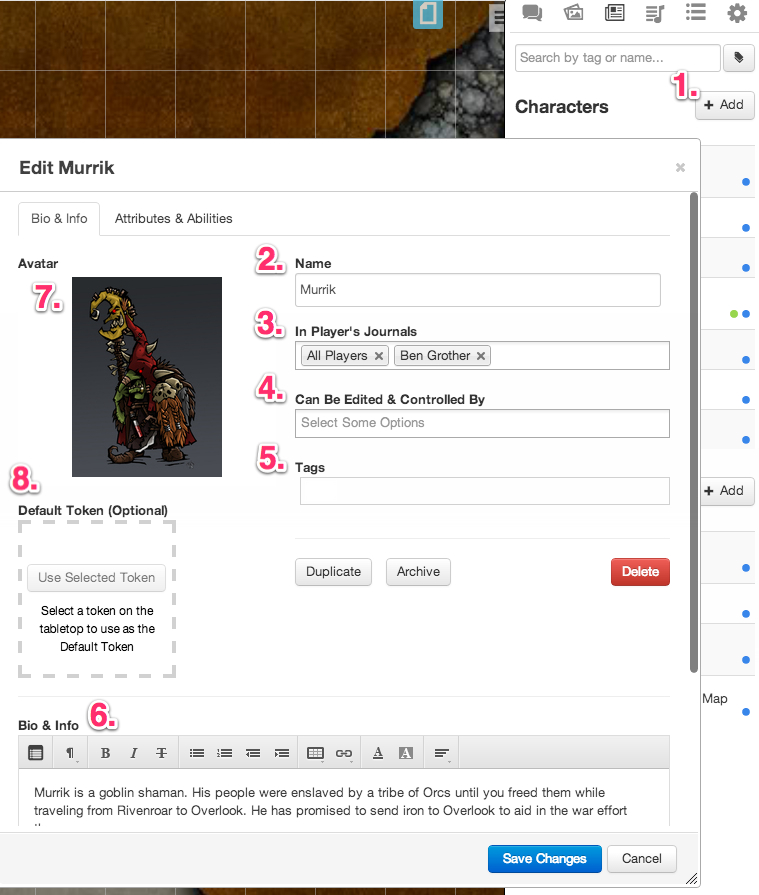
To start a new character, click the (1.) "+ Add" button under the Character heading in the Journal tab. The system randomly generates a (2.) placeholder name and creates the character. From this point, click the "Edit" button to further customize the Character.
By default, only the GM sees the Character. To allow other Players to see the Character in their Journal tab, add their names to the (3.) "In Players Journals" field. You can also choose "All Players" to allow everyone to view the Character.
Players who can view the Character will see the name, avatar, and bio.
The (4.) Controlled By field allows you to give Players in your game the ability to "speak" as that Character in the Text Chat. They are also able to edit the Character's information if they control it. In addition, if you use the Represents Character feature of the Tokens Settings, players who have permission to control this Character will also be able to control any tokens that represent this character.
The (5.) Tags field allows you to tag the Character so that you can quickly find it later using the Search box at the top of the Journal tab in the sidebar.
The (6.) Bio field allows you to input information about the Character. In addition there's a GM Notes field that's only visible to the GM. Both Bio and GM Note fields have a plethora of formatting options, as well as, the abilities to add tables and copy and paste from PDFs.
You can upload an Avatar (7.) to represent this Character in the Journal listing as well as the Chat interface. Just drag and drop an image from your computer, or drag and drop an image from the Art Library search results into the box.
The Default Token field (8.) gives you the ability to select a token on the tabletop to use as the default token for this Character whenever it is added to the table. Just select a token, then press the "Use Selected Token" button. A copy of the token will be stored, including any notes, player permissions settings, and bar values and links. You can then drag-and-drop the Character from the Journal listing in the right sidebar onto the tabletop, and a new copy of the Character's default token will be added to the table.
Once a Token is tied to a Character in the Journal, a Shift+Click on the Settings icon when a token is selected or Shift+Double Clicking on the token directly will open the attached Character; Alt+Click opens the character to the Attributes & Abilities tab.
Archiving the Character will put it in long-term storage. You can easily return it to the Journal tab by clicking on the "Archived Items" link that will appear in the list after you've archived at least one Character. Deleting the Character will permanently remove it from the Campaign, and cannot be undone.
| Useful Tip: Set up all your tokens ahead of time and assign them to Characters. Then when your players join your game, just give them control of the Character and they'll be able to control all the tokens for that Character right away. |
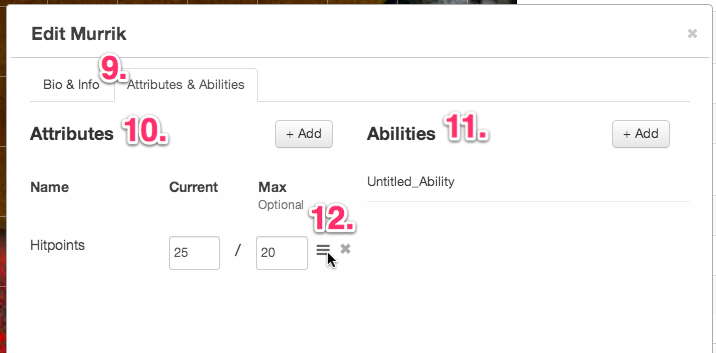
Characters also have Attributes and Abilities, which are used to track stats about the Character and store rolls and other chat commands that are frequently used by that Character. To access the Attributes and Abilities, click on the "Attributes and Abilities" tab along the top of the screen (9.).
You can add Attributes (10.) to your Characters. Each attribute has a name, as well as, a current and (optional) max value. Any players that you give permission to edit/control the Character will also be able to edit the Attributes. Attributes can be used as variables in Macros and Abilities.
Abilities (11.) are designed to work in conjunction with Attributes. Abilities work almost exactly as Macros. You can put any valid chat command (rolls, emotes, etc.) into the ability. By using an Attribute that is assigned to a Character as a variable modifier, you can create complex Character-based Abilities. Type "@" to view a list of Attributes that can be used. Since the variable used in the Ability is linked to a Character Attribute, the value will sync when changed in the Character editor. You can easily add and remove Abilities from your Macro Quick-Bar by selecting the Character from the Journal Tab. Shift+Clicking on an Ability on the Macro Quick-Bar will open that Character's Ability editor.
Finally, you can hover over Attributes and Abilities (12.) to drag and drop to re-order them or delete them.
Abilities Example
Pathfinder specific examples might give a good tip on how to make it in your own game.
Handouts
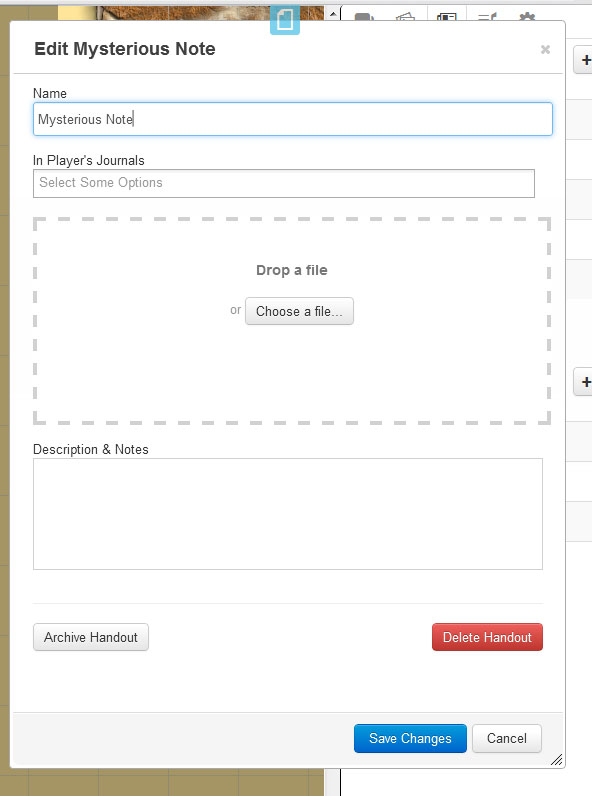
Handouts are very similar to Characters and have some of the same fields. The main difference is that Handouts are designed to be either one large image or a long description (or both).
If you include an image that's larger than the handout window, a magnifying glass will appear over the image when you view the handout. Clicking on the image in the handout will display either the original dimensions or a full-screen version of that image.
You must put the Handouts into Players' Journals using the "In Player Journals" field in order for Players to be able to see them. After you've given Players permission to view the Handout, you can also use the "Show to Players" button to force the Handout to open on the screens of Players who can view it.
You can also drag and drop a Handout from the Journal tab in the right sidebar onto a player, and that player will be given permission to view the Handout and it will also appear on their screen immediately.
External Journal Access
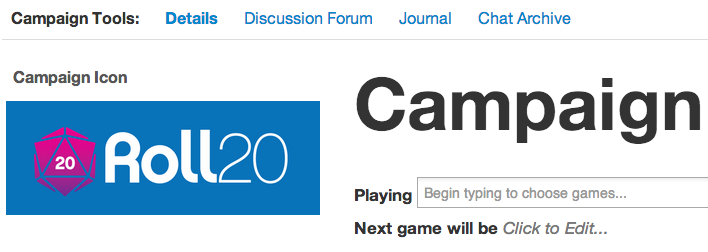
You can easily view your Journal entries outside of the app. Located on the Campaign Details page, along with access to your campaign forums, and chat archive.
This is great for checking up on things in-between gaming sessions without the hassle of loading up the whole tabletop. You can also keep the external Journal open in a separate tab or browser window, or even on another screen.
The external Journal updates in real-time. So if a change is made to a character’s bio, you don’t need to reload, you’ll see the change right away. This really enables you to use the external Journal as a play aid during your Roll20 games.


