Difference between revisions of "Video and Voice Chat"
From Roll20 Wiki
Kristin C. (Talk | contribs) (Removing References to OpenTok and Google Hangouts) |
Kristin C. (Talk | contribs) m (→Roll20 Video/Voice Settings) |
||
| Line 26: | Line 26: | ||
===Roll20 Video/Voice Settings=== | ===Roll20 Video/Voice Settings=== | ||
[[File:VideoANDVoiceSettings.png|thumbnail|200px|right|The Video + Voice Settings on the My Settings tab]] | [[File:VideoANDVoiceSettings.png|thumbnail|200px|right|The Video + Voice Settings on the My Settings tab]] | ||
| − | Go to the '''[[My Settings]]''' tab (the | + | Go to the '''[[My Settings]]''' tab (the <span style="font-family:Pictos;">y</span> icon) on the Sidebar (top-right side of the screen). Scroll down to find the '''Video + Voice''' heading. There will be several drop-down menus here. They are: |
* '''I want to ''Broadcast'' to others''': This controls whether or not you will broadcast Video and Voice, ''Video only(Roll20 WebRTC feature)'', Voice only, or Nothing(disabled) to other players in the game. | * '''I want to ''Broadcast'' to others''': This controls whether or not you will broadcast Video and Voice, ''Video only(Roll20 WebRTC feature)'', Voice only, or Nothing(disabled) to other players in the game. | ||
Revision as of 00:32, 14 January 2017
WebRTC is an HTML5 high-definition, peer-to-peer VOIP service, that runs natively in your browser without the need for any additional plugins. It's also adaptive so it works well with low-bandwidth connections. Roll20 utilizes an in-house built-in WebRTC video and voice chat feature that allows you to communicate with other players.
Once at least two people log into a game using any Broadcast options beyond None, you should see a dialog box along the top of your screen that asks you to give permission for Roll20 to use your camera/microphone.
| Note: If you aren't having much luck with the built-in video/voice chat, you might want to look into our Video and Voice Chat Troubleshooting wiki page. |
Contents |
Enabling and Disabling WebRTC Video & Voice Chat
Managing Browser Permissions
In Google Chrome:
A dialog box will appear along the very top of your browser screen. Click "Allow." (You may only have to do this the first time you use WebRTC).
Note that you can click the little camera icon located in the far-right of your address bar to change the settings of what camera/microphone is being used.
In Mozilla Firefox:
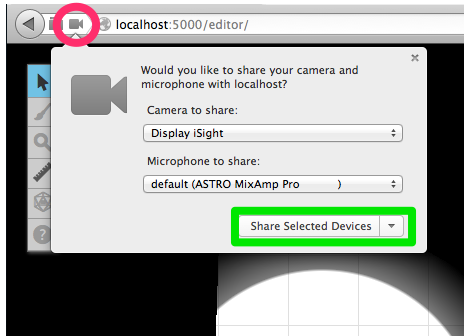
A dialog box will appear, click on "Share Selected Devices" to allow Roll20 to start video chat (highlighted in green below). If for some reason a dialog box does not appear, or if you wish to change your settings after the game has started, click on the Camera icon (highlighted in pink below) to change your settings.
Roll20 Video/Voice Settings
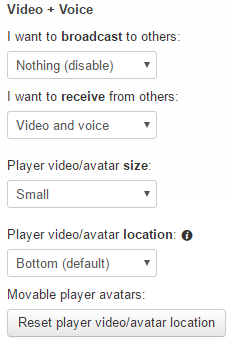
Go to the My Settings tab (the y icon) on the Sidebar (top-right side of the screen). Scroll down to find the Video + Voice heading. There will be several drop-down menus here. They are:
- I want to Broadcast to others: This controls whether or not you will broadcast Video and Voice, Video only(Roll20 WebRTC feature), Voice only, or Nothing(disabled) to other players in the game.
- I want to Receive from others: This controls whether or not you will receive Video and Voice, Video only(Roll20 WebRTC feature), Voice only, or Nothing(disabled) from other players, if they are broadcasting at all.
| If a player changes their Broadcast or Receive settings, they must click on the Reconnect button for the change to be pushed out to the other players currently connected in the game |
- Player Video/Player Avatar Size: This controls the size of the player avatars that are shown on the Tabletop. There are four size options available: Large (200px x 200px), Regular (150px x 150px), Small (100px x 100px) and Names Only. If the last option is selected, the portrait image is hidden entirely and all that remains is the user's name plate. Note that if you choose Names Only, you will still broadcast video and/or voice if that setting is enabled. You need to set the Broadcast To Others setting to broadcast voice-only, or nothing at all.
- Player Video/Avatar Location: This controls where your player avatars are positioned on the Tabletop when using Roll20 WebRTC. You have the option of setting them at the bottom or at the top of the tabletop. At default, the avatars are aligned to the bottom.
- Moveable Player Avatars: One of the features of Roll20 WebRTC is the ability to move the Player Avatars to wherever you want on the Tabletop. Underneath this setting is a single reset button available only when using Roll20 WebRTC. Clicking this will snap the player avatars back to the location you originally designated in previous setting.
Turning Video & Voice Entirely Off and On
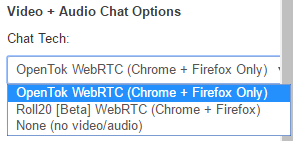
Further down on the My Settings tab, past the Video + Voice heading is the Video + Audio Chat Options Options heading.
Chat Tech: This drop down menu allows you to switch between Roll20 WebRTC or None for your video/voice chat options. Upon choosing a different Video selection than what was selected before (this includes setting it to or from None), your and all other players currently in the game will have their browser tab refreshed. This is necessary to change up the chat tech.
Roll20 WebRTC Features
Relocating Player Avatars Around the Tabletop
One of the unique features of Roll20 WebRTC is the ability to move the player avatars to wherever you want on the screen. This can be very helpful when you have a specific broadcast overlay for streaming. This feature is always enabled for the Game Master, but it can be either disabled or enabled for the players to re-arrange the avatars as they see fit.
To move an avatar, first make certain that Roll20 WebRTC is already enabled, and then hover your mouse over one. An icon resembling three horizontal bars will appear in the bottom left corner of the avatar (over top the Name Plate). This is the avatar's handle that you can click and drag the avatar to a new location on the Tabletop. You can still move these around if you have the avatar portraits hidden and only display the Name Plates. Regardless of who's moving their avatars around, they can only ever be placed in a spot on the Tabletop. You can't drag it atop the Tabletop Toolbar or over the Sidebar. They also will snap away from getting partially stuck under the sides of the browser window.
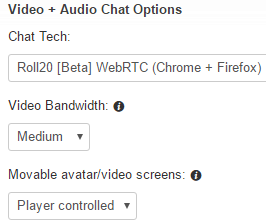
You can decide whether to prevent your players from moving their avatars by going to the Movable Avatar/Video Screens: Setting under the Video + Audio Chat Options heading. You can choose between GM Controlled or Player Controlled. It's important to note that when the Game Master rearranges the locations of the avatars on the Tabletop, these new positions are set on the Players' ends as well. If you set this option to Player Controlled, the Players can change the locations of their avatars, BUT it is only seen locally. One player's screen is likely to be arranged entirely differently than another's (be it GM or Player) and vice versa.
Beyond moving the avatars individually, you can also set the avatar portraits to either align to the top of the Tabletop or the bottom via the Player Video/Avatar Location setting which is found under the Video + Voice Heading. By default, avatars are aligned to the Bottom of the Tabletop.
The locations of the avatars will snap back to their default location if you swap back to either OpenTok or None for Video Chat.
If you ever wish to reset the avatars back to where in the beginning, click on the Reset Player Video/Avatar Location button under the Video + Voice heading of My Settings. This will file the avatar portraits/name plates either on the Bottom of the Tabletop or the Top (depending on what you have set for the Player Video/Avatar Location setting).
A Note About Splitting The Party
If you have the avatars re-positioned on the Tabletop, you're still able to drag players onto individual Pages (AKA Splitting the Party). Just make certain to click and drag on an area of the portrait that isn't the Avatar Handle on the bottom left corner. This will allow to drag the player into the Page Toolbar and assign them to a particular Page.
Muting and Volume Normalization
While video/voice chat is active, other players in your game will have a volume slider overlay located at the bottom of their portrait. This allows you to adjust the volume of each individual. Instead of a volume slider on your avatar, you'll find a mute button. You can use this to mute your mic if you don't have the physical means for it on your microphone itself.
Whispering
Another feature unique to Roll20 WebRTC is the ability to whisper directly to a single player in the game (Presently only the GM has this ability). When Voice is active, a chat bubble icon is available on the upper right hand corner of the avatar upon a mouse over. This icon is the Whisper Player button. Click and hold for the duration of the whisper. While the whisper icon is held down, the other members currently in the game who aren't in on the whisper will have their avatars grayed out to demonstrate that you are holding a private discussion with the other player. This appears on the whispered Player's side as well. Likewise, those players not in on this conversation will see the GM and the whispered player grayed out to them. The group not privy to the whispered conversation can still talk among one another like usual. Everyone's avatars and Voice feeds will return to normal once the GM lets go of the Whisper Player button.
Video/Voice Bandwith Options
You can adjust the video/voice bandwith with Roll20 WebRTC. If you have a user who is working with a slower or limited connection, you can drop the bandwith to a less taxing setting. The drop-down menu for this can be found right underneath the Chat Tech menu option of the Sidebar (if Roll20 WebRTC is currently selected). There are four bandwith settings to choose from: High, Medium, Low, and Very Low. The bandwidth rates scale depending on how many players are currently in the game.
Built-In Push-to-Talk Functionality
Push-to-Talk is a concept where you hold down a key to talk, and then let go when you're not talking. It controls the on/off of your microphone, simulating the behavior of a "walkie-talkie".
Why you want everyone to have this:
- Lets everyone use the regular roll20 interface without installing and setting up a complex extra program like Skype, Ventrilo, Teamspeak, Mumble or Discord.
- Some of these types of program require hosting services, which adds even more complexity.
- Most of these types of program are complex to set up, and would require lots of audio device fiddling and volume customization per-player.
- Shuts down the ambient noise from a player who types really loud or has background noise coming from where they're streaming (children playing, air-condition rattling, loud computer fans, etc).
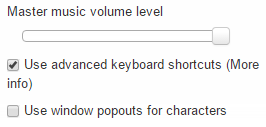
To enable Push to Talk, you will first need to check off Use advanced keyboard shortcuts from the My Settings tab of the Sidebar. This checkbox can be found right underneath the Master Volume Control slider at the top of the tab. Once enabled, pressing the tilde ( ` ) key will mute/unmute your microphone.
| Note: Roll20 keyboard shortcuts only work when the game's browser tab is focused. |
Video Only Broadcast
With Roll20 WebRTC enabled, a new option appears in the I want to broadcast to others: and I want to receive from others: drop down menu–Video Only. This will only display the video footage of a webcam and ignore all microphone input.


