Live Stream and Record Game Sessions
From Roll20 Wiki
Live streaming allows you to let lots of other people who aren't players in your game watch the game as it happens. You can have hundreds of even thousands of viewers watch your play session at once. In addition, your play session will be automatically recorded and archived so that you can make it available for playback long after your session has ended.
While there are many ways to live stream, and several services, we're going to focus on one easy way to live stream a game that works well for us (we regularly live stream our game on a bi-weekly basis; in fact, you can see previous recordings if you want a preview of what the final product will look like).
We use the free Twitch.tv service to actually live stream the session, so if you haven't already, the first thing you'll want to do is sign up for an account on Twitch. You may also want to refer to their support site if you have any questions that are outside the scope of this help article. We'll get you up and running with the basics, but they have features like sharing your previous broadcasts to Youtube, creating highlights, and chatting with your viewers that you'll probably want to take advantage of after you get the live stream going. So, assuming you have your Twitch account, the next thing you need to do is jump ahead to the section that's appropriate for your computer: either PC (Windows) or Mac.
PC (Windows 7)
Note: The following instructions have been verified to work on Windows 7.
There is only one piece of software that you will need to download and install.
XSplit ($29.94 for a 3 month Premium License/$14.94 Personal License/Free Trial License). This software takes a screencast of your Roll20 session, both audio and video, and broadcasts it to your Twitch live stream so others can view it.
Set up XSplit
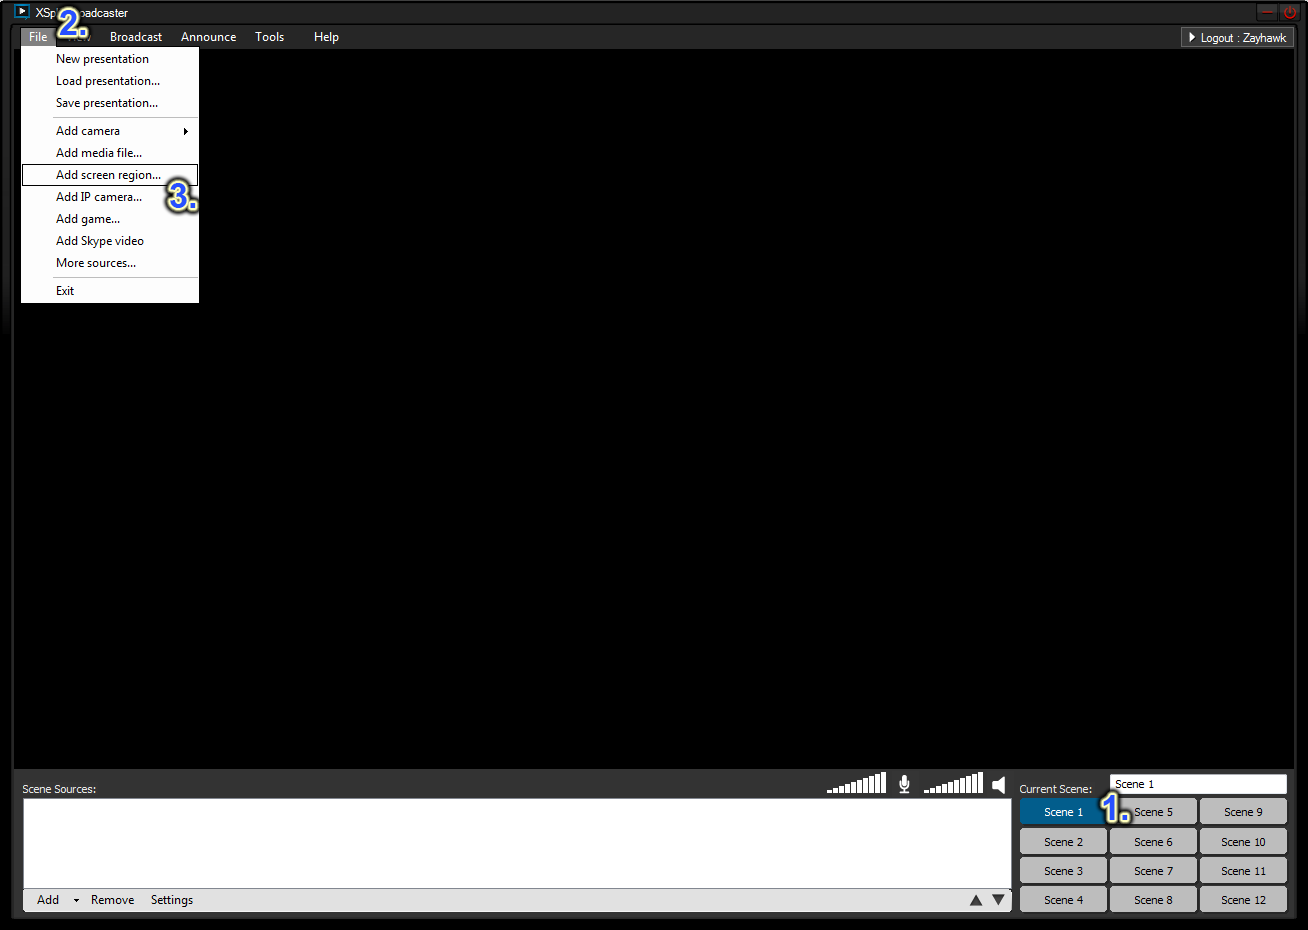
Now that XSplit is installed, you need to setup and configure it. Launch the program, You'll want to (1.) select “Scene 1”, then (2.) click on "File" and then (3.) select the "Add screen region" option.
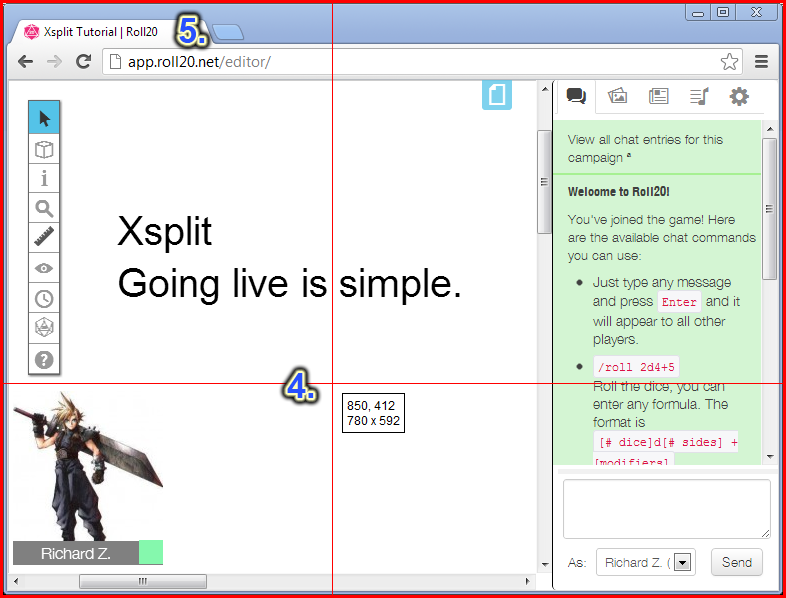
Then (4.) Red crosshairs will appear simply select the region you wish to screencast in this case (5.) the web browser you are using for Roll20.
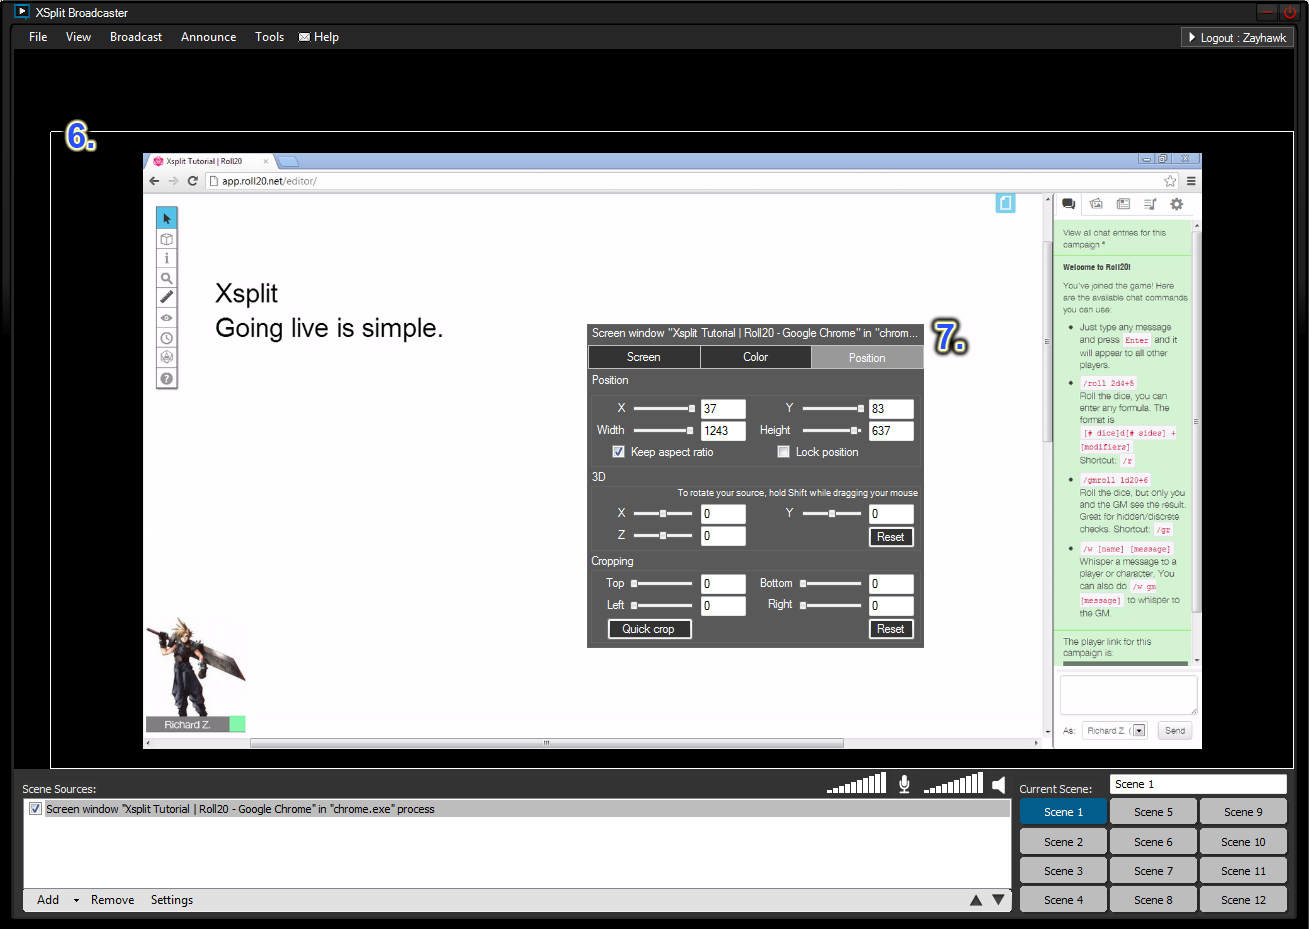
Now that proper screen region has been selected for Scene 1 (6.) You can easily resize the scene by simply dragging or (7.) right click on the scene for more advanced tools( such as screen position, color, or cropping)
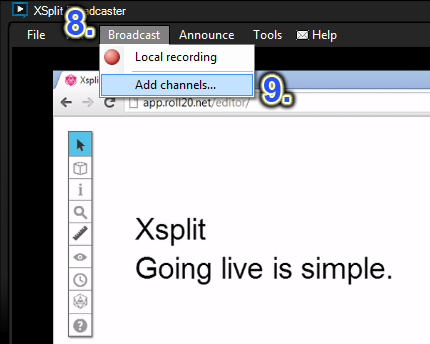
Once your Scene looks just how you want it to you are almost ready to broadcast. (8.) Click on “Broadcast” and then (9.) select the “Add channels” option.
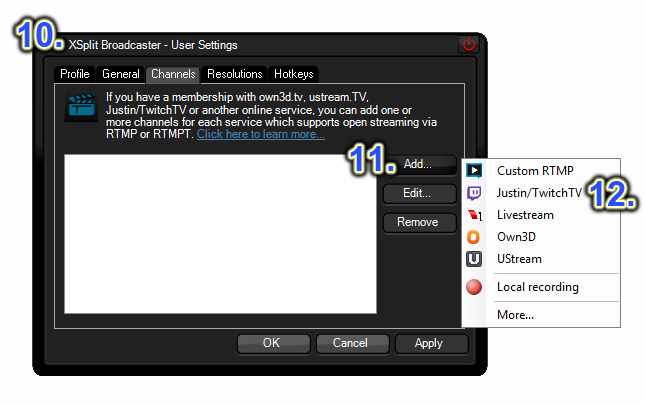
(10.)The XSplit Broadcaster window will open, from here (11.) click the “Add” button and then (12.) select Justin/TwitchTV.
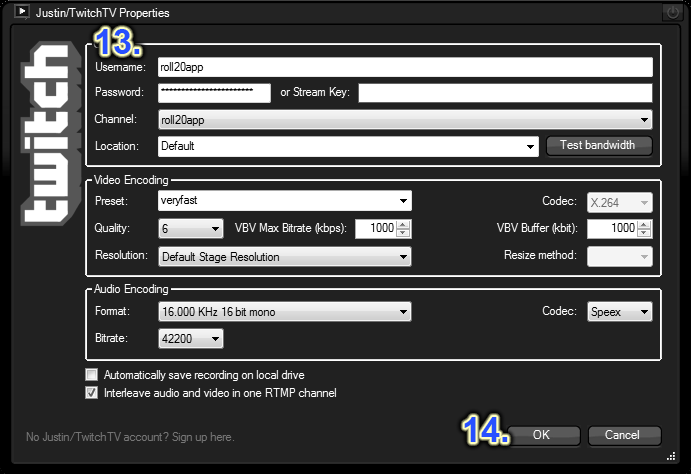
The Justin/TwitchTV properties window will open, from here (13.) enter all your Twitch Channel username and password , then (14.) click the “OK” button. Click “Ok” again on the Xsplit Broadcaster window to close it.
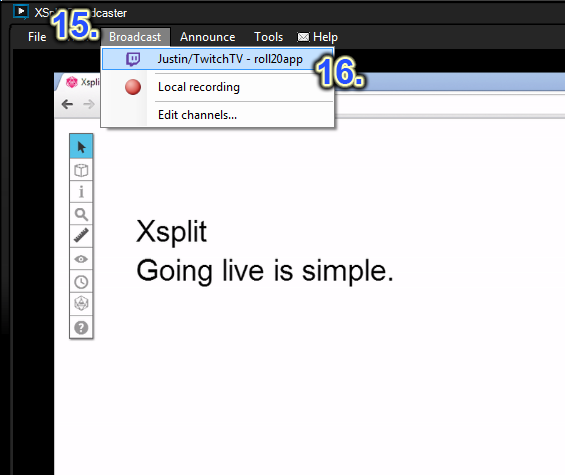
You are now ready to broadcast your Roll20 session via Xsplit to TwitchTV. Simply (15.) click on “Broadcast” and then (16.) select your Justin/TwitchTV Channel.
To let others view your live stream while you're broadcasting, just send them to http://twitch.tv/your_twitch_username, for example http://twitch.tv/roll20app.
Mac OS X
Note: The following instructions have been verified to work on Mac OS X 10.7.x (Lion). They will probably work on older versions of Mac OS X as well, but for best results, you should upgrade to the latest version.
There are several pieces of software that you will need to download and install. Follow the installation instructions for each before continuing.
- CamTwist (Free). This is the software that captures your screen so that you can broadcast it.
- Wiretap Anywhere ($129/Free 30 Day Trial). This software takes the audio from your Roll20 session and your microphone and mixes them together so you can use both in your live stream. Without it, you would only hear yourself talking, not your players or the music from your game. We know this is expensive, and are looking to see if there are any other options that work better, but right now this is by far the best way to record the audio necessary to live stream on a Mac.
- Quicktime Broadcaster (Free). This software (from Apple) takes the video from CamTwist and the audio from Wiretap and broadcasts it to the Twitch servers so that others can view it.
Set up CamTwist
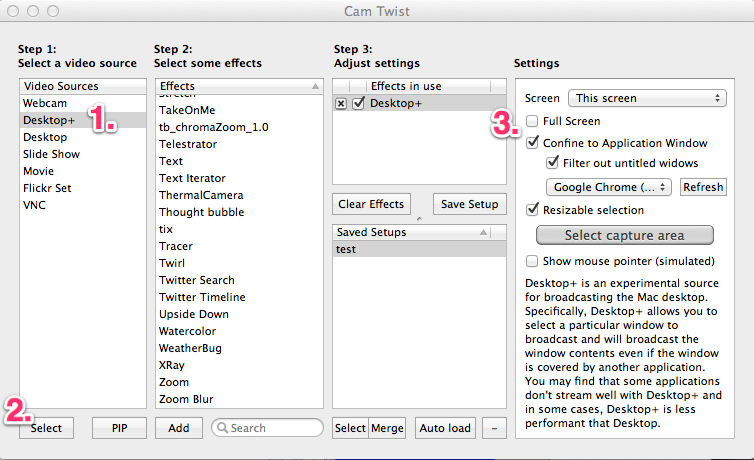
Now that all 3 pieces are installed, you need to set them up and configure them. First up is CamTwist. Launch the program, and you'll be presented with a simple options dialog. You'll want to (1.) click on "Desktop+" and then (2.) click the "Select" button. Then in the far-right pane additional options will appear. You can choose to broadcast your whole screen (the default), or (3.) check the "Confine to Application Window" box to only stream your browser window (recommended).
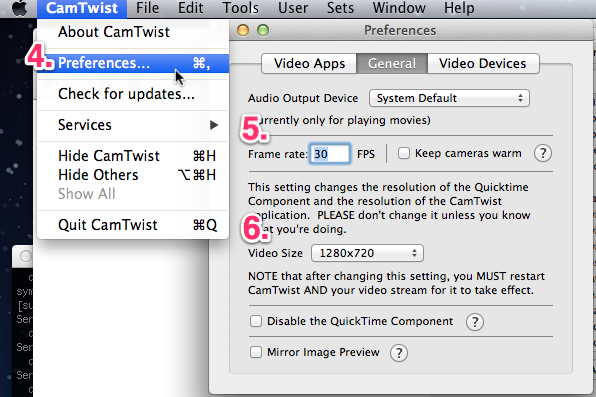
Finally, (4.) select the "Preferences…" menu from the CamTwist menu bar at the very top of your screen (next to the Apple menu). Choose the "General" tab in the settings dialog that appears. You'll want to (5.) enter 30 FPS in the Frame Rate settings box, and for (6.) Video Size choose the size you want to broadcast at (we recommend 1280x720 if your computer can handle it). You may need to fiddle with these options later if your broadcast is laggy. You'll also want to restart CamTwist after making these changes (being sure that all settings are correct after it restarts again.) You only need to change the Preferences… settings this first time.
Set up Wiretap Anywhere
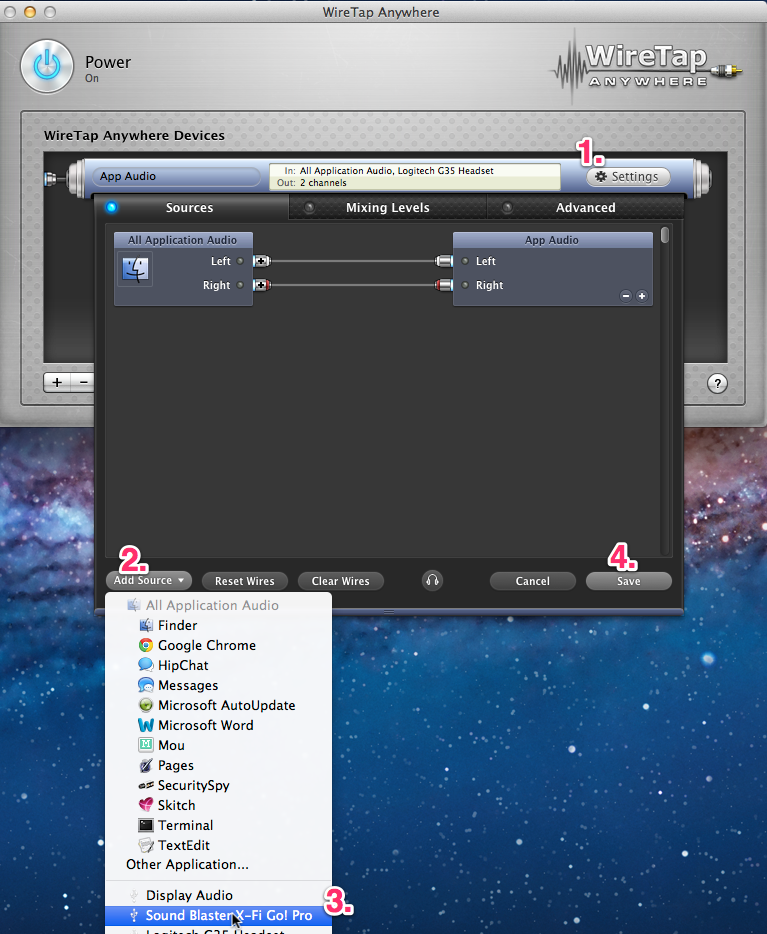
Launch Wiretap Anywhere. You should see a screen similar to the one below, with a virtual device already added. Click on (1.) the Settings button. Choose (2.) Add Source. Select (3.) the microphone that is attached to your computer. Click (4.) Save. Now when you speak or play any audio on your computer, you should see the meters in the "Preview Levels" box on the bottom of the window rising and falling to indicate that sound is being processed by the app.
Set up Quicktime Broadcaster
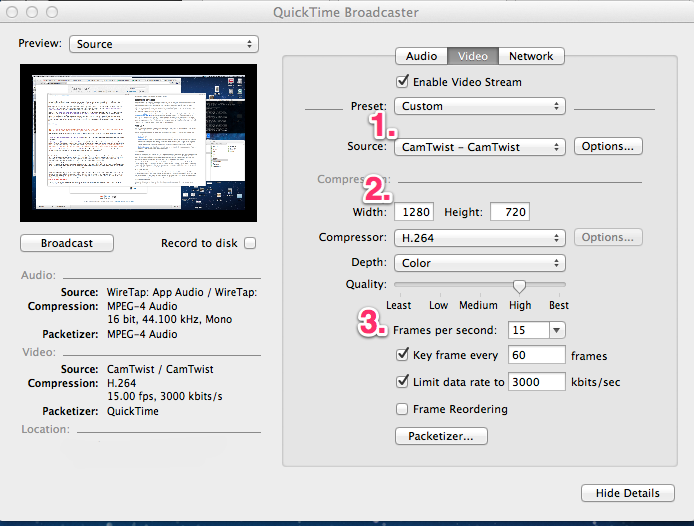
At this point both CamTwist and Wiretap Anywhere should be running and configured properly on your computer. Launch Quicktime Broadcaster (it may take a minute or two to start up!) On the Video tab, you'll want to be sure to set up (1.) the source to CamTwist, (2.) the resolution to match the resolution you have CamTwist recording at (again, we recommend 1280x720), and (3.) set the FPS to 15 or 30 FPS, the keyframes to 60, and the bitrate limit to 3,000 kbps (or less if your connection can't handle that speed).
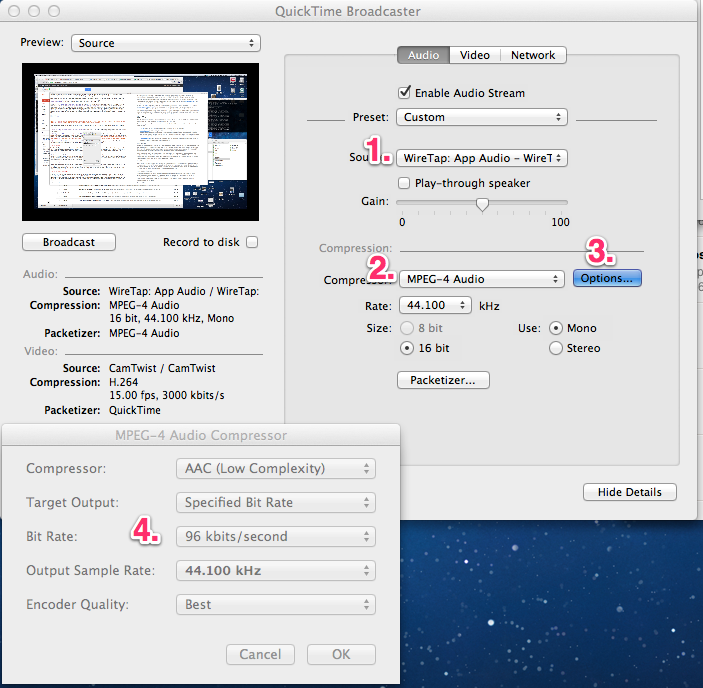
On the Audio tab, you'll want to (1.) make sure that WireTap is the Source, (2.) be sure that MPEG-4 Audio is the Compressor and the rate is 44.100 kHz (Mono). Click (3.) the Options… button, and in the settings dialog that appears, (4.) be sure to choose a decently high bit rate (we recommend 96 kbits/second). The Output Sample Rate should also be set to 44.100 kHz, and Encoder Quality to Best.
Finally, on the Network tab, make sure that (1.) Transmission is set to "Automatic Unicast (Announce)". The Host Name should be "live.twitch.tv:1935/app". The File should be "live_user_your_twitch_username". So for example for us it's "live_user_roll20app". The Username you need to get from your Twitch.tv Broadcast page by clicking on the "Show Key" button. It should be something like "live_123456789_yfdsdfTESdfkDFsERRSLLFJ". The Password is always "jtv".
When you're ready to begin your live stream, just click (2.) the Broadcast button! You don't need to have the Record to disk box checked, as Twitch.tv will automatically record the stream for you as your broadcast it on their servers. Finally, you may want to change (3.) the Preview box from "Source" to "None" during the broadcast, it makes it a little easier on your computer. During the broadcast you will see some information telling you the current bitrate and FPS that you are broadcasting at. If the bit rate is too high for your connection or the FPS is low (less than 10), you may need to adjust some of your settings, such as the recording resolution in CamTwist and the broadcast resolution in the Video tab in Quicktime Broadcaster.
To let others view your live stream while you're broadcasting, just send them to http://twitch.tv/your_twitch_username, for example http://twitch.tv/roll20app.


