Difference between revisions of "Token Features"
From Roll20 Wiki
(→Token Settings: minor edits, corrected View to say See.) |
(→Token Settings) |
||
| Line 31: | Line 31: | ||
[[File:TokenSS2.jpg|right]] | [[File:TokenSS2.jpg|right]] | ||
| − | '''1. Represents Character''': Here you can select whether the Token represents a [[Journal|'''Character''']] or is a None/Generic Token. If the Token is set to represent a Character then the Token will sync with that Character and the Token will automatically be updated with any changes made to the Character in the [[Journal|'''Journal''']]. | + | '''1. Represents Character''': Here you can select whether the Token represents a [[Journal|'''Character''']] or is a None/Generic Token. If the Token is set to represent a Character then the Token will sync with that Character and the Token will automatically be updated with any changes made to the Character in the [[Journal|'''Journal''']].Once a Token is tied to a Character in the Journal, a Shift+Click on the Settings icon when a token is selected or Shift+Double Clicking on the token directly will open the attached Character; Alt+Click opens the character to the Attributes & Abilities tab. |
{{mbox | text = '''Useful Tip:''' Set up Characters in the Journal to represent each of your PCs. Then choose a Token for each Character. Place the Tokens across all the pages of your campaign, and use the Represents Character setting to link each Token to the appropriate Character. Then when your players update their Tokens or their Character, all the Tokens across every page will always stay up-to-date.}} | {{mbox | text = '''Useful Tip:''' Set up Characters in the Journal to represent each of your PCs. Then choose a Token for each Character. Place the Tokens across all the pages of your campaign, and use the Represents Character setting to link each Token to the appropriate Character. Then when your players update their Tokens or their Character, all the Tokens across every page will always stay up-to-date.}} | ||
Revision as of 02:20, 17 November 2013
Creating a New Token
Any image that is placed on the Objects and Tokens or GM Info Overlay layer automatically becomes a Token object. You still have the ability to scale and rotate the image, but there are several Token-specific elements added as well.
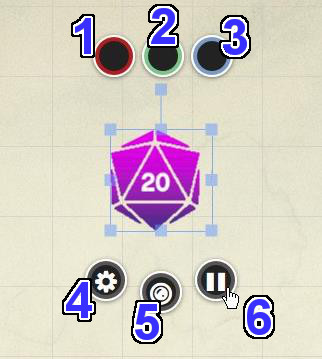
Here is an example of a Token:
1. Radial Menu Bubbles: These three input bubbles can be used by the players or the GM as a counter to keep track of health, turns, money, fuel or whatever else proves useful for your game. Click on a bubble to change the value. You can enter a new value (e.g. "20" or "ABC"), and for numerical values you can also enter relative values (e.g. "+5" will add 5 to the current value, or "-10" will subtract 10.) You can change the colored rims of the bubbles by going to "Token Bar Colors + Display Settings" section on the My Settings tab on the Sidebar and selecting different palette colors.
2. Bar Overlay: If set to be visible, these are passive bars that fill or empty depending on what's entered in its corresponding colored Value Bubble.
3. Nameplate: If set to be visible, this will display the name of the Token.
4. Edit: Clicking on the Edit button brings up a new window where you can name the Token, set permissions on who can control the Token, set what bars/auras are visible to/editable by the players and keep storage of GM notes. Note: This button is only visible to the GM You can also double-click on the token to open the same settings dialog.
5. Status Indicator Overlays:
This button rolls out a menu that gives you a series of colored dots, a red X and over 40 different status icons that overlays over the Token image. You can use these to show status, ailments, or to differentiate multiples of the same Token type. You can have multiple indicators displaying simultaneously.
You can also add counters to individual overlays by mousing over the desired icon in the rollout menu and tapping "0" through to "9" on the keyboard or numpad. Tapping "0" will clear the counter from the icon.
The default position for the overlays is across the top of the token, but you can choose to have them run along the bottom, right or left side by going to the "Token Bar Colors + Display Settings" section on the My Settings tab on the Sidebar and selecting the layout from the "Marker Position:" drop-down menu.
Token Settings
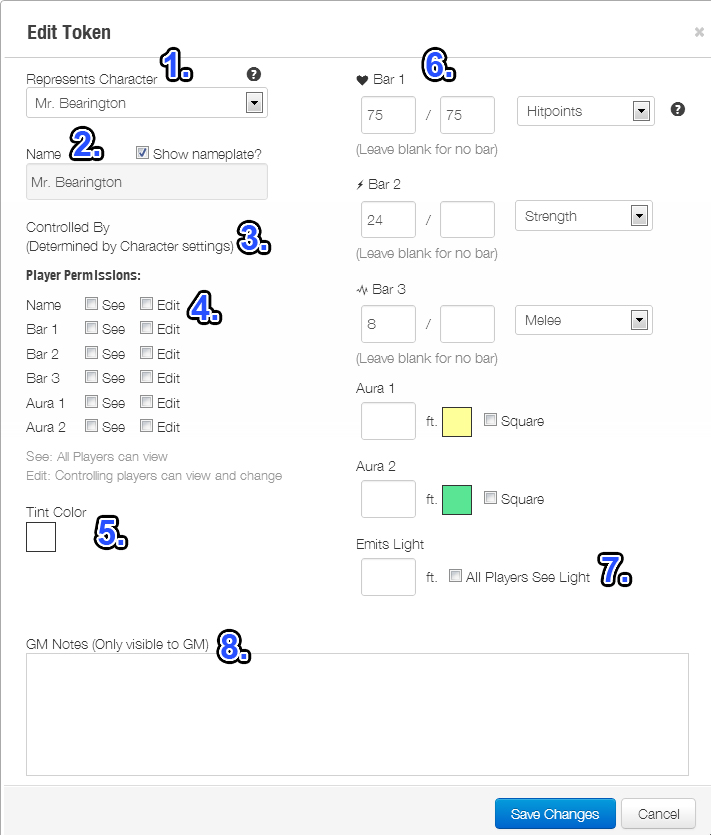
Clicking the Edit button or double clicking on a Token brings up the Edit Token window:
1. Represents Character: Here you can select whether the Token represents a Character or is a None/Generic Token. If the Token is set to represent a Character then the Token will sync with that Character and the Token will automatically be updated with any changes made to the Character in the Journal.Once a Token is tied to a Character in the Journal, a Shift+Click on the Settings icon when a token is selected or Shift+Double Clicking on the token directly will open the attached Character; Alt+Click opens the character to the Attributes & Abilities tab.
| Useful Tip: Set up Characters in the Journal to represent each of your PCs. Then choose a Token for each Character. Place the Tokens across all the pages of your campaign, and use the Represents Character setting to link each Token to the appropriate Character. Then when your players update their Tokens or their Character, all the Tokens across every page will always stay up-to-date. |
2. Name: Here you can set the name of the Token. If you choose to use the Turn Tracker in your game, the Token's name will appear next to its thumbnail picture in the turn list.
3. Controlled By: This is where you assign who in your game has permission to control the Token. If the Token represents None/Generic then clicking on the "Controlled By" field will bring up a list of all the players in the current campaign as well as being able to select the option "All Players". You can assign multiple players to a single Token. If the Token represents a specific Character, then the Token is controlled the player that has control of the Character which is set in the Journal. GM always has control over the Tokens in their Campaign.
Note: If you are creating a brand new Campaign and your players have yet to join, their names will not yet be available for Token assignment. If you're setting your Pages up in advance of your first gaming session, it's recommended to set your PC Tokens to "All Players" and later fine-tune the permissions when your players have visited your Campaign.
4. Player Permissions: There are two possible permissions for each setting: See or Edit. You can toggle the flag for each type by checking or unchecking the corresponding box.
Setting the See flag will allow all players in the game to view the current value of the bar, or see the aura drawn on the tabletop, regardless of whether or not they can control the Token.
Setting the Edit flag will allow all players who can control the Token (based on the "Controlled By" field, above) to see and edit the values of the bar, or change the radius of the aura drawn on the tabletop.
So if you have a Token that you want all players to see the bars for (like a PC), set the See flag. If you also want to allow some players to keep track of their own health, set the Edit flag. If you only want players who can control the Token to see and edit the bars, set only the Edit flag. And of course if you set none of the flags then only the GM will be able to see or edit the bars and auras.
5. Tint Color: Here you can add a color filter to the Token. The default tint color is transparent.
6. Bars and Auras:
Bars: This is where you can set whether any of the three bar elements are either visible and/or editable to the players. The green heart, blue bolt and red cardiograph icons for the bars are there for identifying purposes only. They do not have to represent anything in particular in your game.
You can also input numerical values for the Bar Bubbles directly from the Edit Token window. There are two input fields available for each Bar. The first field is for the Bar's current value and is what's featured in the Token's corresponding Bar Value Bubble. The second field is for the Bar's total value. If it's supplied, Roll20 will use the comparison between the two numbers to render how full or empty that corresponding Bar appears on the Tabletop. The fill will reflect whatever the Player plugs into their Bar Value Bubble while in-game.
Also note that if the Token Represents a Character (as chosen in the field above), you can choose to link each bar to a specific Character Attribute. If you change the value in the bar (via the Token settings, radial bubbles, or in the Character settings) the value will update automatically.
Auras: An Aura is a translucently filled circle or square that radiates from the center of a Token. You can have up to two Auras active at once on any given Token. To turn one on, make sure it's toggled on to See first and then enter a radius value for the Aura. Next to the Aura's radius input field is a palette button where you can choose the color for the Aura. You can set the Aura to a square instead of a circle by checking off the "Square" checkbox next to the color palette button.
Note: To completely remove an Aura from view, do not change the radius value to zero. Clear the field instead. At zero, the Aura still draws to encircle the outer edge of the Token.
7. Emits Light: Here you can set how far light emits from the Token and if All Players can see the light emitted when Dynamic Lighting is enabled.
8. GM Notes: This is a field where a GM can keep private notes on any given Token.


