Difference between revisions of "Macros"
From Roll20 Wiki
m (→More Examples) |
m (→More Examples) |
||
| Line 55: | Line 55: | ||
=== More Examples === | === More Examples === | ||
| + | Here are some system-specific examples; | ||
| + | |||
[[Dungeons_and_Dragons_Next#More_Examples|DnD 5e/Next macros]] | [[Dungeons_and_Dragons_Next#More_Examples|DnD 5e/Next macros]] | ||
Revision as of 22:51, 7 January 2015
Macros are user-defined shortcuts to commands you regularly want to repeat. For example, you can create a macro that shouts a battlecry then performs an attack that you frequently use. Instead of needing to type all of the commands over and over again as you play, you can just type one short command instead.
Contents |
Creating and Editing Macros
Go to the My Settings tab (housed under the small gear image) in the Sidebar. To enter a macro, first type what you want to call the command. Example: "test". Then to the right, put in the command. This could be typed text, a roll, or emote. Press "Enter" after this information to save the command.
To use the macro, type # and the command (e.g. #test) and press enter. There is also a tab auto-complete function for macros.
Multiple commands
One of the strengths of the macro system is its ability to execute multiple actions with a single command. To do this, simply put each item on its own line, and they will be executed in order when you run the macro.
Example
If I want to create a macro that will include an emote, plus my attack and damage rolls it would look like this:
Macro Name:
dagger
Macro Body:
/me rams his dagger home
/roll 1d20+10 vs AC
/roll 1d4+9 Damage
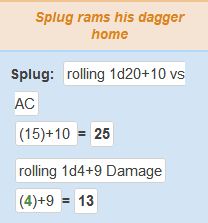
Then, simply by typing #dagger it would run the entire script and look like this:
Macros can also include a mix of command and non-command lines, for example:
#lof
/me calls upon the power of Moradin!
I smite you!
/roll 1d20+4 vs reflex
/roll 1d8+4 damage
This would first emote, then send "I smite you!" to the chat, and then make the two rolls afterwards.
Nesting Macros
Macros can be nested inside each other, which gives the ability to combine macros, and call multiple macros with a single action. To nest a macro, simply include the name of the macro you wish to call on its own line inside your macro.
Example
In this example, we'll have three macros: #damage #attack and #both
Macro #damage = /roll 1d4+11
Macro #attack = /roll 1d20+9
Macro #both =
#attack
#damage
Nesting Abilities
An ability is another name for a macro which is specific to a certain character and is created in a character sheet found on the journal tab. Like macros, abilities can be nested inside each other, which gives the ability to chain abilities together, and call multiple abilities with a single action.
Nesting an ability is similar to nesting a macro but with a slight twist. Like a macro, simply include the name of the ability you wish to call on its own line inside your calling ability. But in addition you have to change the number symbol (#) into a percent symbol (%) and then include the name of the character in front of the ability name using a vertical pipe (|) to separate them.
The vertical pipe key can be found above the backslash key (\) on most keyboards. This key will usually be near the enter key on a US keyboard and in the number row on European keyboards. To type a vertical pipe once you've found the key hold shift as if you were to uppercase a letter and then press the it.
Note: Currently the ability reference symbol (%) does not auto complete at this time like the attribute reference symbol (@) or macro reference symbol (#) do. You must type the entire thing yourself.
Example
In this example, we'll have three abilities: %damage %attack and %both and our character who will be named Bugbear
Ability %damage = /roll 1d4+11
Ability %attack = /roll 1d20+9
Ability %both =
%{Bugbear|attack}
%{Bugbear|damage}
More Examples
Here are some system-specific examples;
Attribute Macros
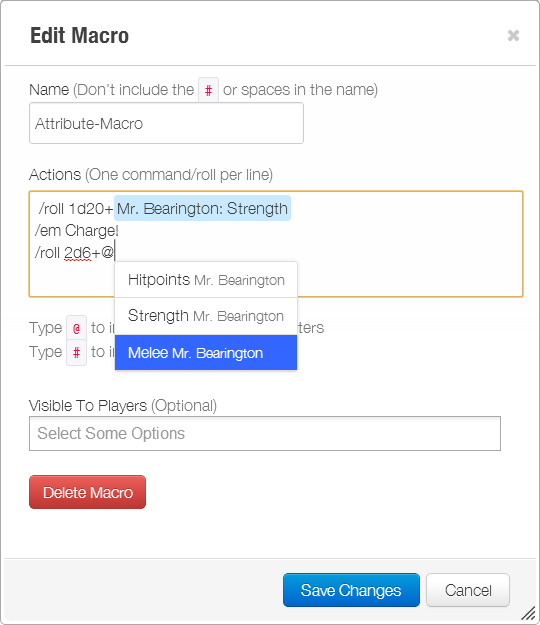
A culmination of the above examples can be used in what we call Attribute Macros. By using an Attribute, that is assigned to a Character, as a variable modifier you can create complex Character based macros. Since the variable used in the Macro is linked to a Character Attribute, the value will sync when changed in the Character editor. The Macro editor supports auto-complete of both nested macros (by pressing “#”) and Attributes from Characters (by pressing “@”).
Tip: When using "@" in the Macro editor use the directional Up and Down key to select the appropriate Attribute.
Video tutorial on using Abilities
A very basic look at using abilities for more simple rolls. (ex. Will Save, Skill Checks, etc.)
Attributes & Abilities
Using a Selected Token with a Macro
The "selected" keyword will allow you to pull information from the element that is currently selected on the screen when the roll/macro is executed. So for example, if you want to pull the value of Bar 1 from the selected token during a roll, you can do:
/roll 1d20 + @{selected|bar1}
You can use "bar1", "bar2", or "bar3". In addition, you can also pull an attribute from the Character linked to that token, if there is one:
/roll 1d20 + @{selected|Intelligence}
You can pull the Name of the currently selected token's by using the "token_name" variable.
/em @{selected|token_name} fires his gun!
If the selected token has a character journal linked to it you can pull the Name from the character journal instead using the "character_name" variable.
/em @{selected|character_name} blocks with his shield!
You can also trigger abilities from the linked character journal by using the ability name as a variable.
%{selected|Attack}
Finally, we've introduced a 3rd argument for variables, allowing you to pull the "max" of a bar or attribute:
/roll 1d20 + @{Guard|Intelligence|max}
/roll 1d20 + @{selected|bar2|max}
Also, all names (for Characters, attributes, and abilities) are now case-insensitive when you use them, so "GUARD" and "guard" will now both match the Character "Guard".
Using a Targeted Token with a Macro
Very similar to using the "selected" keyword to pull information from a selected token (as illustrated above), you can also use the "target" keyword to access information such as variables and/or abilities of a "target" token. This command lets players choose from tokens that they cannot normally select, which is excellent when they have to roll against enemies. For example, if you told a player to roll a single 1d20 roll against a target you've advised has a "strength" attribute to overcome. The roll would look like:
/roll 1d20 - @{target|strength}
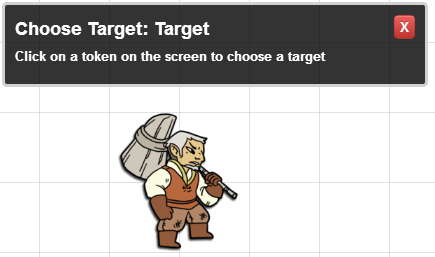
This will bring up a prompt screen for the player to select which token target they are rolling against:
Again, the "target" keyword is almost identical in usage to the "selected" keyword as outlined above in the ways it can be employed-- the primary difference being that it allows players to utilize values from tokens they are not controlling.
Advanced Usage
The full syntax for the target variable is:
@{target|<target_name>|<attribute_name>|<optional_flags>}
(Note that 'target_name' can be anything you like, and can include spaces.)
So if you want to have multiple targets in your macro you can do:
@{target|Target1|HP} vs @{target|Target2|AC}
And if you want to use the max of an attribute:
@{target|Target1|HP|max}
Note that if you want to use the "max" flag you must specify the name of the target yourself, even if you just put "target1" as above.
Roll Options
"Roll options" are "flags" that you can set anywhere in a roll to tell the roll system you'd like to do special things with the roll result.
Rolling For Initiative
To send a roll result directly to the turn tracker, first, select the Token you wish to roll for initiative and then use the below roll option in your macro:
/roll 1d20 + 5 &{tracker}
The "tracker" roll option tells Roll20's roll system, "Show the results of this roll, but also use the result as the value in the turn tracker." If the token that you have selected doesn't already have a turn in the turn order, one will be added. If it already has at least one turn, all current turns will be updated with the new value.
In addition, you can add the result of the roll, or subtract the result of the roll, from the current turn value for the selected token by using the following flags:
/roll 1d20 + 5 &{tracker:+}

/roll 1d20 + 5 &{tracker:-}
For a game such as Shadowrun where you want to subtract 10 from the current initiative after every turn, you could have a global macro like so:
/me @{selected|token_name} ends their turn. [[10 &{tracker:-}]]
Note that the tracker flag works both in regular rolls and inline rolls.
Using a variable with a Macro
Using Roll Queries
The easiest way to include a variable with a macro that you specify when it is executed is to use a Roll Query. For example, if you want to add a variable modifier onto a roll, you can make a macro like so:
/roll 2d20 + ?{Modifier|0}
When the macro is executed, a prompt will appear asking for the modifier to include. If no modifier is specified, the "|0" part of the query tells it to use 0 as the default value.
More information on Roll Queries is available in the Dice Reference.
Specifying a variable in chat
If you'd like to use a variable modifier with your macro roll, simply end the macro command with the modifier, and then specify it when calling your macro
Example
If I want a macro for 1d20+x (where x is my variable value) I could create the following macro:
#d20 /roll 1d20+
then, when running the macro, type #d204 to get /roll 1d20+4
Macro Bar
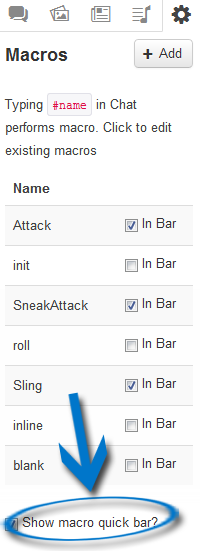
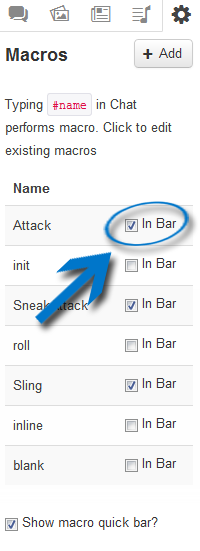
You can also create quick access buttons for any of your macros that will appear in a bar at the bottom of the screen. First, create your macro like normal. Then, to enable the macro quick bar, check off "Show macro quick bar" in the settings menu
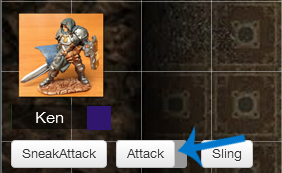
Then, to add a macro to the bar, simply check the "In bar" option next to the macro's name. If you have forgotten to turn the macro quickbar on, toggling on a macro will auto-enable the quickbar to display.
The quickbar, and any macros that you have selected should now appear on the bottom of your screen, underneath the character portraits. If you'd like to re-arrange the buttons on the bar, hover your mouse over the button that you'd like to move. A handle will appear on the right side of the button. You can drag the button around the bar by using this handle.
Shift+Clicking on a Macro in the macro quickbar will open the editor for that specific macro.


