Beginner's Guide to GitHub
From Roll20 Wiki
Submitting Character Sheets, making them translatable to other languages and API Scripts for use by the community requires familiarity with GitHub.com.
The following is a simple, bare-bone guide to get you from "What in the world is Git?" to "Everybody should use my brand new character sheet!" as quickly as possible, without trying to teach you all the intricacies the system is capable of. The "More Info" section contains links to more guides for how Git/GitHub works but are general in nature.
In five steps, the process for submitting a character sheet is Fork, Clone, Commit, Push, and request a Pull.
Contents |
What is Git/GitHub?
Git is a revision control system, a tool to manage your source code history. GitHub is a hosting service for Git repositories. So they are not the same thing: Git is the tool, GitHub is the service for projects that use Git. The GitHub web tools and downloadable GUI are tools to use the underlying Git. Brief comparison
Create Your Account
In order to use GitHub, you need to have an account on their website. You can create a paid account or you can create a free account. Unless you plan to create a large number of projects which you don't want to share with the world, there is no reason to create a paid account: the only difference between the various pricing levels is the number of private repositories you're allowed to have. Everyone, including free accounts, gets to have an unlimited number of public repositories.
GitHub recommends that you keep each repository under 1GB, and enforces a strict limit of 100MB per file. However, these limits are multiple orders of magnitude beyond what you should be working with for character sheets.
FORK the Official Roll20 Repository
A fork is a copy of a repository. Forking a repository allows you to freely experiment with changes without affecting the original project. Most commonly, forks are used to either propose changes to someone else's project or to use someone else's project as a starting point for your own idea.
Click the Fork button on the official repository located at github.com/Roll20/roll20-character-sheets or github.com/Roll20/roll20-api-scripts (as appropriate). This will create a copy of the repository on your account, which you will have permission to make changes to as you please. You can fork the repository as many times as you want, but you only need to fork it once.
If you are working with another user on the same sheet or script, it may be a good idea to go into your new repository's settings and add them as a collaborator. The details of how to add a collaborator are beyond the scope of this tutorial, however.
If you are familiar with the Git version control system, you shouldn't need any other information to complete your character sheet submission. Everyone else, read on!
CLONE Your Repository
Cloning a repository also makes a copy, but a cloned repository is used as a working copy, and it maintains a link – by default named "origin" – to the repository it was cloned from.
For the beginner Git user, I strongly recommend downloading and installing either GitHub for Windows or GitHub for Mac as appropriate for your operating system. In addition to being a simple way to install and setup Git version control on your computer, the GitHub applications make it easy to link to your GitHub user account.
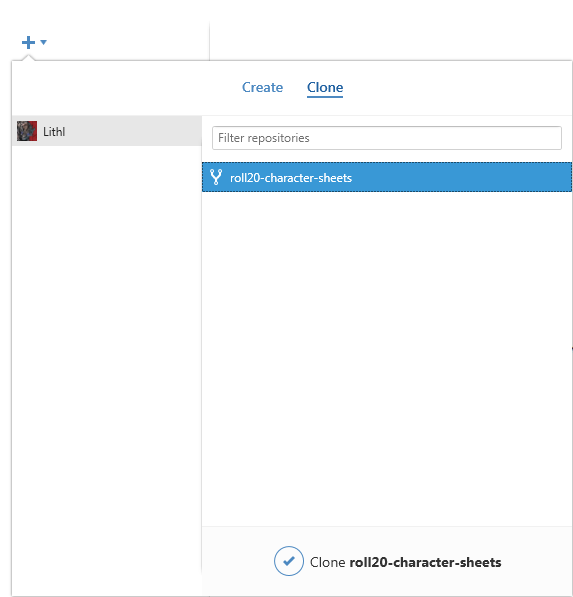
When you first run the GitHub application, it will prompt you to log in to your GitHub account. Then, click the large plus sign in the top left to Clone your repository.
When you clone the repository, you'll be prompted to select a location to put the files. Make sure you select a location that you can find easily, you'll need to know where it is!
If you're not using the GitHub application, you can find the clone url for your repository on the page for your repo. GitHub offers both SSH and HTTPS clone urls, as well as a Subversion checkout url. The details of cloning your repo manually are beyond the scope of this guide, however.
COMMIT Your Changes
When you commit changes, you store a record of everything you changed as well as a human-readable description of what you've done.
Once you have a working copy of your repository cloned, you can make changes to it. Most importantly, this includes creating a new folder for your character sheet or API script and adding the source code to it. When the files in your working copy are different from what has been committed to the repository, you'll see uncommitted changes listed in the GitHub application, as well as the difference between the recorded version and the current version.
When you enter a summary of the changes and optionally enter a longer description, you can commit the change. Commit often! Making frequent commits can help you have a detailed history of the changes you're making, as opposed to a single commit with everything once you're done. Note that there is a length limit to the Summary. However, if you exceed the limit, your message will automatically overflow into the longer Description. You can see this happening when text in the Summary field turns gray.
PUSH Your Commits
Pushing sends all of your commits to the remote repository (by default, "origin"). While commit lets you record your changes, push lets you share your changes with others.
Committing your changes still only stores them on your computer. In order to get those changes onto GitHub, you need to push them up to your origin, the repository being stored online.
Doing this within the GitHub application is simple. You'll notice in the top right corner a button labeled "Sync." This is called sync instead of push because it does more than just the push action. But all you need to know is that, among other things, the Sync button will push your changes.
Create a PULL Request
As its name suggests, a pull is the opposite of a push. Instead of a copied repository sending commits to the original, the original asks for commits from the copy.
On the webpage for your repository, there is a green button which says "Compare, review, create a pull request" when you hover over it. This button will take you a page where you can create a pull request. If there are any differences between your repository ("head") and Roll20's version of the repository ("base"), they'll be displayed here. (Note that you can change what to use as both the head and the base by clicking the nearby "Edit" button.)
Because you don't have collaborator permissions on Roll20's repository, you can't perform the pull action yourself, but you can request someone else to perform the pull. Press the large green button labeled "Create pull request" and a pull request will be opened on the base repository.The people with permission to do so (ie, the Roll20 developers) can examine the pull request as well as the content of the changes proposed, and then merge the request into the official repository.
For clarity's sake, please include the name of the sheet you have made changes for in the pull request, eg. "[Dungeondivers 3rd Edition] fixed broken Might roll".
For character sheet submissions, assuming everything is correct (remember to include sheet.json and a preview image – check the readme for more information), your sheet should get added to the approved.yaml file and be available to all users! API Script submissions do not currently have the same approval process as character sheets, so merging the pull request is all that's necessary.
Once a week, Roll20 processes all available sheet requests. When this occurs, you'll receive an email from GitHub. This email will either let you know a comment was left on your request regarding an issue that was discovered with your submission OR if your sheet was merged as expected and your request was closed (because it was completed successfully).
Making changes to your PULL Request
If you create a pull request and then commit & push some additional changes to your repository/branch before the Pull Request is merged, those new changes will be automatically be updated/included in the original pull request; there is no need to make a second pull.
Beyond your first Pull Request
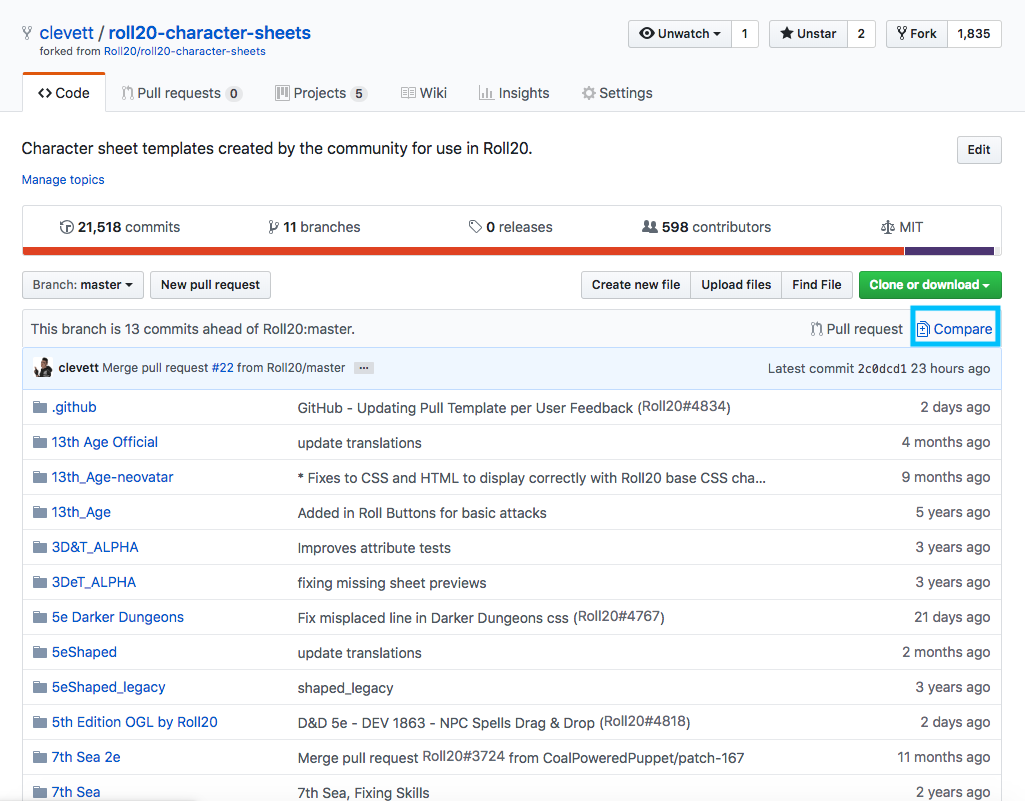
If you make/update another sheet or API script in the future, you do not need to create another fork, nor do you need to clone your repository again. You will need to update your fork with master. Read the guide below on how to sync
1. Go to your fork
2. Click Compare
3. Submit and merge the pull request from master into your fork.
Always do this before you start new sheet work.
Guide to sync your repository with Original (browser)
More info
- Tips on how to use Github (Roll20 forum thread)
- Git -The simple guide (command line tool) by Roger Dudler
- GitHub Workflow (GitHub Desktop) 6/22/16
Git and Github for Poets Youtube Tutorial
10-20 min long videos for non-technical people that teaches the basics on Git and Github, showing how to work with Github in the browser, but also have an intro to using the command line. It's made in 2016 but doesn't seem to be dated on a quick look(March 2019)
- 1.1 Git/GitHub intro 14 min
- 1.2 Branches 12 min
- 1.3 Forks and Pull Requests 13 min
Git and Github for Poets (beyond basics)
- 1.4 GitHub Issues 12 min
- 1.10 Git Remotes 14 min


