Dynamic Lighting Examples
From Roll20 Wiki
| This is about a Roll20 feature exclusive to Plus & Pro-subscribers, or to players in a Game created by a Plus/Pro-subscriber. If you'd like to use this feature, consider upgrading your account. |
Dynamic Lighting is an advanced map lighting tool currently available to Pro & Plus subscribers. It calculates line of sight on the fly as tokens are moved across the tabletop. This sections give general and system specific examples of how to set up lighting and vision.
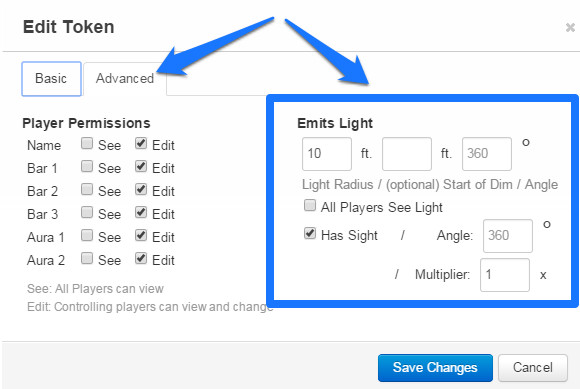
To turn Dynamic Lighting on you must enable it from the Page Settings for each scene you wish to include lighting elements. Remember that a user will only see light sources if they have control over a token that Has Sight enabled. You can activate this setting from the Advanced tab in the Edit Token pane while in the GM view. If the Enforce Line of Sight option is selected in the Page Settings the user will only be able to see light sources that their token is able to see.
The measurements for light distance and vision are calculated using the Page Settings for each individual scene. Whatever the Scale unit measurement is set to (feet, squares, inches, kilometers) is what the units of light range will be calculated in. These examples assume that you are using the default measurements of 5 Feet for each 1 unit but can be converted to any measurement.
Best Performance Guide
Dynamic Lighting is one of the more complicated elements featured on the Roll20 Tabletop. Its effectiveness and how smoothly it runs depends significantly on how the GM goes about setting up their Dynamic Lighting linework and its light sources. The following is a guide on how to keep your Dynamic Lighting lean on processing bloat and running efficiently. Some of these tips are also workarounds to known issues with the feature currently.
The Fewer Lines, the Better the Performance
Every single segment drawn on the Dynamic Lighting layer is taken in account each time Roll20 updates the ray-tracing process that determines what is revealed and what isn't. This happens every screen refresh as you move tokens projecting light/sight around the Tabletop. If you have "Update on Drop" enabled, the ray-tracing is performed only after you pick up a token and place it elsewhere on the page. Complex outlining drawn on the dynamic lighting layer, can cause the Dynamic Lighting feature to become very resource intensive and potentially cause lag during gameplay for you or your players. You can keep a page running smoother if you focus on efficient contouring while drawing your Dynamic Lighting outline and avoid tracing over previously drawn lines. If your dynamic lighting is performing sluggishly, your outline complexity should be the first thing to review.
An example where efficient outlining should be used is when drawing in the walls for organic-shaped areas such as cavern passages. Attempting to perfectly trace the contours of the natural rock face wall would require many segments, so we recommend outlining only the most basic direction of the cavern wall.
Don't Use Circles
A circle drawn on the Tabletop isn't represented by a series of segments, instead, it is a vector calculation that draws a spline between four vertices. Since there aren't any true segments used for a circle shape, there is nothing there for the Dynamic Lighting system to reliably ray-trace as you would expect regular linework on the Dynamic Lighting layer should. If you need a circular shape for your Dynamic Lighting, we recommend drawing it out as a rounded polygon instead.
Don't Use the Freehand Tool
This tool is disabled via the Dynamic Lighting toolbox menu, but you can still copy and paste any linework, including ones done with the Freehand Tool, from one of the other Tabletop layers to the Dynamic Lighting layer. We do not recommend you doing this. A basic line drawn with the Freehand Tool can be comprised of dozens to hundreds of individual segments. You only need a couple of these lines drawn with the Freehand Tool to notably impact the ray-tracing performance of Dynamic Lighting. Please use the Polygon Tool or Rectangle Shape Tool and only copy and paste linework that were drawn with these two tools.
Don't Rotate Shapes/Drawings
Currently, the Dynamic Lighting ray-tracing only takes in to account the original location of the vertices of a shape or line segments in relation to each other. You can copy and paste shapes and lines, move them, and scale them freely; however, you can not rotate them. If you rotate a shape or line, the dynamic lighting will remain the same as it was before you rotated the object.
Negative Light Radius Numbers
We don't recommend using negative numbers for light values on the Advanced Token Settings. We've found that when a token has its dim light radius set to a negative value, some users' browsers would find themselves struggling with a considerable amount of lag. This isn't seen universally for all users on the platform, but it may be best to avoid this entirely to prevent any of your players from hitting this potentially large performance drop.
Opting for Global Illumination
Depending on the battle map you're illuminating with torch and candle tokens, you may choose to enable Global Illumination instead. The more light sources you put on a Page, the required calculation for Dynamic Lighting raytracing increases. If you enable Line of Sight and Global Illumination together, you won't need to place light sources for players to view the room/area their tokens are currently within. Other portions of the Page hidden away by dynamic lighting walls will still be hidden until the players move their tokens to that area. You may also choose to click Global Illumination on and off depending on where the players are at and what the lighting environment is like. For instance, if there's an underground dungeon where some areas are lit up and others not, you can turn on Global Illumination only for the periods your players' tokens are currently residing within regions intended to be well lit. When the party journeys through the unlit parts of the dungeon, the GM can disable Global Illumination on the page to require light sources to guide the players' way.
Being Mindful of "Has Sight"
As the GM, if every token on a Page has "Has Sight" enabled, this can cause some processing lag because the Dynamic Lighting is ray-tracing for every single token that has this option enabled. This is unlikely to be an issue players' browser clients, as they'll only ever see sight enabled on the tokens they directly control. As the GM may want to disable "Has Sight" from NPC tokens for efficiency sake or only enable "Has Sight" for one token in group of monsters to serve as the group's range of sight.
Avoid Using Thin Line Weight
Vertical lines drawn with the polygon tool, can be very difficult to select when their line weight is set to Thin (the narrowest line weight setting). If you ever find yourself in a situation where you can't select Thin weighted lines, hit the keyboard shortcut CTRL+A to select all elements on the Dynamic Lighting Layer. While selected, you can assign a line weight to all content at once by choosing the one you prefer when you have the Drawing Tools submenu selected from the Tabletop Toolbar. Changing the line weight to any other setting thicker than Thin will allow you to individually select pieces of linework again.
Commonly Used Dynamic Lighting Tricks and Tips
The following tips are recommendations that may make it easier to create your own Dynamic Lighting environments.
+s and Xs for Trees, Columns, Stalagmites, and Other Vision Obstructions
Draw an X or +, instead of drawing an enclosing polygon or rectangle to obscure small vision obstructions like trees and columns. This will give you the desired effect of blocking line of sight, but also leaving enough of the map art visible for the Player to have an easier time recognizing what is obscuring their view. The added bonus of this technique is that a + or an X is very ray-trace efficient if you're working on a very complicated dungeon on the Dynamic Lighting Layer.
Light Source Tokens on the Dynamic Lighting Layer
You can place tokens of candles, campfires, torches on a battle map and give them light settings to emulate lit areas on a map. If your battle map already has illustrations of lit props built into the art where adding additional light source tokens would detract from the overall look, you can instead place light-casting tokens on the Dynamic Lighting layer directly. Tokens placed on this layer will not be visible to the PCs, but the light they cast will be visible. Because the token isn't visible, you don't actually have to be concerned about the art being used for the light source tokens. You can use whatever art is most convenient for you. Tokens on the Dynamic Lighting layer behave like art placed on the Background Layer—they will not have the token UI elements like the bars and Settings Gear icon. You can still access the Token Settings dialog window while on the Dynamic Lighting layer (and the Background Layer too) by double-clicking on the token.
Choosing Alternate Colors for Walls and Doors
The color you choose for the linework of your Dynamic Lighting doesn't have any effect on its behavior. Using different colors for doors and walls makes it easier for the GM to locate the linework placed over doorways that they will eventually have to move out of the way for the Players' tokens.
| Note for Module/Addon Creators: If you're creating a game meant to be sold on the Roll20 Marketplace, we recommend that the colors you are using to differentiate walls and doors are colorblind friendly. Color combos to avoid: Green & Red, Green & Brown, Blue & Purple, Green & Blue, Light Green & Yellow, Blue & Grey, Green & Grey, and Green & Black. Our in-house production of modules, for example, use blue for wall linework and orange for doors. |
Portcullises, Prison Bars, Fences, and Palisades
If you have walls that would only partially obscure vision like portcullises, prison bars, tightly-built fences, or loosely-constructed palisades, you may find creating a dotted line or a series of rectangles drawn over the area can create an aesthetically pleasing effect when your players look through to the other side of the "wall". A word of caution about this approach - too many lines drawn in this fashion can make ray-tracing for the Dynamic Lighting lag. It also might make it difficult to select all of the lines/shapes that make up a partial wall if you're too meticulous to block out every single metal bar or wooden stake. You don't have to follow the art's depiction of the individual bars precisely to give your players the impression of looking through a castle portcullis.
Simulating Elevation Line-of-Sight
At present, there isn't a means to have Dynamic Lighting block line-of-sight in only one direction. There are tactics to make elevation changes blocking line of sight by creating walls that are not attached to the rest of the room that hug the edge of an elevation change (like a cliff edge). When the players are viewing the room from the higher elevation, move these walls out of the current room so they no longer are blocking line of sight. Move the elevation walls back into place if the players are later on the lower level and can no longer view the upper elevation level (or vise versa if the players start low and eventually reach the higher elevation later on). You may want to change the color of this linework so it easier to tell what parts of the room are meant to be moved out of view as your players traverse through it.
Adding a Lip to Your Wall Outlines
While drawing the outline of walls and doors, draw them pulled back a little bit from the very edge of the artwork. This way, while the Player is navigating the environment, they can see the edges of the walls, instead of a floor that ends off into complete darkness. This will make it easier on the players to discern when they reach a window or a door or some other detail on the artwork that they should be able to see.
Lighting Guides
The following are lists of light settings you can use on your Token Settings to simulate vision specifications for certain game systems.
System Agnostic Lighting
These are general lighting examples that will work in any system without specific vision rules. They can be tweaked until they best fit the themes and mood of your game.
Lantern
The lantern is a mobile 360 degree light source that can represent anything from a torch to an electric lamp. Since the light source is mobile and being carried by a character, then it's best to give the player's token a Light Radius under the Emits Light section. The All Players See Light options should be checked. Based on the themes of your game your may wish to have the light "fall off" by getting dimmer the further it travels from it's source. You can do this by putting in the (optional) Start of Dim amount. A good default for this is half the value of the Light Radius. For example, if the lantern's Light Radius is 30 feet, you would set the Start of Dim to 15 feet.
Campfire
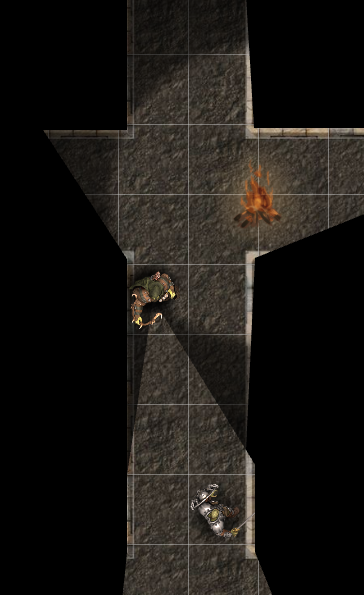
The campfire represents static sources of light, from wall sconces to street lights. Since they won't be moving, campfires are best represented as new tokens. The campfire should receive a Light Radius and have All Players See Light just like the Lantern. However, since it isn't attached to a player, it should not have Has Sight enabled. It's a safe idea to move these static sources of light to the Map Layer so that they don't accidentally get moved.
Glow Stick
Use a glow stick for very dim light sources, such as a patch of incandescent mushrooms, glowing coals, or a luminescent barrel of radioactive waste. The glow stick is prepared based on its mobility like either a Lantern or a Campfire light source. The difference is that the option Start of Dim setting is set very low or even zero. An example might be a lit match, prepared like a Lantern but set with a Light Radius of only 5 feet and a Start of Dim of just 1 foot. This is an excellent way to reduce visibility and increase dramatic tension.
Flashlight
If you want to restrict the angle of a light source use the flashlight. It's prepared mobile or static like a "hooded" Lantern or static like a spotlight. The difference is that the Angle attribute is set in the Emits Light section of the Advanced tab of the Edit Token menu. Typically a flashlight will have between a 20 and 60 degree angle of vision. For example, a hooded lantern might have a 60ft Light Radius, a 30ft Start of Dim, and a 40 degree angle.
Super Senses
Night vision, cat eyes, or low light vision are all ideas of being able to see more clearly in low light environments. To simulate this we use the light Multiplier feature under the Has Sight options. To make use of the Multiplier the token must have Has Sight checked. The multiplier amplifies the Light Radius of all light sources the token is able to see. To a token that has a Multiplier of 2, twice as good as normal vision, a Campfire that normally gives off 30ft of illumination and 15ft of dim light would appear to give off 60ft and 30ft.
Alternate Senses
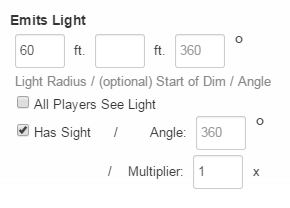
Alternate Senses represents the idea of having "sight" that don't have anything to do with normal light. They work in complete darkness, such as thermal vision, echolocation, or mystical perfect awareness. To simulate this we set up a light source similar to a Lantern on our token but do not include All Players See Light option. This allows this token alone to "see" while not actually producing light or giving any other tokens sight. An example of Infrared Vision might look like a Light Radius of 60ft, All Players See Light is disabled, but Has Sight is enabled.
Daylight
Daylight or other forms of perfect illumination such as a well lit building can be set from the Page Settings menu for the scene you're trying to make day lit. By toggling the Global Illumination option you add a light source that illuminates the entire map. This is useful in creating situations where vision isn't restricted due to lack of light but only by Light Obstructions, such as walls, trees, or boulders. These Obstructions can be added from the Dynamic Lighting Layer.
Realistic Vision
A good way to simulate "realistic" field of visions, meaning that a token cannot see in 360 degrees, is to set the Angle next to Has Sight to 120 degrees. This works similarly to a Flashlight but only affects the light that a token is able to see rather than producing light that everyone can see. Another option might be to extend Angle to 240 degrees to represent someone who is alert and aware of their surroundings, regularly checking their peripheral vision, but still not able to see directly behind them.
If the angle of vision faces toward the back of the token, you can flip it vertically and the 120 degree angle will now be facing the same direction as the token's front.
Blindness
If your scene is using the Restrict Movement feature from the Page Settings menu, the Has Sight feature needs to be selected in order for the token to collide with Light Obstructions. This means to simulate blindness it's better to set the token's Angle of vision to zero degrees rather than disabling the token's Has Sight feature. With the Angle properly set to zero and the Restrict Movement option enabled the token won't be able to see light but will still be blocked by obstructions.
System Specific Lighting
This section will give you exact Dynamic Lighting set ups for some of your favorite systems.
Dungeons and Dragons 5th Edition
Fifth edition Dungeons and Dragons has more in common with 3.5/Pathfinder than differences. Below you'll find specific examples of how to set up lighting and vision in Roll20 for D&D5e. To best represent Dynamic Lighting in 5e you'll need to enable Dynamic Lighting on the Page Settings. You'll want to Enforce Line of Sight as well. Each character token will need Has Sight checked on the token's Advanced tab of the Edit Token menu.
Light Sources
Whether they're mobile or static, light sources in 5e follow the tradition of producing bright light out to a radius of feet, followed by an equal radius of dim light. The radius is specified in the description of the light source. To represent this in Roll20 you'll set the token's Light Radius to the total range of the light (that's the bright light and dim Light Radius added together) and the Start of Dim setting is the dim Light Radius. Additionally the All Players See Light option should be checked, since the object is producing visible light.
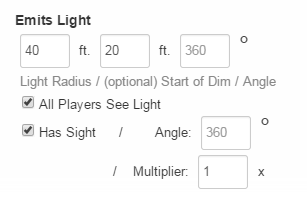
For example, a torch illuminates 20ft of bright light and another 20ft of dim light. To set that up in Roll20 it would look like:
- Light Radius = "40"
- Start of Dim = "20"
- All Players See Light = "Checked"
Blindsight
Characters with blindsight are able to see in ways that don't actually involve normal light. This means that out to a certain radius, usually 60ft, they "see" without light. To represent this we'll create a "light source" for that token, that only that token can see. What separates it from acting like a Lantern is that the All Players See Light box is not checked.
For example, tremorsense of 60ft would look like:
- Light Radius = "60"
- All Players See Light = "Unchecked"
Darkvision
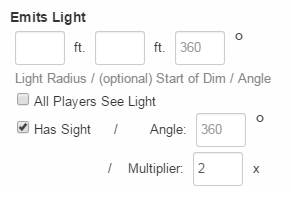
Characters with darkvision are able to see in dim light as if it were bright light and in darkness as if it were dim light, usually out to a radius of 60ft. To represent this we'll create a "light source" for that token, that only that token can see. What separates it from acting like a Lantern is that the All Players See Light box is not checked. Also, to brighten the dim light of other light sources to bright light for this character, we set a multiplier of 2, but we set a light radius of only 30. In the absence of light, the area the character can see as dim light will be doubled by the multiplier, achieving the required radius of 60.
For example, darkvision of 60ft would look like:
- Light Radius = "30"
- Start of Dim = "0"
- All Players See Light = "Unchecked"
- Has Sight = "Checked"
- Multiplier = "2"
Dungeons and Dragons 4th Edition
Below you'll find specific examples of how to set up lighting and vision in Roll20 for D&D4e. To best represent Dynamic Lighting in 4e you'll need to enable Dynamic Lighting on the Page Settings page. You'll want to Enforce Line of Sight as well. Each character token will need Has Sight checked on the token's Advanced tab of the Edit Token menu. In addition 4e uses squares as it's unit of measurement. This should be changed on the Page Settings menu so the "Scale" is equal to "1 unit = 1 sq".
Bright Light
Whether they're mobile or static, light sources in 4e follow the tradition of producing bright light out to a radius of squares. Unlike other editions of D&D they do not produce an additional radius of dim light. The radius is specified in the description of the light source. To represent this in Roll20 you'll set the token's Light Radius to the range listed in the handbook. Additionally the All Players See Light option should be checked, since the object is producing visible light.
For example, a torch illuminates 5sq of bright light. To set that up in Roll20 it would look like:
- Light Radius = "5"
- All Players See Light = "Checked"
Dim Light
Dim light sources are represented much the same as Bright Light. There are mechanics in the game that come into play but the only significant difference for how it is used in Roll20 is in the way it's rendered. To show that the light is dim we add a Start of Dim at 0sq.
For example, a candle emits 2sq of dim light. To set that up in Roll20 it would look like:
- Light Radius = "2"
- Start of Dim = "0"
- All Players See Light = "Checked"
Low-light Vision
While Low-light Vision has mechanical benefits in D&D4e, there is no difference in how Low-light Vision is represented in play in a Roll20 scene.
Darkvision
Characters with Darkvision can see effectively in no light. There is no effective range to this vision making is so the character can see perfectly regardless of the lighting situation. To represent this we'll create a "light source" for that token with an effectively unlimited range, that only that token can see. What separates it from acting like a very powerful Lantern is that the All Players See Light box is not checked. What this means is that unless an Obstruction blocks the characters line of sight, they can see everything.
For example, darkvision would look like:
- Light Radius = "1000"
- All Players See Light = "Unchecked"
Dungeons and Dragons 3rd Edition / Pathfinder
Third edition Dungeons and Dragons, 3.5, and Pathfinder all use nearly identical lighting and vision systems. Below you'll find specific examples of how to set up lighting and vision in Roll20 for the above. To best represent vision and lighting you'll need to enable Dynamic Lighting on the Page Settings page. You'll want to Enforce Line of Sight as well. Each character token will need Has Sight checked on the token's Advanced tab of the Edit Token menu.
Light Sources
Whether they're mobile or static, light sources in third edition follow the tradition of producing bright light out to a radius of feet, followed by an equal radius of dim light. The radius is specified in the description of the light source. To represent this in Roll20 you'll set the token's Light Radius to the total range of the light (that's the bright light and dim Light Radius added together) and the Start of Dim setting is the dim Light Radius. Additionally the All Players See Light option should be checked, since the object is producing visible light.
For example, a torch illuminates 20ft of bright light and another 20ft of dim light. To set that up in Roll20 it would look like:
- Light Radius = "40"
- Start of Dim = "20"
- All Players See Light = "Checked"
Low-light Vision
Character with low-light vision can see twice as far from light sources. To represent that in Roll20 we set the token's "Multiplier" to "2". This means that a torch normally produces 20ft of bright light and an additional 20ft (out to 40ft) of dim light. To a character with Low-light Vision this same torch would appear to produce 40ft of bright light and and additional 40ft (out to 80ft) of dim light.
An example of low-light vision would look like:
- Multiplier = "2"
Darkvision
Characters with darkvision are able to see in ways that don't actually involve normal light. This means that out to a certain radius, usually 60ft, they "see" without light. To represent this we'll create a "light source" for that token, that only that token can see. What separates it from acting like a Lantern is that the All Players See Light box is not checked.
For example, darkvision of 60ft would look like:
- Light Radius = "60"
- Start of Dim = "61"
- All Players See Light = "Unchecked"
Darkvision and Low-Light Vision
Rarely, a character may have both of these traits. One example is the Dhampir playable race. While darkvision allows "normal" sight within a 60ft radius of the character, low-light vision's effect is only noticeable outside of that radius. Since the LLV setting essentially doubles the radius of a light source, darkvisions's radius should be halved. Making the Start of Dim radius 1 value more than the Light Radius prevents the default glow of the edge of the radius from being doubled.
To best represent this, the settings should appear like this:
- Light Radius = "30"
- Start of Dim = "31"
- All Players See Light = "Unchecked"
- Has Sight = "Checked"
- Multiplier = "2"
Advanced Dungeons and Dragons 2nd Edition
Below you'll find specific examples of how to set up lighting and vision for Advanced Dungeons and Dragons in a Roll20 game. To best represent lighting and vision in AD&D you'll need to enable Dynamic Lighting on the Page Settings page. You'll want to Enforce Line of Sight as well. Each character token will need Has Sight checked on the token's Advanced tab of the Edit Token menu.
Light Sources
Whether they're mobile or static, light sources in AD&D follow the tradition of producing bright light out to a radius in feet. Unlike other editions of D&D they do not produce an additional radius of dim light. The radius is specified in the description of the light source. To represent this in Roll20 you'll set the token's Light Radius to the range listed in the handbook. Additionally the "All Players See Light" option should be checked, since the object is producing visible light.
For example, a torch illuminates 15 feet of light. To set that up in Roll20 it would look like:
- Light Radius = "15"
- All Players See Light = "Checked"
Infravision
Characters with infravision are able to see in ways that don't actually involve normal light. This means that out to a certain radius, usually 60ft, they "see" without light. To represent this we'll create a "light source" for that token, that only that token can see. What separates it from acting like a Lantern is that the "All Players See Light" box is not checked.
For example, infravision of 60ft would look like:
- Light Radius = "60"
- All Players See Light = "Unchecked"
Ultravision
Characters with Ultravision can see effectively in no light. There is no effective range to this vision making is so the character can see perfectly regardless of the lighting situation. To represent this we'll create a "light source" for that token with an effectively unlimited range, that only that token can see. What separates it from acting like a very powerful Lantern is that the "All Players See Light" box is not checked. What this means is that unless an Obstruction blocks the characters line of sight, they can see everything.
For example, ultravision would look like:
- Light Radius = "9999"
- All Players See Light = "Unchecked"
See Also


