Video and Voice Chat
From Roll20 Wiki
Page Updated: 2021-11-26 |
Attention: This page is community-maintained. For the official Roll20 version of this article, see the Help Center for assistance: Video & Voice Chat.
| This page haven't been updated since 2018, so might not be as up-to-date as the Video & Voice Chat page. (February 2021) |
Roll20’s in-browser video and voice feature doesn’t require any plugins or widgets to install in order to use your microphone/webcam to communicate with other players in a game. Instead, we utilize a component, called WebRTC (Web Real-Time Communication), to natively run in your Chrome or Firefox browser. WebRTC is an HTML5 high-definition, peer-to-peer VOIP service. It's also adaptive so it works well with low-bandwidth connections.
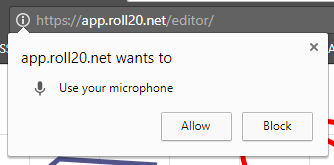
Once at least two people log into the same game using any Broadcast settings beyond None, Roll20 will initiate the process to activate your webcam and/or microphone and attempt to connect everyone in the game into a call. If this is your first time utilizing this feature, you should see a dialog box along the top of your screen that asks you to give permission for Roll20 to use your webcam and/or microphone.
| Note: If you are experiences issues with Roll20 built-in video/voice chat, we recommend walking through the Video and Voice Chat Troubleshooting-page. |
Contents[hide]
|
Enabling and Disabling WebRTC Video & Voice Chat
Video and Voice are enabled by default. Unless this is changed, Roll20 will try to automatically connect a call when at least two users launch the game. This is found at the bottom of the y My Settings-tab.
Managing Browser Device Permissions for the First Time
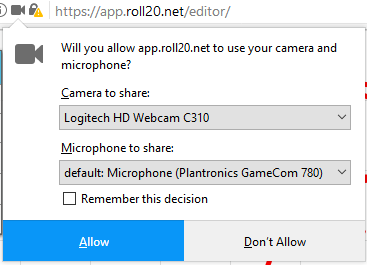
If this is your first time playing in a game that has WebRTC active, your browser will prompt you to give Roll20 device permission to utilize your webcam and microphone before you connect with other players. Unless you have set strict permission restrictions on your browser, you’ll only need to do this once.
Device Permissions In Google Chrome
A dialog box will appear along the very top of your browser screen. Click "Allow".
Note that you can click the little camera icon located in the far-right of your address bar to change the settings of what camera/microphone is being used.
Device Permissions In Mozilla Firefox
A dialog box will appear in the upper left-hand corner of the browser, choose which webcam or microphone devices you would like to use and then click on the Allow button. If for some reason a dialog box does not appear or if you wish to change your device settings after the game has started, click on the Red Camera or Microphone icon in the address/search bar to remove the permissions (click on the X beside each device). A browser tab refresh will bring back the permission dialog box to allow you to change your devices.
Enabling/Disabling Video and Voice for an Entire Game
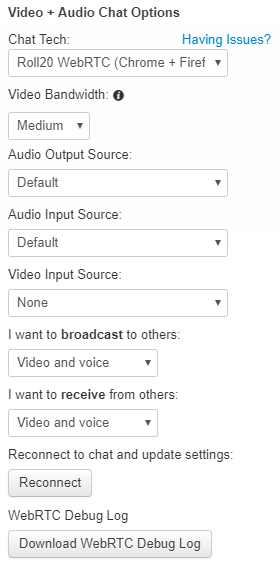
Enabling or Disabling Video and Voice for the entire game can only be done by a GM. On the y My Settings-tab on the Sidebar (top-right side of the screen), scroll down to the Video + Audio Chat Options section. The very first option here is a drop down menu labeled Chat Tech:. There are currently three menu options to choose from this drop down:
- Roll20 WebRTC (Chrome + Firefox Only): This is our complete rebuild that was released as an open beta on January 2018 and will be the tech we will be using moving forward.
- Legacy Roll20 WebRTC (deprecated): This is our first WebRTC build that is using some now-deprecated JavaScript libraries that are causing conflict issues with the latest Chrome and Firefox browsers. Games made after January 2018 will automatically default to the first tech option. We will eventually remove this Legacy option in a future update. For anyone still using this version, we recommend swapping over to the non-deprecated version.
- None (no video/audio): This will disable both Video and Voice for the game. The call connection process will not initiate under this setting. Choose this option if you want to disable Video and Voice completely for everyone in the game.
Enabling/Disabling Video and Voice Individually
Available to both GM and Players is the ability to disable or enable what you personally wish to transmit and what you want to receive from other players.
A couple of examples where adjusting these settings would be useful: If you only own a microphone and not a webcam, you can adjust your settings to transmit voice only. This will force Roll20 to skip attempting to locate and activate a webcam that doesn’t exist on your device. Another example would be if you are player with a limited internet connection. In this situation, you can change your settings to only receive audio and not video to save on bandwidth.
Broadcast and Receive Settings
Under Video + Audio Chat Options of the My Settings tab are the two options with dropdown menus labeled: I want to broadcast to others and I want to receive from others.
The Broadcast to Others menu controls whether or not you broadcast Video and Voice, Video only, Voice only, or Nothing(disable) to other players in the game. If you’re lacking a webcam or microphone device, you typically don't need to change these broadcast setting for WebRTC to work; however, it can help speed up the initial connection process to other players if you specifically tell Roll20 to skip over attempting to connect to a device that is not available.
The Receive From Others menu controls whether or not you will receive Video and Voice, Video only, Voice only, or Nothing(disable) from other players, if they are broadcasting at all.
If you want to disable WebRTC entirely for you personally, adjust Broadcast and Receive settings to Nothing(disable).
If you make changes to your Broadcast or Receive settings while a call is active, you must click on the following Reconnect button for these new changes to be applied.
Roll20 WebRTC Features
Once you have your Video and Voice settings adjusted to the way you want them, here are some additional features that can improve your experience.
Selecting Specific Audio and Video Devices
(This feature is not available for the Legacy version of Roll20 WebRTC)
If you have multiple microphone and webcam devices connected to your computer, you are able to specifically choose which ones you want to use for broadcasting and receiving video and audio.
In the Video + Audio Chat Options section are drop down menus for Audio Output Source (your chosen speaker device), Audio Input Source (your chosen microphone device), and Video Input Source (your chosen webcam device). Your input source menus are available regardless whether a WebRTC call is active or not.
Audio Output Source's device menu, on the other hand, will only populate while a call is active. It will activate the browser's default speaker choice (which is often dictated by your Operating System) initially, but then populate the option menu to every speaker device available. This device menu selection ONLY takes into account the voice audio received through WebRTC. Other Roll20 sounds (chat tab notifications, 3D dice SFX, and Jukebox audio) will play on the browser's default speaker still.
Relocating Player Avatars Around the Tabletop
(This feature is only available when the non-Legacy version of Roll20 WebRTC is enabled.)
While Roll20 WebRTC is enabled, the GM and players can relocate the player avatar portraits (or their video feeds if video broadcast is enabled) around the Tabletop. This can prove useful if the default position of these portraits at the bottom of the Tabletop obscures important elements that the players should be able to see. It can also be helpful when you want to move the video feeds for a specific broadcast overlay while streaming on platforms such as Twitch or YouTube. This feature is always enabled for the Game Master, but it can be either disabled or enabled for the players to arrange these avatar portraits as they see fit.
To move an avatar, hover your mouse over the one you’d like to move. An icon resembling three horizontal bars will appear in the bottom left corner of the avatar (over top the Name Plate). This is the avatar's handle that you can click and drag the whole avatar, Name Plate and Card Hand included, to a new location on the Tabletop. You can still move these around if you have the avatar portraits hidden and are only currently displaying player’s Name Plates. Regardless of who's moving their avatars around, avatars can only ever be placed in a spot on the Tabletop. You can't drag it atop the Tabletop Toolbar or over the Sidebar. They also will snap away from getting partially stuck under the sides of the browser window.
The settings for this feature can be found on the My Settings tab under the Chat Avatars section (this section is directly above Video + Audio Chat Options). As the GM, you can decide whether this feature it available to players. Under the option “Movable avatar/video screens”, you can choose between GM Controlled or Player Controlled. If you set this option to Player Controlled, the Players can change the locations of their avatars, but their positioning will only be seen locally on their own device.
Beyond moving the avatars individually, you can also set the avatar portraits to either align to the top of the Tabletop or the bottom via the Player Video/Avatar Location menu option. By default, avatars are aligned to the Bottom of the Tabletop. This position won’t automatically take if you (or your players) have re-positioned the avatars to a specified place on the Tabletop.
If you ever wish to reset the avatars positioning, click on the Reset Player Video/Avatar Location button. This will file the avatar portraits/name plates either on the Bottom of the Tabletop or the Top (depending on what you have set for the Player Video/Avatar Location setting).
A Note About Splitting The Party
If you have the avatars re-positioned on the Tabletop, you're still able to drag players onto individual Pages (AKA Splitting the Party). Just make certain to click and drag on an area of the portrait that isn't the Avatar Handle on the bottom left corner. This will allow the GM to drag the player, as usual, to the Page Toolbar and assign them to a particular Page.
Mic Input Indicator
Between the user's Nametag and Avatar Portrait (or video footage, if broadcasting that as well), is a small bar that lights up pale blue when a player begins speaking into their microphone. This blue bar expands and contracts with the wavelength of what is picked up from the mic. This is the "Mic Input Indicator" and it should help Voice-Only games determine which player is speaking at any given time during gameplay.
Volume Adjustment and Webcam and Microphone Toggles
Volume Adjustment
While Voice is active in a call, other players in your game will have a volume slider overlay ( <> ) located at the bottom of their Avatar's portrait when you mouse over it. This allows you to adjust the volume of each individual's voice in the call.
Muting Your Microhpone
Instead of a volume slider on your own Avatar, you'll find the Mute button displayed as a speaker icon ( < / > ). You can use this to mute your mic if you don't have the physical means for it on your microphone itself. A pink icon with a dark grey speech bubble within it ( w ) will appear in the upper left corner of your Avatar if you are currently muted. This icon status can be seen by the GM.
Pausing Your Camera
While Video is active in a call, a camera icon ( V ) will appear to the right of the Mute button over your Avatar's protrait. This is the Pause Video button. Clicking on this button will toggle your camera on and off. A pink icon with a dark grey pause symbol within it ( 5 ) will appear in the upper left corner of your Avatar if your webcam has been toggled off. This icon status can be seen by the GM.
Push to Talk
There is an advanced keyboard shortcut to Mute yourself via the Tilde Key(~). Utilizing this shortcut key, you’re able to simulate semi Push-To-Talk functionality. The big difference between conventional Push To Talk functionality in other platforms and Roll20 is you do not want to press and hold the ~ key. Instead, it’s a single press to toggle your mute button on and off.
To enable this, you must first check the Use advanced keyboard shortcuts checkbox under the My Settings tab of the Sidebar. Once enabled, the Tilde Key(~), will toggle your microphone mute on and off. You can use the pink indicator on your avatar to know when mute is currently toggled on. It's important to note that Push To Talk functionality only works while the browser tab currently running the Roll20 game is focused on your device (meaning that you aren't currently browsing on another browser tab or actively interacting with a completely different device application).
Whispering
A GM can whisper directly to a single player in the game when Voice is active in a call. When the GM hovers their mouse over a player’s Avatar, a dark grey double chat bubble icon ( q ) appears on the upper right hand corner of the player's portrait.
This icon is the Whisper Player button. Click on this button to toggle on whisper mode. While the GM is whispering, other players who aren't in on the whisper will have their avatars grayed out to the GM and the Player being whispered to and will no longer be able to hear audio from those other players. Likewise, those players not in on this private conversation will see the GM and the whispered player grayed out to them and will not be able to hear what is being whispered. The group not privy to the whispered conversation can still talk among one another like usual. Everyone's avatars and Voice feeds will return to normal once the GM toggles off the Whisper Player button.
Video Bandwidth Options
You will notice that there is a menu option for Video Bandwidth. This is an option that currently isn’t available as of yet. We are still gathering numbers to figure out what the ideal bandwidth thresholds are for High, Medium, Low, and Very Low. When this setting is available, you’ll be able to adjust the video quality of what you will receive from other players.
When In Doubt, Reconnect
Sometimes, two users may not complete the handshaking process to link their video/voice feed together in a call. If you encounter any issues connecting with your fellow players in the game, the first thing you should try doing is hit the Reconnect button. This will prompt the handshaking process to begin again and reset the call. The Reconnect button is located in two places on the VTT, the first is under the My Settings tab of the Sidebar.
The second, and likely more convenient to access, is available when you mouse over your Avatar's portrait. In the upper right hand corner of the portrait is a dark grey reload icon ( 0 ) This is also a Reconnect button and is only accessible on your own Avatar.
If your group still experiences difficulties connecting in a call, please review our Video & Voice Troubleshooting-page.


