Difference between revisions of "Drawing Tools"
From Roll20 Wiki
Andreas J. (Talk | contribs) m (add "See Also"section) |
Andreas J. (Talk | contribs) m |
||
| Line 7: | Line 7: | ||
[[File:Drawing_Tool.jpg|thumb|right]] | [[File:Drawing_Tool.jpg|thumb|right]] | ||
| − | The | + | The <<span style="font-family:Pictos Custom;">q</span> '''Drawing Tools''' are all located here in the drawing tools button of the [[Toolbox]]. |
== Tutorial Video == | == Tutorial Video == | ||
| Line 15: | Line 15: | ||
{{#evp:youtube|MH78AOhNyuA|Drawing on the Tabletop Tutorial|center|700}} | {{#evp:youtube|MH78AOhNyuA|Drawing on the Tabletop Tutorial|center|700}} | ||
| − | == | + | ==Tools== |
| − | The Freehand tool allows you to draw | + | ===Draw Shapes=== |
| + | The <span style="font-family:Pictos Custom;">a</span> '''Draw Shapes''' tool works similarly to the Freehand tool, but it allows you to quickly draw pre-made shapes. By default you'll draw a rectangle, but you can also hold down the '''Alt''' key while drawing to draw a circle instead. Holding the '''Shift''' key while using the Draw Shapes tool will cause your shape to snap to the grid if one is enabled for the current page. | ||
| − | + | After you activate the Draw Shapes tools, a secondary toolbar will appear. You can change the stroke color (1.) as well as the fill color (2.) and line width (3.) of your drawing by using the secondary toolbar here. | |
| − | + | ||
| − | After you activate the | + | |
[[File:drawingss2.png]] | [[File:drawingss2.png]] | ||
| − | == | + | ===Freehand=== |
| + | The <span style="font-family:Pictos Custom;">q</span> '''Freehand''' tool allows you to draw lines on the tabletop, similar to the way that a whiteboard works. Just select the tool, then click and drag anywhere on the tabletop to start drawing. | ||
| − | + | After you activate the Freehand tools, a secondary toolbar will appear. You can change the stroke color (1.) as well as the fill color (2.) and line width (3.) of your drawing by using the secondary toolbar here. | |
| − | The Polygon/Line Tool draws lines and polygons by connecting vertices clicked out on the tabletop. To draw with the Polygon/Line Tool, first, click on the tabletop where you’d like to start your drawing. Next, click to where the next vertex in the polygon or line should be. Continue this process until the polygon is completed. A right click or hitting the Escape key will finish/close the line or or polygon. If a vertex is clicked very close to the starting point, the polygon will auto-close. If a mistake is made part way into your drawing, Ctrl/Cmd + Z will undo each consecutive segment drawn. Holding down the Shift key while drawing will force the segment vertices to snap to the grid. If a straight line instead of a polygon is desired, right click or hit the Escape key after drawing the very first segment. | + | ===Polygon/Line=== |
| + | The <span style="font-family:Pictos Three;">c</span> '''Polygon/Line''' Tool draws lines and polygons by connecting vertices clicked out on the tabletop. To draw with the Polygon/Line Tool, first, click on the tabletop where you’d like to start your drawing. Next, click to where the next vertex in the polygon or line should be. Continue this process until the polygon is completed. A right click or hitting the Escape key will finish/close the line or or polygon. If a vertex is clicked very close to the starting point, the polygon will auto-close. If a mistake is made part way into your drawing, Ctrl/Cmd + Z will undo each consecutive segment drawn. Holding down the Shift key while drawing will force the segment vertices to snap to the grid. If a straight line instead of a polygon is desired, right click or hit the Escape key after drawing the very first segment. | ||
Like the Freehand and Shape tools, the Polygon/Line tool uses the same secondary appearance toolbar. | Like the Freehand and Shape tools, the Polygon/Line tool uses the same secondary appearance toolbar. | ||
| Line 34: | Line 35: | ||
[[File:Polygon-Line_Tool.jpg]] | [[File:Polygon-Line_Tool.jpg]] | ||
| − | == Text | + | ===Text=== |
| − | + | The <span style="font-family:Pictos Custom;">i</span> '''Text Tool''' that lets you write directly on the tabletop. Just choose the text tool from the Toolbox, and then click on the tabletop where you want to type. You can change the font (1.), size (2.), and color (3.) of the text using the secondary toolbar here. | |
| − | + | ||
[[File:drawingss3.png]] | [[File:drawingss3.png]] | ||
| Line 43: | Line 43: | ||
To edit text after you have added it to the tabletop use the select tool to access the text box and double click to enter edit mode, or right click on it and select 'Edit' from the context menu. | To edit text after you have added it to the tabletop use the select tool to access the text box and double click to enter edit mode, or right click on it and select 'Edit' from the context menu. | ||
| + | ===Clear Drawings=== | ||
| + | The <span style="font-family:Pictos;">#</span> '''Clear Drawings''' tool can be used to clear all of the drawings on the current layer by using in the Toolbox. It’s a great way to quickly delete any sketches that have been made during a battle, for example. | ||
== Grouping Drawings == | == Grouping Drawings == | ||
| − | |||
You can also group things together by selecting them, then right-clicking and choosing “Group” from the Advanced Menu. Grouping things lets you keep them in sync so you always move them at the same time. | You can also group things together by selecting them, then right-clicking and choosing “Group” from the Advanced Menu. Grouping things lets you keep them in sync so you always move them at the same time. | ||
| − | |||
| − | |||
| − | |||
=See Also= | =See Also= | ||
Revision as of 15:58, 4 May 2020
Attention: Roll20 is no longer maintaining this document on the community wiki. For the most up-to-date information please visit this page on our Help Center for assistance: Here. For more information you can email us at Team@roll20.net
Roll20 features a powerful set of drawing tools that you can use to do lots of things, like making notes on the tabletop or even quickly sketching out an entire map.
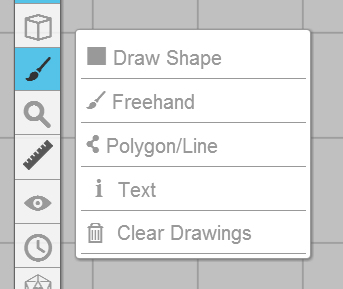
The <q Drawing Tools are all located here in the drawing tools button of the Toolbox.
Contents |
Tutorial Video
This is a tutorial on drawing in Roll20.
Tools
Draw Shapes
The a Draw Shapes tool works similarly to the Freehand tool, but it allows you to quickly draw pre-made shapes. By default you'll draw a rectangle, but you can also hold down the Alt key while drawing to draw a circle instead. Holding the Shift key while using the Draw Shapes tool will cause your shape to snap to the grid if one is enabled for the current page.
After you activate the Draw Shapes tools, a secondary toolbar will appear. You can change the stroke color (1.) as well as the fill color (2.) and line width (3.) of your drawing by using the secondary toolbar here.
Freehand
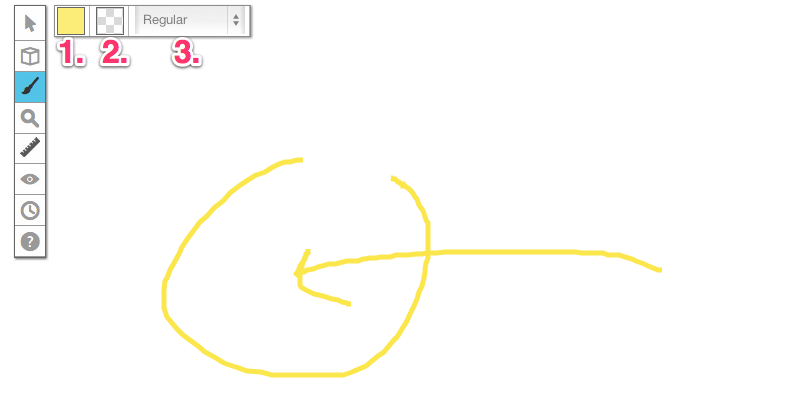
The q Freehand tool allows you to draw lines on the tabletop, similar to the way that a whiteboard works. Just select the tool, then click and drag anywhere on the tabletop to start drawing.
After you activate the Freehand tools, a secondary toolbar will appear. You can change the stroke color (1.) as well as the fill color (2.) and line width (3.) of your drawing by using the secondary toolbar here.
Polygon/Line
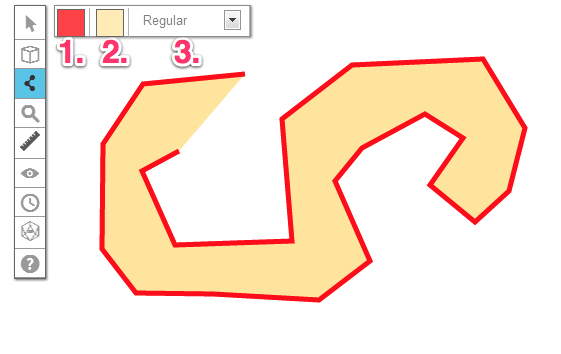
The c Polygon/Line Tool draws lines and polygons by connecting vertices clicked out on the tabletop. To draw with the Polygon/Line Tool, first, click on the tabletop where you’d like to start your drawing. Next, click to where the next vertex in the polygon or line should be. Continue this process until the polygon is completed. A right click or hitting the Escape key will finish/close the line or or polygon. If a vertex is clicked very close to the starting point, the polygon will auto-close. If a mistake is made part way into your drawing, Ctrl/Cmd + Z will undo each consecutive segment drawn. Holding down the Shift key while drawing will force the segment vertices to snap to the grid. If a straight line instead of a polygon is desired, right click or hit the Escape key after drawing the very first segment.
Like the Freehand and Shape tools, the Polygon/Line tool uses the same secondary appearance toolbar.
Text
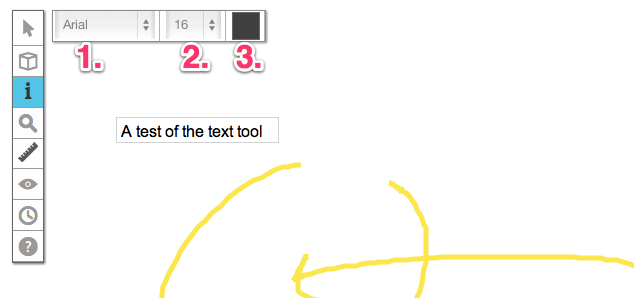
The i Text Tool that lets you write directly on the tabletop. Just choose the text tool from the Toolbox, and then click on the tabletop where you want to type. You can change the font (1.), size (2.), and color (3.) of the text using the secondary toolbar here.
Hitting the Escape key will remove the focus from an active text box.
To edit text after you have added it to the tabletop use the select tool to access the text box and double click to enter edit mode, or right click on it and select 'Edit' from the context menu.
Clear Drawings
The # Clear Drawings tool can be used to clear all of the drawings on the current layer by using in the Toolbox. It’s a great way to quickly delete any sketches that have been made during a battle, for example.
Grouping Drawings
You can also group things together by selecting them, then right-clicking and choosing “Group” from the Advanced Menu. Grouping things lets you keep them in sync so you always move them at the same time.
See Also
- Dynamic Lighting & Advanced Fog of War relies on the shapes drawn with the Drawing Tool
- Updated Dynamic Lighting - the new Lighting system, also relies on Drawing Tool to function
- Toolbox
- w Select and Pan Tool
- b Layers
- c Drawing Tools
- e FX Tool
- s Zoom Tool
-
 Ruler Tool
- E Fog of War
- t Turn Tracker
- t Dice Rolling GUI
- ? Help Tool


