Difference between revisions of "Running Fate Accelerated on Roll20"
From Roll20 Wiki
Andreas J. (Talk | contribs) (more formatting) |
Andreas J. (Talk | contribs) (Remove bloat) |
||
| Line 1: | Line 1: | ||
| − | + | This is a guide to Fate Accelerated on Roll20. It's recommended to use one of the existing [[Character Sheets|character sheets]] for gameplay. | |
| − | + | ||
| − | + | ||
| − | + | ||
| − | + | ||
| − | + | ||
| − | + | ||
| − | + | ||
| − | + | ||
==Creating the Campaign== | ==Creating the Campaign== | ||
| − | |||
From the “Start New Game” option… | From the “Start New Game” option… | ||
| − | + | ||
| − | + | # Enter the name for your Campaign | |
| − | + | # Choose the '''Fate''' Character Sheet you want from the dropdown. ('''Fate by Roll20''' is a two-in-one sheet for both FATE Core and Accelerated) | |
| + | # Click “I’m Ready, Create Game” | ||
[[File:FAE_Start_Game.png|500px]] | [[File:FAE_Start_Game.png|500px]] | ||
| − | + | ==Character Sheets== | |
| − | + | ||
| − | + | ||
| − | + | ||
| − | + | ||
| − | + | ||
| − | + | ||
| − | + | ||
| − | + | ||
| − | + | ||
| − | + | ||
| − | + | ||
| − | + | ||
| − | + | ||
| − | + | ||
| − | + | ||
| − | + | ||
| − | + | ||
| − | + | ||
| − | + | ||
| − | + | ||
| − | + | ||
| − | + | ||
| − | + | ||
| − | + | ||
| − | + | ||
| − | + | ||
| − | + | ||
| − | + | ||
| − | + | ||
| − | + | ||
| − | + | ||
| − | + | '''FATE by Roll20''' | |
| − | + | ||
| − | + | * Official Roll20 Character sheet, updated frequently | |
| + | * Covers both '''FATE Core''' & '''FATE Accelerated''' | ||
| + | * Compatible with the Fate Compendium, best supported | ||
| + | <br> | ||
| + | '''Fate Accelerated Edition''' | ||
| − | + | * Sheet Author:Zachary St Lawrence | |
| + | * Simple Fate Accelerated Character Sheet | ||
| + | * Last Updated: March 2020 | ||
| + | * [https://github.com/Roll20/roll20-character-sheets/tree/master/Fate_Accelerated sourcecode] | ||
| − | + | There is also a good number of Fate Core or Fate Accelerated sheets for various variants. | |
| − | == | + | ==Roll20 Suggestions for Fate Accelerated== |
| − | There exists a Compendium for FATE and FATE Accelerated, which is aimed to be used with the Official character | + | There exists a Compendium for FATE and FATE Accelerated, which is aimed to be used with the Official '''FATE by Roll20'''-character sheet. |
There is little use for the Grid as combat and movement are much more narrative than for games like D&D. | There is little use for the Grid as combat and movement are much more narrative than for games like D&D. | ||
| − | + | Some recommendations: | |
Set up some Journal Entries with default Tokens to use as Aspects, Boosts, Conditions | Set up some Journal Entries with default Tokens to use as Aspects, Boosts, Conditions | ||
| Line 87: | Line 54: | ||
==The Game Elements in the Journal== | ==The Game Elements in the Journal== | ||
| − | |||
I've created a set of "Characters" in the [[Journal]] representing useful Game Elements. Each is associated with a Token so I can drag them out into the Page and change their Names. I keep them in a Sub-Folder called Game Elements | I've created a set of "Characters" in the [[Journal]] representing useful Game Elements. Each is associated with a Token so I can drag them out into the Page and change their Names. I keep them in a Sub-Folder called Game Elements | ||
| Line 95: | Line 61: | ||
In the picture below, the NPC "Succeeded with Style" when trapping the PC under a bookcase and so has 2 free invokes. The PC only managed to get one free invoke when setting off a flash grenade. | In the picture below, the NPC "Succeeded with Style" when trapping the PC under a bookcase and so has 2 free invokes. The PC only managed to get one free invoke when setting off a flash grenade. | ||
| − | |||
[[File:FAE_Icons.png]] | [[File:FAE_Icons.png]] | ||
==Macros== | ==Macros== | ||
| + | Character Sheets have roll buttons which can be used as base to create macros. | ||
| + | |||
| + | ===Generic Macros== | ||
| + | {{mbox | text = The following advice is ''generic'' and doesn't necessarily work with any of the available character sheets}} | ||
| + | The following | ||
The Macros I’m suggesting should make your FATE games run more smoothly. | The Macros I’m suggesting should make your FATE games run more smoothly. | ||
| Line 257: | Line 227: | ||
[[File:FAE_GM_Macro_Bar.png]] | [[File:FAE_GM_Macro_Bar.png]] | ||
| − | == | + | ==[[Turn Tracker]] used for Fate Points== |
| − | + | Here is advice on how the [[Turn Tracker]] could be used for tracking of Fate Points. If used in this manner, it should always be open. | |
| − | + | ||
Put all the Player Characters into the Tracker at the start of the game and leave it open. | Put all the Player Characters into the Tracker at the start of the game and leave it open. | ||
| Line 291: | Line 260: | ||
At the end of each Turn, drag the End-Of-Turn marker to the bottom of the Turn Order. | At the end of each Turn, drag the End-Of-Turn marker to the bottom of the Turn Order. | ||
| − | |||
| − | |||
| − | |||
| − | |||
| − | |||
| − | |||
| − | |||
| − | |||
| − | |||
| − | |||
| − | |||
| − | |||
| − | |||
| − | |||
| − | |||
| − | |||
| − | |||
| − | |||
| − | |||
| − | |||
| − | |||
| − | |||
| − | |||
| − | |||
| − | |||
| − | |||
| − | |||
| − | |||
| − | |||
| − | |||
| − | |||
| − | |||
| − | |||
| − | |||
| − | |||
| − | |||
| − | |||
| − | |||
| − | |||
| − | |||
| − | |||
| − | |||
| − | |||
| − | |||
| − | |||
| − | |||
| − | |||
| − | |||
| − | |||
| − | |||
| − | |||
| − | |||
| − | |||
| − | |||
| − | |||
| − | |||
| − | |||
| − | |||
| − | |||
| − | |||
| − | |||
| − | |||
| − | |||
| − | |||
| − | |||
| − | |||
| − | |||
| − | |||
| − | |||
| − | |||
| − | |||
| − | |||
| − | |||
| − | |||
| − | |||
| − | |||
| − | |||
| − | |||
| − | |||
| − | |||
| − | |||
| − | |||
| − | |||
| − | |||
| − | |||
| − | |||
| − | |||
| − | |||
| − | |||
| − | |||
| − | |||
| − | |||
| − | |||
| − | |||
| − | |||
| − | |||
| − | |||
| − | |||
| − | |||
| − | |||
| − | |||
| − | |||
| − | |||
| − | |||
| − | |||
=See Also= | =See Also= | ||
| − | * [ | + | * [[Fate Core]] |
| − | * [ | + | * [[Dice_Reference#FATE_Dice|Dice_Reference - FATE Dice]] |
| − | + | * [[Keyboard_Shortcuts|Roll20 Keyboard Shortcuts]] | |
| − | [[Category: Games]] | + | * [[Advanced_Shortcuts|Roll20 Advanced Keyboard Shortcuts]] |
| + | * [[User:219283|Mick Hand's GM Tips]] - (Original author of this page) | ||
| + | <br> | ||
| + | <br> | ||
| + | [[Category:Games]] | ||
[[Category:Guides]] | [[Category:Guides]] | ||
| + | [[Category:Fate]] | ||
Revision as of 17:00, 19 April 2020
This is a guide to Fate Accelerated on Roll20. It's recommended to use one of the existing character sheets for gameplay.
Contents |
Creating the Campaign
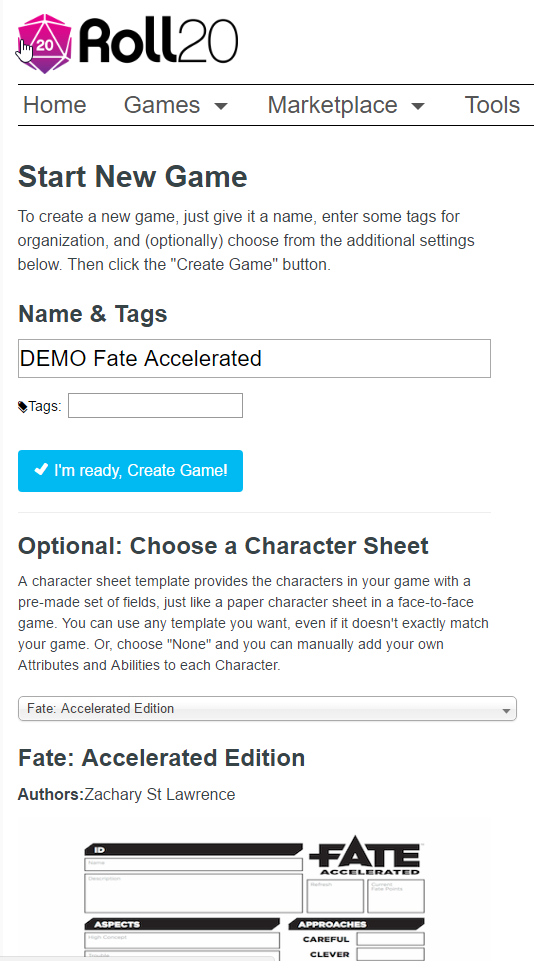
From the “Start New Game” option…
- Enter the name for your Campaign
- Choose the Fate Character Sheet you want from the dropdown. (Fate by Roll20 is a two-in-one sheet for both FATE Core and Accelerated)
- Click “I’m Ready, Create Game”
Character Sheets
FATE by Roll20
- Official Roll20 Character sheet, updated frequently
- Covers both FATE Core & FATE Accelerated
- Compatible with the Fate Compendium, best supported
Fate Accelerated Edition
- Sheet Author:Zachary St Lawrence
- Simple Fate Accelerated Character Sheet
- Last Updated: March 2020
- sourcecode
There is also a good number of Fate Core or Fate Accelerated sheets for various variants.
Roll20 Suggestions for Fate Accelerated
There exists a Compendium for FATE and FATE Accelerated, which is aimed to be used with the Official FATE by Roll20-character sheet.
There is little use for the Grid as combat and movement are much more narrative than for games like D&D.
Some recommendations:
 Set up some Journal Entries with default Tokens to use as Aspects, Boosts, Conditions
 Using Status Markers with numbers to indicate how many free-invokes are available on Boosts
 Use green blob for free invokes available to Players
 Use red blob for free invokes available to the GM characters
 Use background images to set the scene
 Use Handouts to show images to Players (or Shift-Z to show an image of a Token)
 Use the Turn Order to track Player and GM Fate Points
 Also use the Turn Order to track who goes next
 Set up some macros…
   for Players to get them to use the 4 Action Types (Overcome, Create Advantage, Attack, Defend)
   for Players to spend a Fate Point for a +2 Bonus
   for Players to spend a Fate Point for a Re-roll
   for Players to indicate they are taking a Boost or Free Invoke
   for the GM to use the 4 Action Types for non-player characters
   for the GM to give a player character a Fate Point
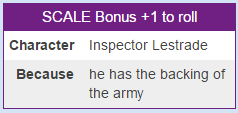
   for the GM to indicate the use of Scale as either +1 to a Roll or +2 to an effect
   (Scale is a feature from Dresden Files Accelerated)
The Game Elements in the Journal
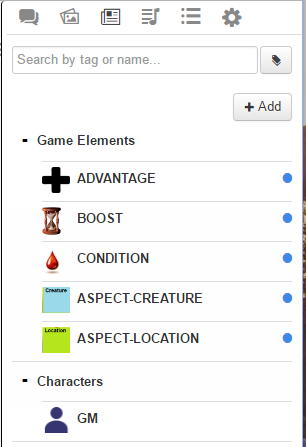
I've created a set of "Characters" in the Journal representing useful Game Elements. Each is associated with a Token so I can drag them out into the Page and change their Names. I keep them in a Sub-Folder called Game Elements
When you drag a Boost or an Advantage onto the table and rename it, you might also want to select the Token and use the icons to indicate if the temporary aspect has free invokes for the Players of for the GM characters. You can choose the green blob and type 1 or 2 for the number of free invokes available to the Players. You can choose the red blob and type 1 or 2 for the number of free invokes available to the GM-controlled characters.
In the picture below, the NPC "Succeeded with Style" when trapping the PC under a bookcase and so has 2 free invokes. The PC only managed to get one free invoke when setting off a flash grenade.
![]()
Macros
Character Sheets have roll buttons which can be used as base to create macros.
=Generic Macros
| The following advice is generic and doesn't necessarily work with any of the available character sheets |
The following
The Macros I’m suggesting should make your FATE games run more smoothly.
It may seem odd to use the Turn Order as a way to track Fate Points, but without the API capabilities, the Turn Order is just about the only thing that a macro can make changes to. So we can write macros to add or subtract from the Turn Order, making it easy to keep track of Fate Points. It also keeps the current Fate Point scores in plain view.
The four Macros whose names start with “Action-” help to focus the players’ minds into the four types of Action. Particularly with new Fate players, it helps them to understand how to phrase their intentions to avoid the uncertain or ambiguous narrative action conversations such as...
Player “I want to shoot him in the leg”
GM “Are you intending to do him damage?”
Player “Yes, and it will slow him down and distract him with the pain as well and might force him to surrender”
GM “You’ll have to pick whether it’s an ATTACK to do damage or it’s a CREATE-ADVANTAGE to give him an aspect of limping or an OVERCOME to terrify him into surrendering”
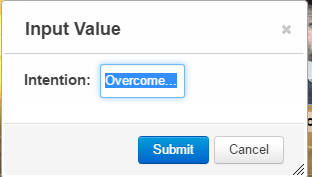
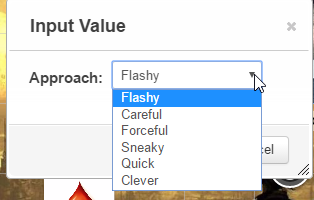
Once the Player has selected which type of Action they are doing, they get to type a brief narrative tag for it and then choose which of their Approaches they want to use.
The result of the actual Dice Roll is shown in the chat window along with Approach and the bonus from the Approach. It’s easier to see what the actual Roll is, to help the player decide whether it would be better to spend a Fate Point to re-roll or add +2.
The following Macros should be flagged as “Token Action” and made visible to ALL PLAYERS…
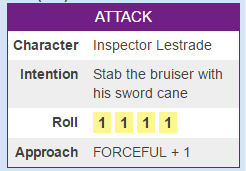
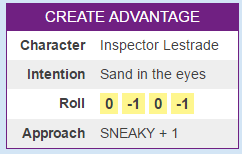
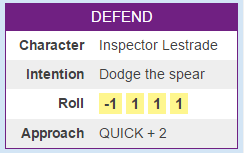
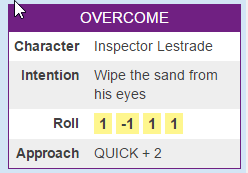
The 4 Action macros ask you to type a brief intention...
...then asks you to choose an Approach...
Then shows the result in the chat window (output shown beneath each Macro defintion).
Action-ATTACK
&{template:default} {{name=ATTACK}} {{character=@{selected|token_name}}} {{Intention=?{Intention|Attack...}}} {{Roll=[[1dF]] [[1dF]] [[1dF]] [[1dF]]}}{{Approach=?{Approach|Flashy,FLASHY + @{selected|flashy}|Careful,CAREFUL + @{selected|careful}|Forceful,FORCEFUL + @{selected|forceful}|Sneaky,SNEAKY + @{selected|sneaky}|Quick,QUICK + @{selected|quick}|Clever,CLEVER + @{selected|clever}}}}
Action-CREATE-ADVANTAGE
&{template:default} {{name=CREATE ADVANTAGE}} {{character=@{selected|token_name}}}{{Intention=?{Intention|Create Advantage...}}} {{Roll=[[1dF]] [[1dF]] [[1dF]] [[1dF]]}}{{Approach=?{Approach|Flashy,FLASHY + @{selected|flashy}|Careful,CAREFUL + @{selected|careful}|Forceful,FORCEFUL + @{selected|forceful}|Sneaky,SNEAKY + @{selected|sneaky}|Quick,QUICK + @{selected|quick}|Clever,CLEVER + @{selected|clever}}}}
Action-DEFEND
&{template:default} {{name=DEFEND}} {{character=@{selected|token_name}}} {{Intention=?{Intention|Defend...}}} {{Roll=[[1dF]] [[1dF]] [[1dF]] [[1dF]]}}{{Approach=?{Approach|Flashy,FLASHY + @{selected|flashy}|Careful,CAREFUL + @{selected|careful}|Forceful,FORCEFUL + @{selected|forceful}|Sneaky,SNEAKY + @{selected|sneaky}|Quick,QUICK + @{selected|quick}|Clever,CLEVER + @{selected|clever}}}}
Action-OVERCOME
&{template:default} {{name=OVERCOME}} {{character=@{selected|token_name}}} {{Intention=?{Intention|Overcome...}}} {{Roll=[[1dF]] [[1dF]] [[1dF]] [[1dF]]}}{{Approach=?{Approach|Flashy,FLASHY + @{selected|flashy}|Careful,CAREFUL + @{selected|careful}|Forceful,FORCEFUL + @{selected|forceful}|Sneaky,SNEAKY + @{selected|sneaky}|Quick,QUICK + @{selected|quick}|Clever,CLEVER + @{selected|clever}}}}
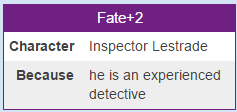
Fate+2
&{template:default} {{name=Fate+2}}{{character=@{selected|token_name}}}{{Because=?{Because...}}} {{Fate=Point Spent [[1d1 &{tracker:-}]]
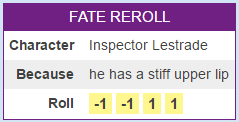
Fate-REROLL
&{template:default} {{name=FATE REROLL}}{{character=@{selected|token_name}}}{{Because=?{Because...}}}{{Roll=[[1dF]] [[1dF]] [[1dF]] [[1dF]]}} {{Fate=Point Spent [[1d1 &{tracker:-}]]
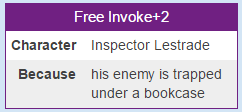
Free-Invoke+2
&{template:default} {{name=Free Invoke+2}}{{character=@{selected|token_name}}}{{Because=?{Because...}}}
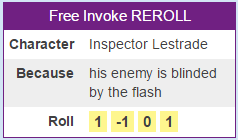
Free-Invoke-REROLL
&{template:default} {{name=Free Invoke REROLL}}{{character=@{selected|token_name}}}{{Because=?{Because...}}}{{Roll=[[1dF]] [[1dF]] [[1dF]] [[1dF]]}}
The Player Macros appear at the top of the screen when they have selected their Token…
The following Macros should be flagged as “In Bar” and are only visible to the GM.
I usually right-click on the buttons in the GM’s Bar (at the bottom of the main page) and then make them bright red.
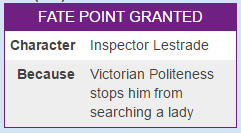
FATE-POINT-GIVE
&{template:default} {{name=FATE POINT GRANTED}} {{character=@{selected|token_name}}}{{Because=?{Because...}}} {{Fate=Point Granted [[1d1 &{tracker:+}]]
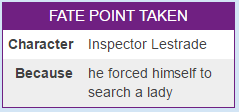
FATE-POINT-TAKE
&{template:default} {{name=FATE POINT TAKEN}}{{character=@{selected|token_name}}}{{Because=?{Because...}}} {{Fate=Point Taken [[1d1 &{tracker:-}]]
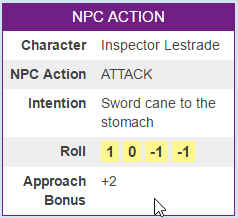
NPC-ACTION
Because NPCs don't usually have full character sheets with Approaches, this one asks what Action Type, then asks for an Intention and then asks what Bonus to show.
&{template:default} {{name=NPC ACTION}} {{character=@{selected|token_name}}} {{NPC Action=?{NPC Action|ATTACK|DEFEND|CREATE ADVANTAGE|OVERCOME}}} {{Intention=?{Intention}}} {{Roll=[[1dF]] [[1dF]] [[1dF]] [[1dF]]}}}} {{Approach Bonus=?{Approach|+4,+4|+3,+3|+2,+2|+1,+1|0,0|-1,-1|-2,-2}}}
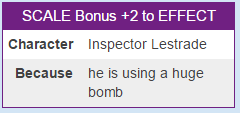
Scale-Effect+2
&{template:default} {{name=SCALE Bonus +2 to EFFECT}}{{character=@{selected|token_name}}}{{Because=?{Because...}}}
Scale-Roll+1
&{template:default} {{name=SCALE Bonus +1 to roll}}{{character=@{selected|token_name}}}{{Because=?{Because...}}}
The GM Macros appear at the bottom of the screen…
Turn Tracker used for Fate Points
Here is advice on how the Turn Tracker could be used for tracking of Fate Points. If used in this manner, it should always be open.
Put all the Player Characters into the Tracker at the start of the game and leave it open.
Add in tokens for the Monsters (or just a single token for the GM if you want to have all the GM creatures go at the same time).
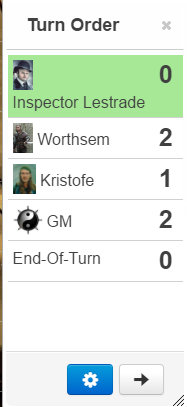
Set the GM’s Score in the Turn Order to the number of Player Characters involved in the scene.
Click the Cog and “Add Custom Item” and add an “End-Of-Turn“ marker.
| I'm using a small variation on the FAE rules for initiative, where the order of turns is determined by choice - it's from Dresden files Accelerated (and from Fate Core) |
The GM decides who should go first (taking into account the situation and the Quick score of the Player Characters and the monsters).
Almost always have one of the Players going first (unless they have been ambushed!)
In the example above, Lestrade is going first (the poor chap is out of Fate Points).
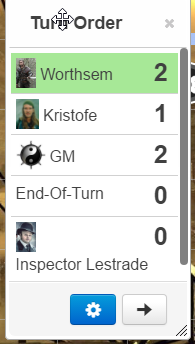
When a Player Character has finished their go, drag the Player to below the End-Of-Turn marker.
The person who finishes their go, chooses who goes next from the ones still above the End-Of-Turn marker.
Beware leaving the GM to go last as the person who goes last decides who goes first in the next Turn, so can give themselves two consecutive goes if they want to.
After Lestrade has had his go, he is dragged down to after the End-Of-Turn..
At the end of each Turn, drag the End-Of-Turn marker to the bottom of the Turn Order.
See Also
- Fate Core
- Dice_Reference - FATE Dice
- Roll20 Keyboard Shortcuts
- Roll20 Advanced Keyboard Shortcuts
- Mick Hand's GM Tips - (Original author of this page)


