


Script:ScriptCards
From Roll20 Wiki
Page Updated: 2025-03-07 |
Version: 2.7.29
Last Modified: 2024-08-23
Code: ScriptCards
Dependencies: None
Conflicts: None
ScriptCards Links
Roll20 Forum Links:
GitHub Links:
Roll20 Wiki Links:
- Main Page - ScriptCards
Working Scripts Submitted by Users:
Official Discord:
YouTube Tutorials:
Introduction to ScriptCards
NOTE: The Roll20 wiki was uneditable for months, so the ScriptCards wiki is a bit out of date. I'm in the process of making updates, but there is a lot to get through, so it will take a bit of time. For information on the latest changes, please see the Changelog on the ScriptCards GitHub page. (August 2024) |
What is ScriptCards
| NOTE: Because the Roll20 Wiki was un-editable for two months, there are sections of the Wiki that are either outdated or entirely missing (in the case of newly implemented features). We are currently in the process of updating the Wiki to bring it into line with the current version of ScriptCards. At the same time, I'm revising some portions of the Wiki to better organize and update portions that are unclear. (August 2024) |
The ScriptCards Mod is a Roll20 (Mod Script) that implements a scripting language interpreter, meaning that it will take the contents of a macro passed to the Roll20 chat server and execute a script (program) complete with variables, loops, branching, and many other standard programming language features. The resultant output is, by default, a "card" (patterned after the D&D 4E Power Cards entries from the official books). The output can be fully customized either directly or with templates and may even be suppressed in cases where the script is simply making attribute/value changes or other non-visual settings. The parser contains its own dice roll parser with a number of features that diverge from the Roll20 Quantum Dice Server.
The ScriptCards scripting language is the programming language specification that is used to create these macros to achieve your desired effects.
In addition to standard items such as Variables, Looping, Branching, and Conditionals, the ScriptCards language defines a number of Built-in Functions to interact with Roll20 API objects, the ability to call other Roll20 Mod scripts, and supports Triggers and Code Libraries.
The ScriptCards interpreter has built in Infinite Loop Protection, limiting the execution to 30,000 lines of code. This limit can be exceeded by altering the limit on a per-script basis with a Settings (--#) statement.
ScriptCards is developed and maintained on GitHub in the ScriptCards Repository and incorporated into the Roll20 OneClick Mod/API system. New features will appear first in the GitHub release, with occasional pushes to OneClick.
- Current OneClick Version 2.7.25
- Current Development Version
- Scriptcards Discord
❗Critically Important (especially if you are coming from PowerCards): ScriptCards does not parse inline rolls. ScriptCards includes its own built-in dice roll parser to allow for the use of variables inside dice rolls. The final numeric value of an inline roll can be used in a ScriptCard, but only as a text substitution value, so inline rolls can't reference the value of ScriptCards variables.
Getting more help when you need it
If you feel like you're getting stuck or need help that you're not getting from this Wiki, please feel strongly encouraged to join the Scriptcards Discord and reach out to the amazing community via the #Scriptcards channel for help. There's an incredibly rich array of amazing information in this Wiki that covers a vast number of topics, in rather technical detail. Although the information has been broken down into sections and subsections, it can still feel overwhelming to try and absorb it all. Many of the Discord community members have been through the challenge(s) you're facing and would be glad to help you accomplish your goals.
Is ScriptCards Related to PowerCards?
I (Kurt J.) have been maintaining and updating PowerCards for a couple of years now, and ScriptCards isn't an effort to supplant PowerCards, but rather represents my effort to address some of the most common issues that PowerCards users run into because of the intrinsic nature of the way PowerCards was conceived and developed over time. ScriptCards is more of a follow-up to PowerCards. Perhaps the most frequent question asked in the PowerCards thread on the forum is something along the lines of “how do I use the result of THIS roll in the roll I make two lines later?” Unfortunately, due to the architecture of PowerCards, this isn’t possible.
Besides this issue, there are various elements of a PowerCards macro that can’t support certain features. For example, you can’t set most card-wide settings (name, leftsub, rightsub) dependent upon the results of a dice roll, and while I’ve implemented a simple “skip forward” mechanism in PowerCards to allow for some flow control, true branching (forward and backwards) is not possible due to the way cards are processed. While it might be possible to rewrite some of the core of PowerCards to allow for implementation of (some) of these features, the result would be a very different script that would not be backwards compatible with the host of users currently using PowerCards in their games.
Instead, I have taken the approach of writing a completely new script from the ground up. There is very little (if any) of the original PowerCards code included in ScriptCards because I am fundamentally changing the way the macro is processed. Note that this isn’t a slight against the original author of PowerCards (Sky). The script has been widely used for years now, and is a testament to the flexibility of the original code that I was able to add so many features over the past two years.
By implementing ScriptCards as a new, separate script, those using PowerCards as it currently exists can continue to do so without interruption, while those interested in the functionality of ScriptCards can make use of its updated feature set. The two scripts (PowerCards and ScriptCards) can happily coexist in the same game, and do not interfere with each other in any way.
Check out What to Know if you are Coming from PowerCards for a comparison table between the two scripts.
Your First ScriptCards Script
A ScriptCard script is text written into the q Text Chat (either typed directly, pasted, or run via a macro/character ability) that will be interpreted and executed by the ScriptCards language interpreter. In most cases, the result of the script will produce output displayed as an HTML formatted "card" in the chat window. A ScriptCards script is composed of an API command: !scriptcard {{ }} enclosing any number of lines that determine what actions the script will take and the output that will be added to the card. At its simplest, the following macro:
!scriptcard {{ }}
Will produce just a title card that displays “ScriptCards” as the name:

Of course, this is just the bare essential macro and isn’t very useful. In order to produce output that is helpful for playing a Roll20 game, we need to include lines between the {{ and }} that direct the API script as to what it should do.
In the tradition of most programming/scripting languages, lets write a "Hello World" script:
!scriptcard  {{
  --#title|Hello World
  --+Hello|
}}
Running this simple script will produce the output:

This illustrates several important points about the ScriptCards language:
- Every line of a ScriptCards script begins with two dashes (--), followed by a single character that determines what kind of line it is.
- Every line must also contain a vertical bar (|). The vertical bar separates the Tag portion of the statement from the Content portion.
- A line beginning with --# is a Settings line and is used to alter default values that impact how the output is displayed. In this case, "title" is the Tag part of the statement, and "Hello World" is the statement Content.
- The "title" setting controls the caption displayed at the top of the output
- A line beginning with --+ is a Direct Output line, and is used to add a row of output to the body of the card.
- This statement does not have a Content portion, but the vertical bar used to separate Tag from Content is still required. The --+ statement can (and usually does) have a content portion, which would be displayed next to the Tag portion in the output.
Structure of a ScriptCard Script
The body of a ScriptCard Script contains one or more statement lines, which, as a general rule, are interpreted as they are executed and run sequentially from top to bottom. There are exceptions to this general functionality, including the ability to branch to other parts of the code, call subroutines, and terminate execution. There are also special constructs utilized by Reentrant Scripts, that allow execution to begin at locations other than the top of the script. These exceptions will be covered throughout this document whenever exceptions apply.
A ScriptCard line begins with two dashes, followed by a statement identifier character that tells the brains of the script (aka, the "interpreter") what type of line it is. There are many different types of statements which will be discussed throughout this Wiki, including detailed information on the function, and thorough instructions on the use and of each one.
After the line type identifier, an often optional bit of text referred to as the line's Tag is supplied. This name is essentially free-form and CAN be omitted in the case of some line types. Also note that if you are used to using PowerCards, Tags in ScriptCards do not need to be unique.
Following the Tag is a vertical bar ( | ; also called a "pipe" character), and then the Content portion of the line. Again, each type of line might interpret this content differently, and in the case of some statement types it is optional.
Creating the lines of instruction that a Scriptcard uses
Here is a more visual representation of the syntax used to create the various lines of instructions that Scriptcards needs in order to perform any tasks for you
[double dashes] [statement identifier character] [tag section of the line] [pipe] [content section of the line]
|  ----  Line  Type  Identifier  Section  ----  | ----  Tag Section  ---- | pipe | ---- CONTENT  SECTION ---- |
Detailed example of instruction line syntax:
--#title|Longsword Attack
Let's break down the example and connect the dots back to the information you learned a few minutes ago. Let's go through each element individually:
- -- is the "double dash" or "two dashes" that start every type of line.
- # is the statement identifier character, indicating that this line will be a "settings" statement.
- title is the statement Tag. For the "#" statement type, the Tag indicates what setting we will be updating.
- | separates the Tag from the Content
- Longsword Attack is the Content portion of the statement. In this case, it indicates what will be placed in the "title" setting.
A Note on whitespace
ScriptCards lines are delimited by the -- sequence. This means that whitespace before/after a line is ignored by the interpreter. The following two scripts are identical as far as the interpreter is concerned:
!script {{
  --#title|Stealth Check
  --=Roll|1d20 + @{selected|stealth}
  --+|@{selected|token_name} attempts to move undetected...
  --+Stealth|@{selected|token_name} rolled a [$Roll]
}}
!script{{--#title|Stealth Check--=Roll|1d20 + @{selected|stealth}--+|@{selected|token_name} attempts to move undetected...--+Stealth|@{selected|token_name} rolled a [$Roll]}}
A Note Square Brackets
Roll20 has some issues if square brackets are next to each other (like or ) as it tries to interpret them as inline rolls. You can get around this by using \\[ and \\] instead of plain square brackets. One of the first things ScriptCards will do is globally replace these escaped values with the simply bracket equivalent.
The default ScriptCards output contains a number of sections:

ScriptCards Variables
UNDER CONSTRUCTION
ScriptCards currently supports four types of variables:
- Roll Variables are used to hold the results of dice rolls or mathematical calculations. Roll variables hold information about the individual dice rolls or other components that make up the final result of the roll/calculation.
- String Variables hold generic text that is not (normally) associated with a dice roll.
- Arrays Are groups of String variables (the elements of an array are always strings)
- Hash Tables Are called associative arrays in some languages, and can be used to store key/value pairs of strings.
Roll Variables
| Set With | --= or [=...] |
| Referenced With | [$...] |
A roll variable is used to store the results of dice rolls or math calculations when more than just the final resultant value is important. Roll Variables are set via the --= statement or the [=...] referencing structure and the content of the assignment statement is processed by the ScriptCards built-in roll parser. When outputting the content of a Roll Variable, the [$...] referencing structure is used.
When assigning a value to a Roll Variable, the variable name is specified as the tag portion of the statement, and the content is parsed by the roll parser to determine the result.
--=AttackRoll|1d20 + @{selected|strength_mod} [STR] + @{selected|pb} [PROF]
--+Result|[$AttackRoll]
In this case, we are creating a roll variable called AttackRoll. The content portion of the roll will be passed to the ScriptCards roll parser, which will roll 1d20 and add two modifiers, storing the result in the AttackRoll roll variable. The roll parser will store extra information about the roll to various components of the AttackRoll variable, including the text passed to the parser, a formatted version of the result in a hover-over text box, and details on each die rolled.
A Roll Variable is referenced using the [$...] structure, so in this case [$AttackRoll] will output the roll value in the default format for dice rolls. There are a number of suffixes that can be used to retrieve portions of the information stored in the Roll Variable:
❗ Important Notes:
1) Roll modifiers are case-sensitive
2) Roll Modifiers will remove any flavor text that was included with the original roll assignment.
Modifier Meaning No modifier In a Direct Output Line (--+), GM Output Line (--*), or String Assignement (--&), will be replaced with a formatted roll display, including a mouseover with roll text details. In any other type of line, will display the same results as .Raw .Total The end result of the roll equation. Formatting rules for "No Modifier" apply based on line type. .Raw The total value of the roll variable without any formatting, no matter what kind of line the reference is used in. .Base The cumulative result of any dice rolled in the Roll Text (Numeric modifiers are not included) .Ones The number of dice in the roll that came up as 1s .Aces The number of dice in the roll that came up as the maximum number on the die .Odds The number of dice in the roll that came up with an odd number .Evens The number of dice in the roll that came up with an even number .RollText The raw text of the roll that was use to generate the results .Text A text representation of the results of the roll, including the numbers rolled for each die .tableEntryText The text portion of the result of a table roll .tableEntryImgURL The image source portion of the result of a table roll .tableEntryValue If the tableEntryText is purely numeric, will contain the numeric value
In the case of our AttackRoll variable above, if we want to know the value of the dice roll (1d20) itself without the modifiers, we will use [$AttackRoll.Base].
String Variables
Arrays
Hash Tables
ScriptCard Statement Type Details
Quick Reference: Statement Types
The table below lists each of the statement identifier types available in the ScriptCards language. Each entry also lists what the Tag is used for (if at all) and the format the Content is expected to be in along with usage notes.
Identifier Statement Type Tag Content Notes --/ Comment unused unused The --/sequence is used to add comments to a script. No processing will take place on a --/ line, so the tag and comment can be freely used to add notes to your code.--\ Console Log unused Log Text ) to the API console log. --# Set Parameter Parameter name Desired parameter value Parameters generally control the behavior of large segments of the output card. Things like the Title of the card, the colors of the header and rows, etc. There are also parameters that control how various features of the card behave (like "usehollowdice"). --+ Direct Output Free Text - Is output in bold at start of the line. Output in normal text after Tag Direct Output statements are what creates row sections on the output card. A script without any direct output sections will end up looking similar to the sample at the start of this wiki (the !script {{ }} script) because all other statement types do not create output lines. --= Assign Roll Variable Variable Name Roll Equation (or text) to assign Roll/Numeric variables are assigned with this command. The content will be processed as a dice roll, and various properties will be set along with the numeric results. --& Assign String (or Array Element) Variable Variable name Content to store in the string variable. Roll Variables and String Variables are completely separate entities, and can technically share names, but this would likely lead to confusion and should be avoided. Elements in an array can be assigned with this statement by specifying the array name followed by the index number you wish to assign in parenthesis (ex: Fruits(4)) as the variable name --@ API Call API ! Command API call parameters (replace -- with _) Other Roll20 API scripts can be called using this command. The Tag is the trigger command for the API script (e.g., !token-mod, or !setattr, etc.) --: Branch Label Label Name Unused (Comments if desired) Branch labels are the destination for branch and procedure call statement types. The content portion of the statement is unused, though it is recommended to list parameter information here if you are writing a procedure that accepts passed parameters --^ Branch To (GOTO) Label name to branch to Unused (Comments if desired) An unconditional branch to a label (--:). Execution of the script will jump to the line after the named label. A GOTO branch does not support parameter passing or a return point. --> Call Procedure (GOSUB) Label name to call Procedure parameter list semicolon (;) separated An unconditional procedure call. Execution will jump to the line after the named label, and a return statement (--<) will return execution to the line after the procedure call. Procedure calls can be nested and called recursively. --< Return from Sub Unused Unused (Comments if desired) The return statement returns execution to the most recent procedure call line. Note that the vertical bar is required for the statement to be complete. --? Conditional Statement Condition to be evaluated True action|False action The condition will be evaluated and, by default, execution will jump to one of the two indicated branch labels as a GOTO branch (or simply continue to the next line if only a True branch is specified and the result is False). You can make the branch a procedure call by prefixing the label with a > symbol. In this case, you can include a semicolon separated list of parameters. Several other true/false actions are supported. See the --? statement description for details. --s Store to Persistent Storage "settings", "rollvariables", or "stringvariables" Name of the data set to store (see save/load section below) This statement type (and the --l statement) still function, but it is recommended to use the storage mechanism in the --~ command instead. --l Load from Persistent Storage "settings", "rollvariables", or "stringvariables" Name of the data set to store (see save/load section below) This statement type (and the --s statement) still function, but it is recommended to use the storage mechanism in the --~ command instead. --v Create Visual Effect "token", "betweentokens", or "point" Tokens and parameters for generating the effect Visual effects are played on the page the token is on. "point" effects require Version 1.2.8+ --a Play Audio Track Unused Jukebox track name (case sensitive) Plays an audio track by name from the Roll20 jukebox. Requires v1.5.2+ --e Echo to Chat Name to send chat command as Chat message to send Variable substitution takes place on the tag and content. --R Retrieve Repeating Section Row information "find", "first", "next", "byindex", "bysectionid", "dump" Parameters for retrieving row information. See Referencing below Working with repeating section information on character sheets is possible without tracking row indexes ($0, $1, etc.) by using the --R statements. --~ Assign a variable to the result of a built-in function Variable Name Parameters for function call ScriptCards includes a number of built-in functions for things like measuring distance, manipulating strings, etc. The type of variable that gets set (Roll or String) is dependent upon the function that is being called. --c Case Statement Test Value Vertical bar separated list of cases, with the match:branchlabel format. Branch labels can be procedure calls by prefixing them with ">", and can contain parameters. --i Information Request User Prompt;Button Caption InfoType;VariableName;ParameterText See full documentation below. --d Data Statement ! for data definition or StringVar for data read For definition lines, a semicolon separated list of data elements. Unused to read lines. Similar to BASIC read/data statements. --d! defines string data elements anywhere in your code. --dvarName reads the next data element into varName. --% For...Next Loop Loop Counter for "For", empty for "Next" For "For", Start;End;Step, empty for Next See For...Next Loop documentation below. Allows you to create loops that will run a specified number of times with a loop counter. --* GM Output Free Text - Is output in bold at start of the line. Output in normal text after Tag GM Output statements are whispered to the GM as a separate card after the output of the main card is completed. Their use is identical to the Direct Output statement (--+). If there are no GM Output statements in a card, no GM card will be whispered. --! Object Modification <objectType>:<objectId> setting:value|setting:value... Set properties of tokens/characters or character attributes (v1.5.0+ required) --X Exit Script none none End script processing and exit the script. --z Modify Z-Order <objectType>:<objectID> tofront or toback As of 2.7.0, this command works on graphic objects and allows you to manipulate the z-order (or top to bottom order) of objects. This command will be expanded when the API update (originally planned for March 2024) is released, to include additional object types and options.
The sections below detail the individual statement types supported by ScriptCards
Comment (--/)
A --/ statement is ignored by the ScriptCards parser. You can use this type of statement to add comments and informational text to your script.
--/|[Comment Text]
Example:
!script {{
  --/|Script Name : Fireball
  --/|Purpose     : Allow the player to cast a fireball and blow stuff up!
  .
  .
  .
}}
Console Log (--\)
A --\ statement will ignore the tag portion of the statement and output the content portion of the statement to the API console log, including variable substitution.
--\|[Log Text]
Example:
!script {{
  --\|The value of Roll is [$Roll]
}}
Set Parameter (--#)
A --# statement sets parameters used by ScriptCards when the card output is built. These include things like the title of the card, the background colors used for various portions of the card, the content of the left and right subtitle blocks, the tokens displayed in the emote (if any), the emote text, etc. A full list of these setting values is included below.
--#<ParameterName>|[Parameter Value]
For settings statements, the Tag determines the setting that will be updated, while the Content determines the value that will be stored in that setting.
For global settings, if the same setting is set multiple times in a script, the MOST RECENTLY EXECUTED setting will be what is used when the card output is built. Most settings are "Per-Line", meaning they will only impact output lines generated after the setting is made, and can thus be changed with every line if desired.
Examples:
  --#title|Magic Missile
  --#leftsub|Level 1 Spell
  --#rightsub|Force Damage
The three examples above set the “title”, “leftsub”, and “rightsub” values for the card to the content value for the line.
Content portions can include roll variables (see --= lines below) and can be used multiple times in a macro. The last execution of a setting line will be the one used when the card output is generated.
Settings Lines do not produce output lines on the card.
The following link is an image that shows the various sections of a ScriptCard:
https://cdn.discordapp.com/attachments/1034740409580130358/1066948467437617172/SC_Card_Illustrated.png
Parameter Definitions and Details
The following settings are available and are grouped by the section they apply to.
ℹ️ Please Note: Parameter names are not case sensitive.
[Expand/Collapse
Parameters]
| Overall/ Admin Settings | |||
| Name | Effect/Use | Default Value | Type |
| hideCard | If set to any non-default value, the entire card output will be suppressed | 0 | Global |
| whisper | Comma separated list of who to whisper the output to. Use "gm" for GMs and "self" for the sender | none | Global |
| showFromForNonWhispers | If set to a non-zero value, will include the sender on cards that aren't whispered | 0 | Global |
| reentrant | Used to name a script for re-entrant button use | 0 | Global |
| parameterDelimiter | Specify the character sequence used to separate parameters in various calls (defaults is semi-colon (;)) (1.6.7+) | none | Per-Line |
| executionLimit | Maximum number of script lines the interpreter will try to execute. This prevents "infinite loop" sandbox crashes | 40000 | Global |
| deferralCharacter | Changes the meta script deferral sequence to the specified value | ^ | Per-Line |
| debug | If set to a non-zero value, will output lots (and LOTS) of information to the API console log about the running script. Useful for troubleshooting. | 0 | Per-Line |
| timezone | IANA Specifier for the local time zone, used in system/date functions | America/New_York | Per-Line |
| overrideTemplate | Allows a user to specify one of the templates provided by Keith Curtis' Supernotes mod, which will cause ScriptCards to ignore most of the visual output settings from this section in favor of the Supernotes template. | none | Global |
| storagecharacterid | Allows you to specify a character to use for --s and --l statements in the currently running script | Internal search for "ScriptCards_Storage" (which must still exist) | Per-Line |
| gmoutputtarget | Sets the player that will receive output from --* lines. If set to "self", the output will be whispered to the player running the script. Can be set to any valid whisper target. | gm | Global |
| functionbenchmarking | If set to 1, will enable basic statistics about execution of functions (with -->). After your script finishes running the number of calls to each called function will be reported in the API console log as well as the number of milliseconds the script took to run. | 0 | Global |
| concatenationCharacter | Changes the character used to identify a concatenation (append) operation from a standard assignment operation. Example: --#concatenationCharacter|_ --&test|A quick brown fox --&test|_ jumped over the lazy dog. --+Output:|[&test] would display: Output: A quick brown fox jumped over the lazy dog.
|
+ | Per-Line |
| limitmaxbarvalues | If set to a non-default value, setting barX_value with --t will limit the value to the max value for the bar on the token sheet. | 0 | Per-Line |
| Selection Settings | |||
| Name | Effect/Use | Default Value | Type |
| activePage | If set to a page ID, will be used for [*P:] attribute references. The "playerpage" string can be used to retrieve the current player ribbon page. | empty | Per-Line |
| sourceToken | Token ID of the Source character. Will be displayed in the left portion of the emote area if specified, and will be used for referencing attributes. | None | Per-Line |
| targetToken | Token ID of the Target character. Will be displayed in the right portion of the emote area if specified, and will be used for referencing attributes. | None | Per-Line |
| Title Settings | |||
| Name | Effect/Use | Default Value | Type |
| hideTitleCard | If set to any non-default value, the top portion of the card (title and subtitle area) will not be included on the output | 0 | Global |
| titleCardBackground | A hex color code representing the background color of the title area. | #1c6ea4 | Global |
| titlecardBackgroundImage | Specify an image (content for a CSS background-image tag) for the title card area Example: --#titlecardbackground|url('https://s3.amazonaws.com/files.d20.io/images/248538196/c9xft1A2jWNqOkBsxQwyLQ/max.jpg?1633278017'); background-size: 100% 100%; background-repeat: no-repeat; |
none | Global |
| titleFontLineHeight | Line spacing on the title area | 1.2em | Global |
| titleFontFace | Name of the font used on the title area | Contrail One | Global |
| titleFontSize | Size of the title font | 1.2em | Global |
| titleFontColor | Color of the text on the card title | #FFFFFF | Global |
| titleCardBottomBorder | Border CSS specifier for the bottom of the title card area | 2px solid #444444; | Global |
| titleCardGradient | If set to non-zero value, will place a vertical gradient on the title card area. Using the SC-Utility script is highly encouraged as it makes setting gradients very easy (along with tons of other benefits). Example 1: --#titlecardbackgroundimage| linear-gradient( to right, Lavender, MediumPurple, Indigo ); Example 2: --#titlecardbackgroundimage| radial-gradient( ellipse farthest-side at left top, LightGreen, MediumSeaGreen, DarkOliveGreen ). |
0 | Global |
| title | Text displayed in the title area of the card | ScriptCards | Global |
| Subtitle Settings | |||
| Name | Effect/Use | Default Value | Type |
| subtitleFontFace | Name of the font used on the subtitle sections | Tahoma | Global |
| subtitleFontSize | Size of the subtitle font | 13px | Global |
| subtitleFontColor | Color of the text in the subtitle areas | #FFFFFF | Global |
| subtitleSeparator | The character(s) that will be placed between leftsub and rightsub | ♦ | Global |
| leftSub | Subtitle text. Will be centered if rightsub isn’t specified, otherwise will be offset to the left with a separator between leftsub and rightsub. | None (Empty) | Global |
| rightSub | Subtitle text. Will be centered if leftsub isn’t specified, otherwise will be offset to the right with a separator between leftsub and rightsub. | None (Empty) | Global |
| Emote Settings | |||
| Name | Effect/Use | Default Value | Type |
| emoteState | If set to anything other than "visible", the emote portion of the card will not be displayed | visible | Global |
| emoteBackground | Background color of the emote area | #f5f5ba | Global |
| emoteFontWeight | Font weight for the font in the emote area | bold | Global |
| emoteFont | Name of the font used in emote area (above the title of the output card) | font-family: Georgia, serif; font-weight: bold; | Global |
| emoteFontSize | Size of the font used in the emote area | 14px | Global |
| emoteFontColor | Color of the font in the emote area | None (Empty) | Global |
| emoteSourceTokenSize | Specify the size of the Source Token image (left side image) in pixels. NOTE: Do not include the "px" on the end like other size settings as the script automatically adds "px" after the number. Image of example usage: https://cdn.discordapp.com/attachments/855799249366155284/1109262372239056927/sc_tokensizes.png |
50 | Global |
| emoteTargetTokenSize | Specify the size of the Target Token image (right side image) in pixels. NOTE: Do not include the "px" on the end like other size settings as the script automatically adds "px" after the number. Image of example usage: https://cdn.discordapp.com/attachments/855799249366155284/1109262372239056927/sc_tokensizes.png |
50 | Global |
| emoteSourceTokenOverride | Specify the URL of the image that will override the avatar that represents the Source Token (left side image) in the emote section, if emoteState is set to display the emote section. | 0 | Global |
| emoteTargetTokenOverride | Specify the URL of the image that will override the avatar that represents the Target Token (right side image) in the emote section, if emoteState is set to display the emote section. | 0 | Global |
| emoteText | Text to display in the emote portion of the card | None (Empty) | Global |
| Main Description Settings | |||
| Name | Effect/Use | Default Value | Type |
| evenRowBackground | Hex code for the background color for even rows | #eeeeee | Per-Line |
| oddRowBackground | Hex code for the background color for odd rows | #d0e4f5 | Per-Line |
| bodyBackgroundImage | Specify an image (content for a CSS background-image tag) for the body area | none | Global |
| evenRowBackgroundImage | Specify an image (content for a CSS background-image tag) for the even card rows Example: --#evenRowBackgroundImage|url('https://s3.amazonaws.com/files.d20.io/images/248538196/c9xft1A2jWNqOkBsxQwyLQ/max.jpg?1633278017'); background-size: 100% 100%; background-repeat: no-repeat; |
none | Per-Line |
| oddRowBackgroundImage | Specify an image (content for a CSS background-image tag) for the odd card rows Example: --#oddRowBackgroundImage|url('https://s3.amazonaws.com/files.d20.io/images/248538196/c9xft1A2jWNqOkBsxQwyLQ/max.jpg?1633278017'); background-size: 100% 100%; background-repeat: no-repeat; |
none | Per-Line |
| LineHeight | Vertical size of each line on the output card | normal | Per-Line |
| bodyFontFace | Name of the font used in the card rows | Helvetica | Global |
| bodyFontSize | Size of the text in the card rows | 14px | Global |
| evenRowFontColor | Hex code for the text color for even rows | #000000 | Per-Line |
| oddRowFontColor | Hex code for the text color for odd rows | #000000 | Per-Line |
| tableBGcolor | Background color of the whole card. Normally not visible | #EEEEEE | Global |
| tableBorder | Color of the border that surrounds the whole card | 2px solid #000000; | Global |
| tableBorderRadius | CSS specifier for how rounded the borders of the output card are. Use "0px;" for square borders | 6px; | Global |
| tableShadow | CSS specifier for the drop shadow under the output card | 5px 3px 3px 0px #aaa; | Global |
| outputtagprefix | Anthing in this setting will be pre-pended to the tag portion of all subsequent --+ or --* lines | empty | Per-Line |
| outputcontentprefix | Anthing in this setting will be pre-pended to the content portion of all subsequent --+ or --* lines | Single space (" ") | Per-Line |
| Dice Roll Settings | |||
| Name | Effect/Use | Default Value | Type |
| rollHilightLineHeight | Determines the height of the hilight box placed around roll results (1.4.2+) | 1.0em | Per-Line |
| diceFontSize | Size of the dice created with the [d4] [d6], etc. formatting markers | 3.0em | Per-Line |
| diceFontColor | Color of the dice created with the [d4] [d6], etc. formatting markers | #1C6EA4 | Per-Line |
| rollHilightcolorboth | Background box hilight color if both a 1 and a max on the die are rolled (1.4.4+) | #8FA4D4 | Per-Line |
| rollHilightColorCrit | Background box hilight color if the maximum number on the die was rolled (1.4.4+) | #88CC88 | Per-Line |
| rollHilightColorFumble | Background box hilight color if a 1 was rolled (1.4.4+) | #FFAAAA | Per-Line |
| rollHilightColorNormal | Background box hilight color if neither a 1 or a max on the die are rolled (1.4.4+) | #FFFEA2 | Per-Line |
| noMinMaxHighlight | If set to anything other than "0", rolls will not display crit/fumble/mixed highlight colors. | 0 | Per-Line |
| noRollHighlight | If set to anything other than "0", rolls will not be formatted (plain numbers) but will still get a tooltip with details | 0 | Per-Line |
| allowPlainTextInRolls | If set to a non-zero value, plain character text in rolls will be copied to the roll text | 0 | Per-Line |
| disableInlineFormatting | If set to a non-zero value, inline formatting (bold, italics, color, text alignment, etc.) will not be performed on --+ lines | 0 | Per-Line |
| disableRollProcessing | If set to a non-zero value, --= lines will not process dice rolls strings | 0 | Per-Line |
| roundUp | If set to a non-default value, integer division will round up instead of down | 0 | Per-Line |
| useHollowDice | If set to a non-zero value, the hollow/outline versions of the dice fonts will be used | 0 | Per-Line |
| explodingonesandaces | If set to 1, rerolls on exploding dice will be figured into the Ones and Aces properties of the roll | 0 | Per-Line |
| Button Settings | |||
| Name | Effect/Use | Default Value | Type |
| buttonBackground | Background color for buttons created with [button][/button] | #1C6EA4 | Per-Line |
| buttonBackgroundImage | A CSS specifier for a background image to use for buttons (i.e. url(...);) Example: --#buttonBackgroundImage|url('https://s3.amazonaws.com/files.d20.io/images/248538196/c9xft1A2jWNqOkBsxQwyLQ/max.jpg?1633278017'); background-size: 100% 100%; background-repeat: no-repeat; |
empty | Per-Line |
| buttonFontSize | Text size for captions on buttons created with [button][/button] | x-small | Per-Line |
| buttonFontFace | Font Family specifier for captions on buttons created with [button][/button] | Tahoma | Per-Line |
| buttonTextColor | Text color of labels on buttons created with [button][/button] | #FFFFFF | Per-Line |
| buttonPadding | Set the size of the padding area around buttons | 5px | Per-Line |
| buttonBorderColor | Border (outline) color for buttons created with [button][/button] | #999999 | Per-Line |
As of ScriptCards 1.6.0, ten user settings (usersetting0 thru usersetting9) are now available. These settings are not used by ScriptCards but are available for script author use. These settings are stored and recalled with the basic syntax: (--Ssettings and --Lsettings).
As of Scriptcards 2.6.0, there is now expanded support for storing data, including settings. Read more about persistent data here.
ℹ️ Note: Settings Lines (--#) do not produce output lines on the card
Direct Output (--+)
A direct output line(--+) that displays a line of content on the ScriptCard. It can be a simple line of text with a Tag/Content pair, or it can include Roll Variable references and inline formatting. The Tag can be blank (the | is still required). If a tag is specified, it is output in bold at the beginning of the line followed by the content.
--+[Bolded Text Output]|[Text Output]
Examples of Direct Output lines:
  --+Hello|World
  --+Attack|The monster rolls [$Attack] to hit!
  --+Damage|@{target|token_name} is hit for [$Damage] [#3333AA][b]frost[/b][/#] damage.
Direct Output lines support inline formatting, roll variable replacement, character attribute references, and procedure variables.
GM Output (--*)
A GM Output line--* is identical to a direct output line(--+), except that it will be sent on a separate card that is only visible to GMs.
--*[Bolded Text Output]|[Text Output]
Example:
  --+PlayerLine|This line is shown on the public card
  --*GMLine|This line will only be shown to GMs, on a separate card.
Roll Variable Assignment (--=)
See the Variables section for more information on Roll Variables
In ScriptCards, when you want to roll dice you need to store the result of the roll into a Roll Variable. This is done by specifying the name of the Roll Variable as the Tag, and the roll text as the Content of the line.
--=<Roll Variable Name>|[Roll Component] [Roll Component] ...
All components of a roll equation should be separated with spaces.
Examples:
  --=MissileDamage|1d4 + 1
  --=Attack|1d20 + @{selected|strength_mod} [STR] + @{selected|pb} [PROF]
In these examples, the MissileDamage Roll Variable will be set to the result of rolling 1d4 and adding 1. The Attack Roll Variable will roll 1d20, add the selected character’s strength modifier and proficiency bonus (assuming D&D 5E) and store that value into the variable.
Adding Flavor Text to Rolls
Text enclosed in square brackets [ ]'s is considered "flavor text" and will be added to the result text but does not impact the roll result. You can also think of this as a method for labeling parts of more complex rolls. The roll will appear normally in the chat message but when someone hovers over the result with their mouse, the pop up will provide the flavor text entered. Be aware that if the labeled result is used in a subsequent roll the label will be lost, so the flavor text/ labeling should only be added to a roll variable right before it's displayed.
Example 1:
!script{{
  --=ForceRoll| 1d8 [Force Damage]
  --=PainRoll| 1d4 [Pain]
  --=BleedRoll| 1d6 [Bleeding]
  --+| [$ForceRoll] [$PainRoll] [$BleedRoll]
}}
The result of running Example 1 would be something like this:
- 6 3 4
- (Hover your mouse over each result to see the flavor text labels.)
- (Hover your mouse over each result to see the flavor text labels.)
Example 2:
!script{{
  --=AthleticsBonus| @{selected|athletics_bonus} [Athletics]
  --=AcrobaticsBonus| @{selected|acrobatics_bonus} [Acrobatics]
  --=SkillBonus| [$AthleticsBonus] + [$AcrobaticsBonus]
  --+| Athletics Bonus: [$AthleticsBonus]  Acrobatics Bonus: [$AcrobaticsBonus]  Skill Bonus: [$SkillBonus]
}}
The result of running Example 2 would be something like this:
- Athletics Bonus: 2 Acrobatics Bonus: 1 Skill Bonus: 3
- Hovering your mouse over each result, you can see that the Athletics and Acrobatics flavor text is available, but that it didn't carry through to the Skill Bonus where they were added together. If you want the Skill Bonus to display the flavor text, you'd want to do something like example 3.
- Hovering your mouse over each result, you can see that the Athletics and Acrobatics flavor text is available, but that it didn't carry through to the Skill Bonus where they were added together. If you want the Skill Bonus to display the flavor text, you'd want to do something like example 3.
Example 3:
!script{{
  --=AthleticsBonus| @{selected|athletics_bonus} [Athletics]
  --=AcrobaticsBonus| @{selected|acrobatics_bonus} [Acrobatics]
  --=SkillBonus| [$AthleticsBonus] [Athletics] + [$AcrobaticsBonus] [Acrobatics]
  --+| Athletics Bonus: [$AthleticsBonus]  Acrobatics Bonus: [$AcrobaticsBonus]  Skill Bonus: [$SkillBonus]
}}
The result of running Example 3 would be something like this:
- Athletics Bonus: 2 Acrobatics Bonus: 1 Skill Bonus: 3
- Hovering over each result, you can see that now the Skill Bonus has flavor text identifying the components that make up the total.
Customizing Dice Rolls
The following dice formats are supported:
Format Pattern Example Description XdY 3d8 Simple format. Roll a Y-sided die X times XdYkhZ 2d20kh1 Roll Y-sided die X times and keep the highest Z number of dice XdYklZ 4d6kl3 Roll Y-sided die X times and keep the lowest Z number of dice XdY>Z 5d6>3 Roll Y-sided die X times and count a 1 for each roll greater than Z XdY<Z 5d6<3 Roll Y-sided die X times and count a 1 for each roll less than Z XdYr<Q and XdYr>Q 10d6r<2 Roll a Y-sided die X times, rerolling results less than or equal (or greater than or equal to) to Q XdYro<Q and XdYro>Q 10d6ro<2 Roll a Y-sided die X times, rerolling results less than or equal (or greater than or equal to) to Q one time, keeping the reroll result XdY! and XdY!>Q and XdY!<Q 8d6! Roll a Y-sided die X times, rerolling max results and adding them to the total for the die (or rerolling results >= or <= Q and adding (Exploding dice) XdYkhZr<Q and XdYkhZr>Q 4d6kh3r<1 Roll a Y-sided die X times, rerolling results less than or equal to (or greater than or equal to) Q, and keep the highest Z results XdY!h and XdY!l 4d6!h Roll 1dY X times. If the max number on the dice is rolled, roll it again and add to that die's total. Return only the highest (h) or lowest (l) die roll (Deadlands skill checks). XdF 4dF Fudge dice support. Roll a Fudge die X times, with possible values of +, -, or blank. Roll hover text and .Text will display the values appropriately. XdYW, XdYWS, XdYWH, XdYWSH 4d6W Wild dice support (as seen in games like d6 system). X-1 dice of Y sides will be rolled normally. 1 die of Y sides will be rolled as an exploding die. If the "S" modifier is specified, the Wild die will eliminate itself from the total if the first roll on it is a 1. If the H modifier is included, a 1 on the initial Wild die will remove the highest die amongst the non-wild dice. None, one, or both can be specified. XuY 3u8 Roll a Y-sided die X times, but only generate unique values. If X is greater than Y, only Y dice will be rolled. XmY 3m8 Roll a Y-sided die X times, but always use this highest number on the die. Ex: 3m8 will always roll 24.
(Note: As of writing this (v 1.7.7 and likely previous versions too), Y cannot equal 0. The result of rolling Xd0 is the error "NaN" where the result should be.)
Using Dice Rolls in Equations
The following operators are supported in a roll equation:
Operator Operation + Addition - Subtraction * Multiplication / Division \ Integer Division (Rounds down) % Modulo (Remainder of Divison)
Roll Modifiers
Roll Variables can be accessed at any time after they have been created by using the [$VariableName] format, with the optional modifiers in the following table. Roll modifiers allow you to reference parts of a roll, or to display the roll results in different ways.
❗ Important Notes:
1) Roll modifiers are case-sensitive
2) Roll Modifiers will remove any flavor text that was included with the original roll assignment.
Modifier Meaning No modifier In a Direct Output Line (--+) will be replaced with a formatted roll display, including a mouseover with roll text details. In any other type of line, will display the same results as .Total .Total The end result of the roll equation as an unformatted number .Base The cumulative result of any dice rolled in the Roll Text (Numeric modifiers are not included) .Ones The number of dice in the roll that came up as 1s .Aces The number of dice in the roll that came up as the maximum number on the die .Odds The number of dice in the roll that came up with an odd number .Evens The number of dice in the roll that came up with an even number .RollText The raw text of the roll that was use to generate the results .Text A text representation of the results of the roll, including the numbers rolled for each die .tableEntryText The text portion of the result of a table roll .tableEntryImgURL The image source portion of the result of a table roll .tableEntryValue Numeric value of tableEntryText (via parseInt). If a non-numeric value, will be 0 .Raw The total numeric result without any formatting, even if placed somewhere formatting would normally be done. .RollCount The total number of actual dice rolled to make up the roll calculation. If multiple dice are rolled in a single roll set, the results of each die will be counted. ***v1.7.0*** .RolledDice(x) A 1-based "array" of the dice rolled during a roll assignment. If multiple dice are rolled (ie, 1d20 + 1d4) the results of all of the die rolls will be concatenated into the array. ***v1.7.0*** .KeptCount The number of dice rolled that have not been eliminated by a KH or KL clause. If the roll does not contain a KH or KL clause, this will be the same as RollCount. ***v1.7.0*** .KeptDice(x) A 1-based "array" of the rolled dice that were kept after processing a KH or KL clause. It the roll does not contain a KH or KL clause, all of the rolled dice will be included. ***v1.7.0*** .DroppedCount The number of dice dropped from the roll due to a KH or KL clause. If the roll does not contains a KH or KL clause, DroppedCount will be 0. ***v1.7.0*** .DroppedDice(x) A 1-based "array" of the rolled dice that were dropped from the total after processing a KH or KL clause. If the roll does not contain a KH or KL clause, no dice will be added. ***v1.7.0***
Examples:
  --+Total Damage|[$MissileDamage.Total] (roll was 1d4+1)
  --+Base Damage|[$MissileDamage.Base]  (without the +1)
  --=Attack|1d20 + @{selected|strength_mod} [STR] + @{selected|pb} [PROF] + [$BlessBonus] [Bless]
In this case, 1d4 will be rolled and stored in “BlessBonus”, which can then be used in the Attack line.
Mathematical Functions in Roll Expressions
The ScriptCards roll parser works from left to right, always maintaining a current value and applying whatever comes next to the total. The functions here below can be added to a roll expression:
Expression Meaning {ABS} Absolute Value {CEIL} Ceiling value (round up to the next whole number) {FLOOR} Floor value (round down to the next whole number) {ROUND} Round value (round up if the decimal portion is greater than 0.5, otherwise round down) {ROUND:X} Round value to X decimal places (round up if the decimal portion is greater than 0.5, otherwise round down) {NEGATE} Multiply the value by negative one. {SQRT} Take the square root of the running value. {SQUARE} Square the running value. {CUBEROOT} Take the cube root of the running value. {CUBE} Cube the running value. {SIN} Return the SIN of running value. {COS} Return the COS of running value. {TAN} Return the TAN of running value. {ASIN} Return the ASIN of running value. {ACOS} Return the ACOS of running value. {ATAN} Return the ATAN of running value. {MAX:X} Caps the running value at X. (v1.4.12) {MIN:X} If the running value is less than X, set the value to X. {CLAMP:X:Y} Adjust the running value to remain between X (lower bound) and Y (upper bound) {PAD:X} Whenever the .Raw or .Total (same as no suffix) gets displayed, leading zeros will be added to the number to make it at least X digits long (ex. {PAD:3} would result in 5 being displayed as 005). Note that this can have a negative impact on conditional statements if they are being used as string comparisons instead of numeric comparisons.
Here are the syntax rules when using the above listed functions:
Example 1.
!script {{
  --=output|2.9 {FLOOR}
  --+output|[$output]
}}
The output from this example is "2".
Example 2.
!script {{
  --=output|2.9 {FLOOR} {NEGATE} - 3
  --+output|[$output]
}}
The output from this example is "-5".
Basically, a function will use as its input whatever the current "running total" is.
Please note that there must always be a space between the function expression and its input. For example, "2.9 {FLOOR}" will work, but "2.9{FLOOR}" will not work.
Rolling on Rollable Tables
You can also roll on a rollable table using the expression [T#tablename], where tablename is the case-sensitive name of the table in your game. Proper weighting for each entry in the table is taken into account when rolling on rollable tables. The .tableEntryText and .tableEntryImgURL properties of the Roll Variable will be set to the matching values on the resultant table entry.
Example:
Note: To see this script in action, you'll first need to create a new rollable table named "FruitTable" in your list of Roll Tables, and then add a couple entries of fruit with images for each. For the entry names, use the fruit name or a brief description of the fruit. Add an image to each entry that represents the fruit. With the rollable table setup complete you can use the following script to randomly select and display a fruit, along with its image, from the table.
!script{{
--=Fruit|[T#FruitTable]
--&fruitText|[$Fruit.tableEntryText]
--&fruitImg|[$Fruit.tableEntryImgURL]
--+|[img width=32][&fruitImg][/img] [&fruitText]
}}
Special Notes about Dice Rolls
(READ THIS!): In order to support the ability to include Roll Variable values in rolls, ScriptCards does not use the built-in Roll20 dice rolling engine, and does not support “inline rolls” (rolls included with [[ ]] in the card). Because I have included my own roll parser, there may be some odd roll methods that are not currently implemented. If you run into dice roll options that don’t work, please let me know and I’ll try to support them.
Special Notes Update: As of version 1.2.3, inline rolls will be parsed by ScriptCards, using only the FINAL RESULT of the roll. The components (dice, modifiers, etc.) will not be visible to ScriptCards.
Roll Variable Lines do not produce output lines on the card, so you must use an output line .
String Variable Assignment (--&)
See the Variables-section for more information on String Variables
String variables function in most ways like roll variables, except that they do not attempt to process any dice rolls, and do not have the list of properties that a roll variable has. They are designed to simply contain text. To assign a string variable, use the --& statement:
--&<String Variable Name>|[+][Content]
Examples:
  --&MyText|Hello
  --&First|Alpha
  --&Last|Omega
  --&Final|[&First] [&Second]
  --&Phrase|The quick brown fox
  --&Phrase|+ jumped over the lazy dog
The first example simply assigns the word "Hello" to the MyText string variable. The second and third examples similarly assign "Alpha" and "Omega" to the First and Last string variables. The fourth example uses string variable referencing to set the value of Final to what is in First, a space, and what is in Last, resulting in "Alpha Omega" being in Final.
The last two examples demonstrate using the "+" modifier to add text to an existing string variable. Phrase is initially set to "The quick brown fox", and then " jumps over the lazy dog" is added to it because the first character of the content is a "+" symbol, indicating that the content should be added to the variable instead of replacing it.
As indicated in the fourth example above, string variables are referenced using the syntax [&variablename]
Call Mod (--@)
ScriptCards can use a Call API instruction to execute other Mod commands. The Tag contains the Mod command to use (alter, or roll20AM, for example - do not include the !) The content portion of the statement contains the parameters that are passed to the API script. Because the -- sequence can't be used here, an underscore (_) at the beginning of the line or preceded by a space is replaced with -- before the Mod command is executed.
Examples:
  --@eh|list
  --@alter|_target|@{target|token_id} _bar|3 _amount|-[$Damage]
In the first example above, the command !eh list will be executed, calling EncounterHelper. In the second, AlterBars(Forum) is called to modify a token's Bar 3 value.
Note: When ScriptCards (or any Mod script) runs other Mod script commands, there is not an associated player attached to the executed command. This means that the script being called won't know if the person running the ScriptCard is, for example, a GM. The most common instance of this is when calling !token-mod and trying to use --ids instead of acting on selected tokens. Since this is an ability normally limited to GMs, you need to enable "Players can IDs" (in !token-mod config).
See API:Script Index for more options.
Branching
ScriptCards supports several methods that allow code execution to branch to different parts of the script, rather than only being able to proceed directly through each line of code in the script. Branching relies on the use of Branch Labels --: and then one of several types of statements that evaluate which code branch to execute.
Branch Label (--:)
A branch label defines a line in your code that can be reached by one of the branching instructions (--^, -->, --? or --c). The Tag serves as the label name, and must be unique on the card.
The vertical bar (|) separator must be present, but the content portion of the line is unused and can be treated as a comment.
Examples:
  --:MyLoop|
  --:CriticalHit|Will jump here if we roll a critical hit!
A Branch Label line does not produce an output line on the card.
Return (--<)
A return instruction marks the end of a Gosub procedure. As long as the branch statement is not a direct branch --^, execution will return to the statement after the one that called the subroutine. The Tag and Content portions are both optional, but the vertical bar separator must be included.
--<|
Examples:
  --<|
  --<|End of MySub
In both cases, the value of the tag and the content portions of the statement are ignored, but the vertical bar separator must still be present.
Branch (--^)
A Branch line (aka direct branch) jumps execution to the label indicated by the Tag. The vertical bar (|) separator must be present, but the content portion of the line is unused and can be treated as a comment. This type of branch does not directly allow a return statement --< to bring the code execution back to where the branch occurred. If you want the code to be able to return to the original branch point, one of the remaining branch types below should be used instead.
Examples:
  --^MyLoop|Jumps to MyLoop
  --^SkipCrit|We didn't crit, so skip the Crit code
A Branch line does not produce an output line on the card.
Call Procedure (-->)
Similar to a branch, a Call Procedure (sometimes known as a "gosub") line branches execution to the label indicated by the Tag. However, the return pointer of the call will be pushed onto a stack so that a Return instruction (--<) will return execution to the next line in the card. A list of parameters for the subroutine can be passed as the content portion of the tag, and are separated by semicolons (;).
--><Procedure Label>|[Parameters (Separated by semicolons (;)]
Examples:
-->FixFormat|#3333FF;#999999
In this example, a label called FixFormat will be branched to as a subroutine, passing the parameters #3333FF and #999999. In the subroutine, these parameters are referenced by number as [%1%] and [%2%].
Conditional Statement (--?)
See the Variables section for more information on Variables
See the Referencing section for information on referencing variable content
Syntax
General syntax of conditional statements:
 --?  [Equation used to determine True/False]  |  [Execution path if True] | [Optional Execution path if False]
|  ---  ---  ---  TAG SECTION   ---  ---  ---  |  -----   ----   ----   CONTENT SECTION   ----   ----   ----  |
A conditional statement contains some equation in the Tag that will be evaluated to True/False. If any part of the variables for comparison can, or does, contain a space (e.g. "The Dog", "Fruit salad"), it needs to be surrounded by double quotes. Here are some real-world examples of different comparisons:
Example 1:
--?[$AttackRoll.Base] -eq 20|
This comparison checks if the initial value of the roll, before any modifiers are included, is equal to 20. Normally -eq is case-sensitive, but rather it's case-sensitive or not only applies to text comparisons; and never applies to digits. This check is great if you want to do something special when the player rolls a "natural 20", or use a set of rules that includes the "critical success" model. You can easily change the 20 to any other number to accommodate any special rules your game uses.
Example 2:
--?"[&Fruit]" -inc "Green grapes"|
This comparison checks if the non-case-sensitive phrase "green grapes" is a part of the contents of the &Fruit string variable. Because the comparison is not case sensitive "Green grapes", "greEN GRapes" and "gREen GRApes" will produce the same results. This check is perfect for checking for a specific value or phrase in variables that are created by a script in an automated fashion.
ℹ️ Note: The use of the double quotes around both the variable ("[&Fruit]") and the phrase ("green grapes") we're comparing against. We have direct evidence that at least one entry in the list will have at least one space, so we enclose the variable and the value we're comparing it against in double quotes to ensure there are no issues.
General Guidance: It's safe to use double quotes any time around the variable and/or the comparator, even if the quotes are not strictly required, however the comparison will not work if the double quotes are needed, but are not being used.
Example 3:
--?@{selected|dexterity_mod} -lt 8|
This comparison looks at the dexterity_mod attribute of the token that is currently selected (so make sure a token is selected before running this!) to determine if the attribute is less than 8. This is perfect for determining pass/fail outcomes for anything within your game. Additionally, you can perform math operations on Roll Variables before and after any comparisons are made.
Example 4:
--?@"{targeted|name}" -inc "dwarf"|
This comparison will prompt the person running the script to select a target token by clicking on it on the tabletop. The Comparison will then check the name of the token to determine if it contains the phrase "dwarf"
ℹ️ Note: The use of double quotes around the variable and the comparison phrase, since the targeted creature's name could contains spaces. Since it would be painful to check ahead what creature names might be involved in this script one day, double quotes surround the variable and the value we're comparing it against to rule out potential future issues with spaces. A quick and easy way to future-proof this type of comparison!
Comparators
The following comparison operators are available for use in the equation portion of the syntax to achieve a True/False evaluation:
[Expand/Collapse Comparators]
| Comparator | Meaning | Works on Numbers |
Works on Text |
Case Sensitive for Text |
|---|---|---|---|---|
| -eq | Equal To (Case Sensitive) | Yes | Yes | Yes |
| -eqi | Equal To (Not Case Sensitive) | Yes | Yes | No |
| -ne | Not Equal To (Case Sensitive) | Yes | Yes | Yes |
| -nei | Not Equal To (Not Case Sensitive) | Yes | Yes | No |
| -gt | Greater Than (numeric strings only) | Yes | No | N/A |
| -ge | Greater Than or Equal To (numeric strings only) | Yes | No | N/A |
| -lt | Less Than (numeric strings only) | Yes | No | N/A |
| -le | Less Than or Equal To (numeric strings only) | Yes | No | N/A |
| -inc | Includes (Not Case Sensitive). | Yes | Yes | No |
| -ninc | Does Not Include (Not Case Sensitive). | Yes | Yes | No |
| -csinc | Includes (Case Sensitive). | Yes | Yes | No |
| -csninc | Does Not Include (Case Sensitive). | Yes | Yes | No |
| -match | Regex Match (Case Sensitive). | Yes | Yes | No |
| -imatch | Regex Match (Not Case Sensitive). | Yes | Yes | No |
Branch Types
After the equation, there are several types of branching behavior that you can choose from in order to utilize the results of the equation's comparison. Generally speaking, one of two execution paths will be taken, based on the equation returning True or False. These execution paths are detailed in the content section of the statement. The "If True" path is required and is specified first (directly after the vertical bar). The Optional "If False" path is specified after "If True" path, and is also separated by a vertical bar. The details of the different branch types are in the table below, along with examples of syntax.
Example:
  --?[$AttackRoll.Total] -ge [$TargetAC] | Hit     | Miss
     | ---- ----  (Equation)  ----  ---- |If True) |If False)
The following Branch types can be utilized after the equation to achieve the results you desire. Remember that the False path is optional, which affords an incredible amount of flexibility in how you evaluate conditions and subsequently act on results.
[Expand/Collapse Branch Types]
| Branch Format |
Meaning |
|---|---|
| :Label | If just a label is specified, execution will branch to that label when the comparison is matched. NOTE: You cannot use a standard Return ( --<|) statement to return to the Conditional (--?) statement if you use the default branch label syntax. Use a >Label syntax (below) instead.Example: --?[$AttackRoll.Total] -ge [$TargetAC] |Hit |Miss
|
| >Label | If a label name is preceded by a ">" character, a gosub branch will be performed. In this case, parameters can be passed to the subroutine by separating them from the label and each other with semicolons (;). Parameters that can contain a semicolon (like token/character IDs) should be surrounded by double quotes. Example: --?[$AthleticsRoll.Base] -gt 8 |>AthleticsSuccess;@{selected|athletics} |>AthleticsFailed;@{selected|strength}
|
| =VariableName | The roll variable "VariableName" will be assigned the value following a semicolon (for example, the code "=Roll;1d20" will roll 1d20 and assign the result to a variable named "Roll", if the condition is true). Example: --?@{selected|strength} -le 7 |=StrengthCheck;1d20+@{selected|strength_mod} |=DexCheck;1d20+@{selected|dexterity_mod}+2
|
| &VariableName | The string variable "VariableName" will be assigned the value following a semicolon (for example, the code &Result;Hit will assign the value "Hit" to a variable named "Result", if the condition is true).Example: --?@{selected|wisdom} -lt 10 |&fInterpret;You immediately recognize that you won't be able to interpret the sigils without years of study. |&Interpret;It takes some time but you're able to interpret the sigils.
|
| % or %! | The current for...next loop will perform the "next" action (%) or will break out (%!). Will not directly initiate a sub-level loop though. Example: --?[$StrengthCheck.Total] -gt 5 |% |%!
|
| [ | Code block Example: (see Code Block section below) |
| As of ScriptCards v2.1.7+ | |
| < | Return from the currently executing subroutine and continue processing the script from the line after the branch that sent the script to this line. Example: --?"[&Fruit]" -eq "Tomato" |<
|
| +Tag;Content | Create a Direct Output line (ie, --+) with the Tag portion in bold and the Content portion in normal text.Example: --?@{selected|strength} -le 4 |+Strength results:;Your strength is not great enough to overcome the boulder |+Strength results:;With some effort you finally wrestle the boulder out of the way.
|
| *Tag;Content | Create a GM-Only Output line (ie, --*) with the Tag portion in bold and the Content portion in normal text.Example: --?@{target|dexterity} -lt 5 |*GM Note:;Player dexterity is much lower than the intended success value of 7.
|
| Fun Fact! | Prior to version 1.2.1, all conditional statements resulted in either a branch to a label statement, or a gosub branch. As of version 1.2.1 additional options for what happens when a condition is matched were added, and 1.2.5 adds further additional functionality. |
Additional Examples:
Example 1)  --?[$AttackRoll.Base] -eq 20 |CriticalHit
Example 2)  --?[$AttackRoll.Base] -eq 1 |>Fumble;@{selected|dexterity_mod}
Example 3)  --?"@{target|npc_type}" -inc "undead" |&MonsterType;Undead |&MonsterType;Not Undead
Example 4)  --?[$Attack.Total] -ge [$ArmorClass] |>Hit |>Miss
Example 1: If the Base value of AttackRoll is a 20 (natural 20 on the die) execution will branch to the CriticalHit label, otherwise the execution will proceed directly to the next line of the script.
Example 2: If the Base value of the AttackRoll is 1 a gosub branch will be executed to the "Fumble" label, and passed the value of the selected character's dexterity_mod as parameter [%1%].
Example 3: If the npc_type attribute of the targeted character is "undead", the MonsterType string variable will be set to "Undead", otherwise it will be set to "Not Undead".
Example 4: Calls the "Hit" procedure on a hit and the "Miss" procedure on a miss and return execution to the next line after the procedure calls were finished.
Text that does (or could) contain a space should be enclosed in double quotes.
Multi-part Conditionals
Multi-part conditionals are supported with -and and -or as separators. For example:
--?[$Attack.Total] -ge @{target|npc_ac} -and [$Attack.Base] -ne 20|HitButNotCrit
Multi-part conditionals are evaluated from left to right, and each evaluation is either ANDed or ORed with the current cumulative state. This means that (assuming "true" and "false" are actually conditional expressions that evaluate to either true or false):
true AND false OR true
Will be evaluated as True because the first true and false will be false, but then false OR true that remains will be true.
Conversely:
true or false and false
Will be False, because the first true or false will evaluate to true, and then true and false will be false.
Code Blocks
A new feature (1.2.7), code block allow you to treat a group of statements as a single unit based on a condition. This is similar to begin...end or curly braces in some languages, though a bit more limited. As part of the true or false execution branch of a conditional, you can use the "[" character to begin a code block.
If that execution path is taken, the code in the block will be executed. Otherwise, the code in the block will be skipped. Blocks are completed with the --]| statement, and can optionally include an "else" block by using --]|[ as the block terminator. Here is an example:
!script {{
  --=Roll|1d2
  --+Roll|[$Roll]
  --?[$Roll.Total] -eq 2|[
    --&Value|Yep!
    --+|We are inside the TRUE portion of the block
  --]|[
    --&Value|Nope
    --+|We are inside the FALSE portion of the block
  --]|
  --+After|the blocks!
  --+Value|[&Value]
}}
In this case, we begin by rolling 1d2 and then use a conditional to see if the result is 2. if it is, we execute everything inside the code block that begins on the conditional line, up until the end of the block marked with --]|[ because we have an "else" block. The else block is terminated with --]|.
At this time, blocks cannot be nested, and can only be created as part of a conditional (--[ is not a valid statement type)
A conditional statement does not produce a line of output on the card.
Case Statement (--c)
For more information related to Case statements check out the sections on Variables and Referencing
The case statement (--c) allows you to specify a value to test as the tag and a list of possible matches. These matches are case-insensitive. Matching groups are separated with vertical bars and matches and their branch labels are separated by a colon (:). It is also allowable to use Roll Variable or String Variable assignment syntax instead of a branch label, just as with the --? statement. If none of the values are matches, the script will simply proceed onto the next line. Both direct and procedure branches are supported, and procedure branches can include parameters as normal.
Example 1:
!script {{
    --#title|Case Statement Testing
    --=Roll|1d4
    --C[$Roll.Total]|1:>One;[$Roll]|2:>Two;[$Roll]|3:>Three;[$Roll]|4:>Four;[$Roll]
    --X|

    --:One|  --+Value|was One ([%1%])  --<|
    --:Two|  --+Value|was Two ([%1%])  --<|
    --:Three|  --+Value|was Three ([%1%])  --<|
    --:Four|  --+Value|was Four ([%1%])  --<|
}}
This script uses the value of [$Roll.Total] and compares it against 1, 2, 3, and 4, using a gosub branch to the matching value. The first match test is 1:>One;[$Roll], where 1 is the value being matched, followed by a procedure branch to One which gets the Roll roll variable as a parameter. As a further example, the case statement below uses the value of a roll query to assign a Roll Variable based on the query result:
Example 2:
--c?{Difficulty|10|20|30|40}|10:=BonusHealing;0|20:=BonusHealing;10|30:=BonusHealing;30|40:=BonusHealing;50
The $BonusHealing variable will then contain either 0, 10, 30, or 50 depending upon the user's choice.
Using this syntax, the first example in this section (Example 1) could be rewritten as:
!script {{
    --#title|Case Statement Testing
    --=Roll|1d4
    --C[$Roll.Total]|1:&Result;One|2:&Result;Two|3:&Result;Three|4:&Result;Four
    --+Value|was [&Result] ([$Roll.Raw])
}}
Instead of branching to various section labels, this revised example assigns the string variable &Result to "One", "Two", "Three", or "Four", depending on the output of the roll, and displays it along with the $Roll itself.
Save and Load: Persistent Data Storage (--s) and (--l)
In Scriptcards version 2.6.0 released on Jan-6-2024, updated and enhanced functionality was introduced for saving and loading data to persistent storage. This update is considered experimental until it has undergone thorough testing for at least a few weeks, and it will not be submitted to the OneClick library until the experimental period is over. For the meantime, you can get the latest version from the Scriptcards GitHub repository. The original method of saving and loading data will remain supported by Scriptcards. This updated and enhanced functionality is in addition to the original method.
Original Method of Saving and Loading
This statement pair is used to either store (--s or load (--l) data from persistent storage. Items stored in persistent storage remain between card rolls and between Roll20 sessions. There are three types of data that can be stored:
--sSetTInGs and --LsetTINgs) are not case sensitive, the label you provide for storing information is![Expand/Collapse Save & Load Info]
| Command to Save (--s) |
Command to Load (--l) |
Notes |
|---|---|---|
| --Ssettings Lines starting with --# |
--Lsettings Lines starting with --# |
Saving Settings (--Ssettings) (--Lsettings), will save the --# lines that are used throughout a Scriptcards script. A great use for saving Settings is to create "templates" for the appearance and layout of various Cards saving the trouble of having to remember or keep notes nearby that document your favorite combinations of layouts, sizes, colors, fonts, etc. Make sure to keep a separate backup, just in case something happens to the Roll20 servers or website that causes the stored settings to become lost or corrupted. This particular storage command works by identifying any Settings (aka parameters) that are overridden from the default base values and captures the setting name and the updated value, saving that information under whatever name you assign in the tag section part of the command.
For Example: Let's say you changed the title and subtitle by putting |
| --SrollVariables Lines starting with --= |
--LrollVariables Lines starting with --= |
When Roll Variables are saved, all roll variables that exist in the currently executing script will be saved under the name listed in the tag section of the command. When loading roll variables, the saved variables will be appended to any variables already on the current card. Loaded variables will overwrite any existing variables that have the same name as variables already defined in the scriptcard that the variables are loaded to). This means it is safe to create roll variables before the load statement. For more information on Roll Variables, please check this article in the wiki: Roll Variables (--=) |
| --SstringVariables Lines starting with --& |
--LstringVariables Lines starting with --& |
When String Variables are saved, all string variables that exist in the currently executing script will be saved under the name listed in the tag section of the command. When loading string variables, the saved variables will be appended to any variables already on the current card. Loaded variables will overwrite any existing variables that have the same name as variables already defined in the scriptcard that the variables are loaded to). This means it is safe to create roll variables before the load statement. For more information on String Variables, please check this article in the wiki: String Variables (--&) |
Examples of Syntax
This example demonstrates how to save different types of data.
--Ssettings|GreenStyle
--Srollvariables|FirstCardVars
--Sstringvariables|FirstCardStringVars
Here's how to load the data that was saved in Example 1 above.
--Lsettings|GreenStyle
--Lrollvariables|FirstCardVars
--Lstringvariables|FirstCardStringVars
This command calls up a GUI that allows you to review and manage the settings you have stored.
!sc-liststoredsettings
ℹ️ Note: Anything saved using the expanded methods will be reviewed in a different way, discussed below where the expanded method is discussed.
Practical Application Examples
The primary intended use of persistent storage is for consistent formatting across multiple cards, as shown below:
!scriptcard {{
  --#titlecardbackground|#22CC22
  --#oddrowbackground|#cceecc
  --#evenrowbackground|#99ee99
  --Ssettings|@{selected|token_name}
}}
--Lsettings|@{selected|token_name}
Enhanced methods of Saving and Loading data
As of Scriptcards version 2.6.0 saving and loading data to persistent storage has received an update that provides expanded functionality. In order to tap into the expanded functionality you must:
1. Create a dedicated "mule character" specifically named "ScriptCards_Storage".
This name is case sensitive, so be sure to note the capital letters.
2. Once you've created the properly named mule character you must then restart the API sandbox via the console page.
Saving data still begins with --s and Loading data still begins with --l; but with the expanded functionality, various data types can be specified with their respective symbols. All data will be saved to the mule character ScriptCards_Storage, so you can manage or review the stored data by reviewing the storage character sheet. Items stored in this way are stored in attributes on the Storage character. You can transmog this character into other games as needed and all of your stored data will be preserved.
Syntax: --s(symbol)[optional prefix]|[Optional list of items to save, separated by semicolons (;)]
[Expand/Collapse Save & Load Info]
| Command to Save (--s) |
Command to Load (--l) |
Attribute Prefix |
Notes |
|---|---|---|---|
| --s$ | --l$ | SCR_ | This is for saving and loading Roll Variables. |
| --s& | --l& | SCS_ | This is for saving and loading String Variables. |
| --s@ | --l@ | SCA_ | This is for saving and loading Arrays. |
| --s: | --l: | SCH_ | This is for saving and loading HashTables Note: Hash Tables are newly introduced in update 2.6.0 |
| --s# | --l# | SCT_ | This is for saving and loading ScriptCards Settings |
Examples of Syntax
This example demonstrates how to save multiple variables of the same type.
!script{{
--=MyFirstRoll|1d20
--=MySecondRoll|1d10
--=MyThirdRoll|1d5
--=Number1|1d3
--=Number2|1d3
--=Number3|1d3
--s$|MyFirstRoll;MySecondRoll;Number3
}}
This example shows how to save selected roll variables from within a script. Three variables are saved: MyFirstRoll, MySecondRoll; Number3.
❗ Important: The normal variable referencing is not used (i.e. [$MyFirstString]) as this would be replaced with the actual value of MyFirstString. We need to refer to the variable name itself.
The optional prefix can be used to store multiple variables with the same name - perhaps for different characters, scripts, etc.
--s&fred|charactername
Would store the variable on the character sheet in an attribute named "SCS_fred-charactername", while leaving the prefix off would store the variable as "SCS_-charactername". The various variable types have their own "SC" prefix, so different variable types with the same name won't collide. Ex. "SCS_-attack" is a string variable called attack, while "SCR_-attack" is a roll variable.
The types are:
- SCR_ - Roll Variable
- SCS_ - String Variable
- SCA_ - Array
- SCH_ - Hash Table
- SCT_ - ScriptCards Setting
Visual Effects (--v)
The --v statement allows you to create visual effects on the VTT. The tag portion of the statement (before the |) specifies the location of the effect. The standard statement format for --v is:
--v<Location Specifier>|< X Y | Token_ID | Token_ID Token_ID> <Effect Specifier> [moveall]
Location Specifiers
There are three potential location specifiers, each of which requires a different number/type of parameters, which are passed in the content portion of the command:
Location Specifier Effect Location Effect Types Notes point X and Y Coordinate on the map specified by first two parameters of content bomb, bubbling, burn, burst, explosion, glow, nova, ping* and custom** Upper left corner of the map is 0 0 token The center point of a specified token (by Token ID) bomb, bubbling, burn, burst, explosion, glow, nova, ping* and custom** None betweentokens Used for line-stlye effects. Two Token IDs are required beam, breath, missile, splatter and custom** First token will be the effect source, and second token determined the direction
(* see notes on the ping specifier below)
(** Custom effects can be created in the Roll20 VTT and their names can be used as specifiers for effects)
Effect Specifiers
Roll20 provides 11 pre-defined effect types and 11 pre-defined effect colors. An effect specifier is comprised of a type, followed by a dash (-), followed by the color:
  burst-fire
  explosion-magic
  breath-acid
Available effect types: beam*, bomb, breath*, bubbling, burn, burst, explosion, glow, missile*, nova, splatter*
(* These effects are line/direction based and only function with the betweentokens location specifier)
Available effect colors: acid, blood, charm, death, fire, frost, holy, magic, slime, smoke, water
Note: Effect types and colors are case sensitive (all lower case).
Examples:
  --vpoint|250 250 explosion-magic
  --vtoken|@{selected|token_id} nova-water
  --vbetweentokens|@{selected|token_id} @{target|token_id} beam-acid
Pings
As of version 2.0.0, it is now possible to use "ping" as a special type of effect specifier. When used, the VTT will ping the given location (either an X/Y coordinate or the center point of a given Token_ID). This is the same effect that users can create by holding down their mouse button at a location on the map. It is also possible to specify the "moveall" modifier at the end of the command to re-center all player's views on the pinged location.
Examples:
  --vtoken|@{selected|token_id} ping
  --vpoint|150 150 ping moveall
Audio Effects (--a)
The --a statement plays an audio track from your Roll20 jukebox by name. The content value of the statement specifies the case-sensitive name of the track to play. If the jukebox track does not exist, no sound will be played, and a warning will be output to the API console log indicating the missing track.
--a|< Jukebox Track Name>
Example:
  --a|SwordHitSound
  --a|Woodland_Exploration_Ambient
No external APIs are required.
Echo to Chat (--e)
The echo statement is simply a call to the API's sendChat command, using the tag as the speakingAs parameter and the content as the text to send.
--e[Speaking As]|[ Text to Speak ]
Example:
--eThe Ghost|/em hovers around @{selected|character_name}... BOO!
Would output "The Ghost hovers around (charactername)... BOO!" as an emote to chat. This will happen whether or not you have a character named "The Ghost" in your journal or not (roll20 sees this message as coming from the API, not from a player or a character).
Whispering
You can use the echo statement to send a whisper, but there's a trick to it. If you execute this code here:
--eThe Ghost|/w ExamplePlayerName Boo.
Then the player named "ExamplePlayerName" would see on his screen a whisper from "The Ghost" that says "Boo."... but you would not see anything on your screen! And you wont see anything on your screen no matter what you try to replace "The Ghost" with... not even if you try to use "GM" or your own player name. Because, again, roll20 sees the message as coming from the API, not from a player or a character.
So, in conclusion, it's best to use something like this when you're sending a whisper:
!script {{
  --#hidecard|1
  --&sender|The Ghost
  --&receiver|ExamplePlayerName
  --&message|Boo.
  --e[&sender]|/w [&receiver] [&message]
  --eScriptCards|/w gm **Whispered from [&sender] to [&receiver]:** [&message]
}}
This will ensure that the message appears in your chat feed as well.
Repeating Section Access (--R)
See the Referencing-section for information on referencing repeating section content
Roll20 provides a mechanism for character sheet authors to allow for entries for data types that can be repeated on the same sheet via Repeating Section rows (ex, weapons, actions, inventory, etc.) Repeating sections can potentially be one of the most complicated and confusing Roll20 systems to work with, and ScriptCards tries to streamline this process via the --R statement type.
--r<subcommand>|<parameters>
In the examples below, the following terms will be used:
- Sub Command - This specifies exactly what you want the
--Rcommand to do - Character_Id - Refers to the internal ID associated with a character. One method for retrieving the ID is
@{selected|character_id} - Section Prefix - Repeating sections each have a prefix name associated with the section. For example, in the D&D 5E by Roll20 sheet,
repeating_attackis the section prefix for the portion of the player character sheet that contains any defined attack options. For NPCs,repeating_npcactionis the section prefix for NPC Actions. Note that these will be character sheet specific. - Repeating Row - A repeating section can contain 0 or more rows. Each row contains all of the information for a given entry in the section.
- Row Index - Rows in a repeating section are numbered starting at 0, and often referenced in the chat window as
@{selected|repeating_attack_$0_atkname}or something similar. The 0 in this case represents the index of the first row in the section. - Field - A repeating section row consists of any number of fields, specifying entries like name, damage, range, and the like.
- SearchText - Represents a string that you will be looking for in a field.
Working with Repeating Section data
ScriptCards handles repeating sections by loading a single row from a single repeating section into memory at a time and then allowing you to reference the fields associated with that row. You can move through the rows in a section sequentially, by index, or by searching for a particular item.
There are several subcommands available when using the --R statement:
Sub Command Parameters Description first Character_Id;Section Prefix Loads the first row from the repeating section defined by Section Prefix into memory next none Loads the next row from the current section into memory (used after --Rfirst) find Character_Id;SearchText;Section Prefix;Field Searches the "Section Prefix" repeating section looking for "SearchText" in the field named "Field" and loads the matching row into memory search Character_Id;SearchText;Section Prefix;Field same syntax as --rfind, except that it will do a case-insentitive partial match. This is converted to a regex, so if you need to find special regex characters (like +), prefix them with a "\". byindex Character_id;Section Prefix;Index Loads the entry matching "Index" from the Section Prefix repeating row into memory bysectionid Character_id;Section Prefix;Section ID Loads the entry matching "Section ID" from the Section Prefix repeating row into memory. Section IDs are standard Roll20 strings, and may be referenced from other repeating sections. For example, the 5E sheet's repeating_attacks have an itemid attribute that refers to the repeating_inventory list. If you add ;1 to the end of the parameter list, the search will be case-insensitive dump none Outputs all of the available fields for the loaded repeating section row to the Mod Scripts console for debugging or research
Example 1:
--Rfind|@{selected|character_id};Greatsword;repeating_attack;atkname
Will look at the character's repeating_attack section for an entry with an atkname value equal to "Greatsword".
Example 2:
--Rfind|@{selected|character_id};Bite;repeating_npcaction;name
Will look for a "Bite" action on the character's repeating_npcaction list.
Example 3:
--Rfirst|@{selected|character_id};repeating_attack
Would load the character's first repeating_attack row into memory.
Example 4:
--Rnext|
No parameters are required for --Rnext, which loads the next entry in the list that was obtained with "first" into memory.
Example 5:
--Rbyindex|@{selected|character_id};repeating_attack;4
Loads the character's 5th repeating_attack entry into memory. (NOTE: index numbers start at 0 to match Roll20's $X numbering system.)
Section prefixes and how to use them
To see the complete list of the section prefixes for the "D&D 5E by Roll20" character sheet, as well as a nice explanation for how to use them, please refer to the D&D 5E by Roll20 wiki page that includes a section of info on repeating sections.
For other character sheets, you will need to view the documentation on those sheets, or examine the character sheet code live through Browser Developer Tools, or go look at the sheet sourcecode if it's available on the character sheet repository.
Additional information
- However a row is obtained, it will be parsed to replace any attribute references (ie,
@{level}) with the corresponding character attribute. - If at any point a valid entry isn't found (find doesn't find something, first doesn't see any rows, or next goes off the end of the list) any attempts to reference the row data will return "NoRepeatingAttributeLoaded".
- You can reference repeating attribute data using the syntax
[*R:attributename]syntax (similar to referencing standard character attributes).
Examples:
Example 1: This example will display the details of the "Greatsword" PC attack:
!script {{
 --Rfind|@{selected|character_id};Greatsword;repeating_attack;atkname
 --+Attack Name|[*R:atkname]
 --+Base Damage|[*R:dmgbase]
}}

Example 2: This example will list all of the actions an NPC can take (just actions, not legendary, etc.)
!script {{
 --#title|NPC Actions
 --#sourcetoken|@{selected|token_id}
 --Rfirst|[*S:character_id];repeating_npcaction
 --?"[*R:name]" -eq "NoRepeatingAttributeLoaded"|END

 --:NPC_Action_Display|
 --+[*R:name]|[*R:description]
 --Rnext|
 --?"[*R:name]" -ne "NoRepeatingAttributeLoaded"|NPC_Action_Display

 --:END|
}}
In the script above, we get the "first" repeating_npcaction and check to make sure it exists (ie, [*R:name] doesn't return "NoRepeatingActionLoaded". As long as we have a valid repeating row, we display the name and description of the action.We then execute "next" and repeat until we run into "NoRepeatingAttributeLoaded", indicating that we have run out of repeating_npcaction rows.
See Repeating Section Values for more information.
Special debugging command: dump
--Rdump|
The "dump" command will list all of the attributes ScriptCards knows about for the currently loaded repeating row to the API Console Log.
Built-In Functions (--~)
ScriptCards has the ability to run a function built into the API script and return the results to a variable by using --~ calls. Some functions return roll variables, while others return strings. Functions are grouped into several different categories. There are a handful of functions without a category, in which case the category is omitted from the call.
General Syntax:
--~[Variable Name]|[Category];<Function>;[parameter];[parameter]...
Function Descriptions
The section below is a work in progress to document each function fully instead of relying on the huge table further down with limited details.
Functions are called with the --~ command and follow the syntax:
--~[Variable Name]|[Category];<Function>;[parameter];[parameter]...
In the function descriptions below, the following will be stated for each function:
- Purpose: What the function does
- Returns: What (if anything) is return in the [Variable Name] variable, including the variable type (RollVariable or StringVariable)
- Syntax : How to call the function
- Params : The meaning of each of the parameters
Each function (with the exception of a handful of the earliest implemented functions) are grouped into categories by the object or entity types they deal with.
Array Functions
Array functions either return/generate an array, manipulate an array, or return parts of an array as a variable.
Elementary Array Functions
Note: these array-related functions are holdovers from the original array implementation. They are all still available, but may haven been superseded by better methods. This will be indicated along with each function.
Array functions are part of the "array" category.
define Array Function
- Purpose: Creates an array from the values passed into the function.
- Returns: Unused
- Syntax : --~|array;define;arrayname;Value1;Value2;Value3...
- Params : The "arrayname" parameter determines the name of the array that will be created. Each parameter after the arrayname represents an item that will be included in the array.
Example:
--~|array;define;Fruits;Lemon;Peach;Mango;Watermelon
The above example will create an array named Fruits (or empty/recreate if the Fruits array already exists). The array will contain 4 items (Lemon, Peach, Mango, and Watermelon)
Notes: Arrays can now be created without the need for a function call by assigning with the --& command (or conditional branch assignment):
--&fruits(9999)|Peach
--&fruits(9999)|Mango
--&fruits(9999)|Watermelon
Will create the same array as the function above. Supplying a sufficiently large index (ie, 9999) with ensure that the value is always added to the end of the array.
add Array Function
- Purpose: Adds items to an existing array.
- Returns: Unused
- Syntax : --~|array;add;arrayname;Value1;Value2;Value3...
- Params : The "arrayname" parameter determines the name of the array that will be updated. Each parameter after the arrayname represents an item that will be added to the array. If the array does not exist, it will be created.
Example:
--~|array;add;Fruits;Grape;Lime;Dragonfruit
The above example will add three items to the Fruits array (Grape, Lime, and Dragonfruit).
Notes: Items can now be added to arrays without the need for a function call by assigning with the --& command (or conditional branch assignment):
--&fruits(9999)|Grape
--&fruits(9999)|Lime
--&fruits(9999)|Dragonfruit
- Will update (or create) the Fruits array, adding the three items to the end of the array.
remove Array Function
- Purpose: Removes items (by value) from an array.
- Returns: Unused
- Syntax : --~|array;remove;arrayname;Value1;Value2;Value3...
- Params : The "arrayname" parameter determines the name of the array that will be updated. Each parameter after the arrayname represents an item that will be removed from the added to the array if it exists.
Example:
--~|array;remove;Fruits;Lime
The above example will remove the Lime entry from the Fruits array (if it exists).
replace Array Function
- Purpose: Searches an array for a given item (by value) and replaces all occurrences of it with a new value.
- Returns: Unused
- Syntax : --~|array;replace;arrayname;SearchValue;ReplaceValue
- Params : The "arrayname" parameter determines the name of the array that will be updated. The SearchValue parameter is the item that will be searched for in the array, with all instances being replaced by the ReplaceValue.
Example:
--~|array;replace;Fruits;Grape;Pear
The above example will replace Grape in the Fruits array with Pear (if it exists).
getfirst Array Function
- Purpose: Each array stores an internal index to the current item in the array. Note that this method of traversing arrays is outdated and the index can generally be ignored by using other array access methods. Note that this function sets the current index for the array to 0. This function gets the value of the entry at the first array position and places it in a string variable named with the Tag
- Returns: String Variable
- Syntax : --~stringvariable|array;getfirst;arrayname
- Params : "stringvariable" is the name of a string that will be created with the return value in it. The "arrayname" parameter specifies the array that will be examined.
Example:
--~|array;define;Fruits;Lemon;Peach;Mango;Watermelon
--~Item|array;getfirst;Fruits
--+Fruit|[&Item]
In this example, we define to Fruits array as above and use "getfirst" to set the index to item 0 and return its value ("Lemon") to the StringVariable "Item".
getlast Array Function
- Purpose: Each array stores an internal index to the current item in the array. Note that this method of traversing arrays is outdated and the index can generally be ignored by using other array access methods. Note that this function sets the current index for the array to the last position in the array. This function gets the value of the entry at the last array position and places it in a string variable named with the Tag
- Returns: String Variable
- Syntax : --~stringvariable|array;getlast;arrayname
- Params : "stringvariable" is the name of a string that will be created with the return value in it. The "arrayname" parameter specifies the array that will be examined.
Example:
--~|array;define;Fruits;Lemon;Peach;Mango;Watermelon
--~Item|array;getlast;Fruits
--+Fruit|[&Item]
In this example, we define to Fruits array as above and use "getlast" to set the index to item 3 and return its value ("Watermelon") to the StringVariable "Item".
getcurrent Array Function
- Purpose: Each array stores an internal index to the current item in the array. Note that this method of traversing arrays is outdated and the index can generally be ignored by using other array access methods. This function gets the value of the entry at the current index and places it in a string variable named with the Tag
- Returns: String Variable
- Syntax : --~stringvariable|array;getfirst;arrayname
- Params : "stringvariable" is the name of a string that will be created with the return value in it. The "arrayname" parameter specifies the array that will be examined.
Example:
--~Item|array;getcurrent;Fruits
--+Fruit|[&Item]
In this example, we use the current index in the Fruits array return its value to the StringVariable "Item".
getnext Array Function
- Purpose: Each array stores an internal index to the current item in the array. Note that this method of traversing arrays is outdated and the index can generally be ignored by using other array access methods. This function advances the index in the array and gets the value of the entry at the new index and places it in a string variable named with the Tag. If the array has run out of entries, the value "ArrayError" will be returned.
- Returns: String Variable
- Syntax : --~stringvariable|array;getnext;arrayname
- Params : "stringvariable" is the name of a string that will be created with the return value in it. The "arrayname" parameter specifies the array that will be examined.
Example:
--~Item|array;getnext;Fruits
--+Fruit|[&Item]
In this example, we advance the index in the Fruits array and return the new position's value to the StringVariable "Item".
getprevious Array Function
- Purpose: Each array stores an internal index to the current item in the array. Note that this method of traversing arrays is outdated and the index can generally be ignored by using other array access methods. This function moves the index backwards one entry in the array and gets the value of the entry at the new index and places it in a string variable named with the Tag. If the array index tries to move before the first item, the value "ArrayError" will be returned.
- Returns: String Variable
- Syntax : --~stringvariable|array;getprevious;arrayname
- Params : "stringvariable" is the name of a string that will be created with the return value in it. The "arrayname" parameter specifies the array that will be examined.
Example:
--~Item|array;getprevious;Fruits
--+Fruit|[&Item]
In this example, we move the index in the Fruits array back one entry and return the new position's value to the StringVariable "Item".
getindex Array Function
- Purpose: Each array stores an internal index to the current item in the array. Note that this method of traversing arrays is outdated and the index can generally be ignored by using other array access methods. This function returns the current index position (as a number starting at 0) in the supplied string variable.
- Returns: String Variable
- Syntax : --~stringvariable|array;getindex;arrayname
- Params : "stringvariable" is the name of a string that will be created with the return value in it. The "arrayname" parameter specifies the array that will be examined.
Example:
--~Location|array;getindex;Fruits
--+Index|[&Location]
In this example, we get the index in the Fruits array and return the index number StringVariable "Location".
setindex Array Function
- Purpose: Each array stores an internal index to the current item in the array. Note that this method of traversing arrays is outdated and the index can generally be ignored by using other array access methods. This function moves the index backwards one entry in the array and gets the value of the entry at the new index and places it in a string variable named with the Tag. If the array index tries to move before the first item, the value "ArrayError" will be returned.
- Returns: String Variable
- Syntax : --~|array;setindex;arrayname;newindex
- Params : The "arrayname" parameter specifies the array that will be examined. The "newindex" parameter specifies the value to set the index to.
Example:
--~|array;setindex;Fruits;2
In this example, we move the index in the Fruits to position 2.
Non-Categorized Functions
NOTE: The function table below will eventually be replaced by the description/detail information above.
The following functions do not have categories associated with them, and are called without listing a category.
Syntax:
--~[Variable Name]|<Function>;[parameter];[parameter]...
Table of Non-Categorized Functions:
[Expand/Collapse
Non-Categorized Functions]
| Function Name |
Parameters | Return Type |
Description |
|---|---|---|---|
| distance | token_A_ID;token_B_ID | rollVariable | Calculate the Chebyshev distance in grid units between two tokens. This is the measurement scheme D&D 4E/5E use for diagonal distance measurement |
| euclideandistance | token_A_ID;token_B_ID | rollVariable | Calculate the Euclidean distance between two tokens. This is essentially the Pythagorean theorem in action. Returns the result in grid units. |
| euclideanpixel | token_A_ID;token_B_ID | rollVariable | Calculate the Euclidean distance between two tokens and returns the result in pixels instead of grid units. |
| euclideanlong | token_A_ID;token_B_ID | rollVariable | Calculate the Euclidean distance between two tokens and returns the result in grid units, but the grid unit conversion is performed AFTER the pixel distance isCalculated instead of before. More accurate over long distances. |
| manhattandistance | token_A_ID;token_B_ID | rollVariable | Also called "taxicabdistance" (which is an acceptable function name), this measures to how-many-over, how-many-up/down distance, disallowing diagonal movement. |
| getselected | none | stringVariable | Using the variable name in the tag, a series of string variables will be created: VariableNameCount will contain the number of selected tokens. VariableName1 will contain the token ID of he first selected token, VariableName2 the second, etc. |
Examples:
This example uses a non-categorized function, returning the HowFarAway roll variable as the result:
--~HowFarAway|distance;@{selected|token_id};@{target|token_id}
Categorized Functions
Most ScriptCards functions are grouped into several major categories. The table below lists the function categories and their sub functions within each category.
Syntax:
--~[Variable Name]|<Category>;<Function>;[parameter];[parameter]...
Table of Categorized Functions:
[Expand/Collapse
Categorized Functions]
| Category Name |
Function Name |
Parameters | Return Type |
Description / Example |
|---|---|---|---|---|
| Categorized Array Functions | ||||
| array | define | arrayname;value1;value2;... | none | Creates an array called "arrayname" and adds value1, value2, etc. to the array |
| array | sort | arrayname(;descending-optional) | none | Sorts the specified array in place in ascending order (alphabetically). |
| array | numericsort | arrayname(;descending-optional) | none | Sorts the specified array in place in ascending order (numerically). |
| array | add | arrayname;value1;value2;... | none | Adds value1, value2, ... to the existing array "arrayname" |
| array | remove | arrayname;value1;value2;... | none | Removes value1, value2, ... from the existing array "arrayname". Resets the array index to 0. |
| array | replace | arrayname;currentvalue;newvalue | none | Replaces all occurrences of "currentvalue" in "arrayname" with "newvalue" |
| array | setatindex | arrayname;index;newvalue | none | Replaces the array item at index "index" with "newvalue" |
| array | getindex | arrayname | stringVariable | Retrieves the current index in "arrayname" and stores it in the supplied string variable |
| array | setindex | arrayname;newindex | none | Sets the current index in array "arrayname" to "newindex" |
| array | getcurrent | arrayname | stringVariable | Gets the item at the current array index in "arrayname" and returns it as a string variable. Will return "ArrayError" if there is no current item. |
| array | getnext | arrayname | stringVariable | Increments the current index in "arrayname" and returns the new current value. Will return "ArrayError" if the end of the array is reached. |
| array | getprevious | arrayname | stringVariable | Decrements the current index in "arrayname" and returns the new current value. Will return "ArrayError" if the the current index was already zero. |
| array | getfirst | arrayname | stringVariable | Set the current index of "arrayname" to zero and retrieve the current item. Will return "ArrayError" if there is no current item. |
| array | getlast | arrayname | stringVariable | Set the current index of "arrayname" to the last item in the array and retrieve the current item. Will return "ArrayError" if there is no current item. |
| array | removeat | arrayname;indexposition | none | Removes the item at index "indexposition" from "arrayname". Resets the current array index to 0. |
| array | indexof | arrayname;searchvalue | stringVariable | Searches the array "arrayname" for an item with the value of "searchvalue" and, if found, returns the index of the first matching value or "ArrayError" if not found |
| array | getlength | arrayname | stringVariable | Returns the number of items in array "arrayname" |
| array | pagetokens | arrayname;tokenid OR pageid;(optional filter) | stringVariable | Creates an array (arrayname) of all of the token ids (technically Graphics objects) on the same page as the specified token id or on the page matching the page id. Returns the number of tokens found to the stringVariable. Multiple filter values - separated by semicolons are supported. Filters are cumulative and can only remove items from the returned list. For example, specifying npc;pc will always return no results because the PCs will be removed when "npc" is processed, and the NPCs will then be removed by the "pc" filter. In addition to char, graphic, pc and npc filters you can specify attr, prop, and tprop filters. each of these filters can accept attribute/property name, and a comparator value. The property name and value are separated by = for an exact match or ~= for a partial match. The property name is case sensitive, but the match is not. (Ex: attr:npc_type~=undead) |
| array | selectedtokens | arrayname | stringVariable | Creates an array (arrayname) of all of the token ids (technically Graphics objects) selected when the script was executed. Returns the number of tokens found to the stringVariable. |
| array | stringify | arrayname(;separator-optional) | stringVariable | Returns all of the items in "arrayname" as a string separated by default semicolon (;) or the current #parameterdelimeter. New in 2.1.0, an additional parameter can be added that specifies the delimiter to be used. |
| array | fromstring | arrayname;delimiter;string | unused | Creates an array from "string", splitting "string" on "delimiter" to separate the items |
| array | statusmarkers | arrayname;tokenid | none | Creates an array (arrayname) of the active statusmarkers (sometimes called Token Markers) for the specified tokenid |
| array | objects:objectype | arrayname;filter | none | Creates an array (arrayname) of the IDs of game objects of the specified type that match the indicated filter. Note that "filter" is really just that the designated field starts with the specified value. The designated field is "name" for all objects with names. For other objects, the filter field is _displayname for players, title for jukeboxtracks, stroke (color) for paths, text for text and not supported for campaign, card, and hand objects. Filters are not case sensitive. |
| array | fromrepeatingsection | arrayname;charid;repsection name;field name | unused | Creates an array from the entries in the repeating section defined by repsection name, returning the values of field name as the elements in the array |
| array | fromtable | arrayname;tablename;"name", "image", or "both" | unused | Creates an array from the entries in a rollable table. "name" and "image" determine if the entry name or image URL is returned in the array. If "both" is specified, both components will be returned for each array element separated by a vertical bar. |
| array | fullrepeatingsection | arrayname;charid;repsection name;field1:field2:field...;sepsequence | unused | Creates an array from the entries in the repeating section defined by repsection name, returning the values of each field specified in the field list parameter (separated by colons). The values in the array entries will be separated by the sepsequence. |
| array | fromkeys | arrayname;hashtablename | unused | Creates an array with all of the keys in a given hashtable. |
| array | attributes | arrayname;charid;(optional 'name' starts with) | unused | Creates an array of Object IDs for attributes on a character. If the last parameter is specified, only attributes with names starting with that value will be returned. |
| array | fromrollvar | arrayname;RollVariableName;type | unused | Creates an array from the list-type items in a roll variable. The "type" can be "rolled", "kept", or "dropped" |
| Categorized Hashtable Functions | ||||
| hash | clear | HashTableName | none | This command will clear all entries from a hashtable. Note: This feature is introduced in ScriptCards version 2.6.2 on Jan-20-2024 and could change depending on further testing of the suite of functions and commands associated to the hashtable command (--h) introduced in version 2.6.0. Example: --~|hash;clear;MyHashTable
|
| hash | set | HashTableName;Key1==Value1;Key2==Value2;Key3==Value3;... | none | Creates the hashtable HashTableName with the Keys and Values provided. There is not a limit to the number of Key/Value pairs that can be used with this function. Example: --~|hash;set;Fruits;Mango-Cost==2sp;Mango-Size==Medium;Mango-Shape==Oblong;Mango-Avail-Spring==False;Mango-Avail-Summer==True;Mango-Avail-earlyAutumn==True;Mango-Avail-lateAutumn==False;Mango-Avail-Winter==False
|
| hash | fromobject | HashTableName;objecttype;objectid | none | Creates a hashtable with all of the attributes (except bio, notes, and gmnotes) of the given object with key/value pairs equal to the attribute names and values. |
| hash | getplayerspecificpages | HashTableName | none | Creates a hashtable with the contents of the Campaign's playerspecificpages object, which will have player IDs as keys and page IDs as values for those entries. |
| hash | setplayerspecificpages | HashTableName;objecttype;objectid | none | Will set the Campaign's playerspecificpages object. The source hash table should contain player IDs as keys and page IDs as values for them. Leave off the hash table name (but include the semicolon (;)) clear the value and return all players to the ribbon page. |
| hash | getjukeboxtracks | HashTableName | none | This will create a hash table with the names of every jukebox track as keys and their object ID. It will also create keys with TrackName-playing, TrackName-loop, and TrackName-Volume. Here is a simple jukebox/soundboard. |
| hash | fromrepeatingrow | characterID;sectionname;RowID;Hashtablename | none | Create a hash table with the content of a repeating section row on a given character |
| hash | fromrepeatingsection | characterID;sectionname;row name field;Hashtablename | none | This will create a hash table with the contents of each row of a repeating section for a given character. Includes _sectionid to identify each row |
| Categorized Math Functions | ||||
| math | angle | math;angle;tokenid;tokenid | rollVariable | Calculates the angle between two tokens and returns the value in degrees |
| math | ceil | math;ceil;value | rollVariable | Rounds value up to the next integer, dropping any decimal portion of the number |
| math | clamp | math;clamp;value;lowerBound;upperBound | rollVariable | Returns value, but restricted to the range of lowerBound and upperBound. |
| math | floor | math;floor;value | rollVariable | Rounds value down, dropping any decimal portion of the number |
| math | max | math;max;valueA;valueB | rollVariable | Returns the larger of valueA vs valueB |
| math | min | math;min;valueA;valueB | rollVariable | Returns the smaller of valueA vs valueB |
| math | round | math;round;value | rollVariable | Rounds value to the nearest integer |
| Categorized String Functions | ||||
| string | length | string;length;stringValue | rollVariable | Returns the length of stringValue in characters |
| string | before | string;before;searchText;stringValue | stringVariable | Searches stringValue for searchText and returns the portion of stringValue prior to that text |
| string | after | string;after;searchText;stringValue | stringVariable | Searches stringValue for searchText and returns the portion of stringValue after that text |
| string | left | string;left;count;stringValue | stringVariable | Returns the leftmost count characters of stringValue |
| string | right | string;right;count;stringValue | stringVariable | Returns the rightmost count characters of stringValue |
| string | replace | string;replace;searchText;replaceText;stringValue | stringVariable | Replaces searchText in stringValue with replaceText and returns the resulting string |
| string | replaceall | string;replaceall;searchText;replaceText;stringValue | stringVariable | Replaces all intances of searchText in stringValue with replaceText and returns the resulting string Requires 1.2.9+ |
| string | trim | string;trim;stringValue | stringVariable | Removes leading and trailing spaces from stringValue and returns the result. |
| string | substring | string;substring;start;count;stringValue | stringVariable | Returns count characters starting at start from stringValue |
| string | split | string;split;delimiter;stringValue | special | Splits stringValue into pieces, breaking it at delimiter. Returns a rollVariable with "Count" appended to the assigned variable name and a series of string variables with numbers appended (starting at 1) for each of the returned pieces. |
| string | tolowercase | string;tolowercase;stringValue | stringVariable | Converts the passed string to lower case and assigns to the passed variable name. |
| string | touppercase | string | stringVariable | Converts the passed string to upper case and assigns to the passed variable name. |
| string | totitlecase | string | stringVariable | Converts the passed string to title case (capitlaizes the first letter of each word) and assigns to the passed variable name. |
| string | onlynumbers | string | stringVariable | Returns only the number values from a string, preserving a leading - sign if it is the first non-whitespace character in the string. |
| string | nonumbers | string | stringVariable | Returns a string with all numeric characters (0 thru 9) removed. |
| string | linefeedstobr | string | stringVariable | Returns a string with any ASCII line feeds changed to HTML br tags |
| string | brtolinefeeds | string | stringVariable | Returns a string with any HTML br tags changed to ASCII line feeds |
| Categorized State Item Functions | ||||
| stateitem | write | stateitem;write;variableType | None | Writes the variable specified in the tag to persistent storage. Specify either rollvariable or stringvariable for variableType. One of each type can be stored in persistent storage at a time. |
| stateitem | read | stateitem;read;variableType | Depends on variableType | Reads the stored variable of the specified type (either rollvariable or stringvariable) and stores the result in a variable named for the line tag. |
| Categorized Turn Order Functions | ||||
| turnorder | clear | none | none | Clears all entries from the t Turn Tracker/Initiative |
| turnorder | addtoken | tokenid;trackervalue | none | Adds the token represented by "tokenid" to the initiative tracker with an initiative value of "trackervalue" |
| turnorder | replacetoken | tokenid;trackervalue | none | Replaces the token represented by "tokenid" in the initiative tracker with an initiative value of "trackervalue". Will add the token if it doesn't exist in the tracker. |
| turnorder | removetoken | tokenid | none | Removes the token represented by "tokenid" from the initiative tracker if it exists |
| turnorder | addcustom | textlabel;trackervalue;(optional)formula;(optional)relativeplacement | none | Add a custom text entry to the t Turn Tracker/Initiative named "textlabel" with an initiative value of "trackervalue". The available placement options are "top", "bottom", "before:tokenid", "after:tokenid" Ex: --~|turnorder;addcustom;My Fancy Custom Turn;99;-1;after:@{selected|token_id}
|
| turnorder | removecustom | custom name | none | Removes the custom turn order token matching the given name from the turn tracker |
| turnorder | sort | none or "a" or "u" | none | Sorts the turn order in descending numerical order unless the additional "a" or "u" parameter is set ("a"scending or "u"p). Version 2.1.1 |
| Categorized System Functions | ||||
| system | date | getdatetime | stringVariable | Returns the date time in the active timezone (see settings) |
| system | date | getdate | stringVariable | Returns the date in the active timezone (see settings) |
| system | date | gettime | stringVariable | Returns the time in the active timezone (see settings) |
| system | dumpvariables | "rolls", "string", or "array" | none | Dumps all of the defined variables of the indicated type to the console log |
| system | findability | system;findability;charactername;abilityname | stringVariable | Returns the object ID of the ability on the indicated character or "AbilityNotFound" |
| system | runaction | character_id;abilityname;param1;param2;param3;param4;... | stringVariable | ill look for an ability called "abilityname" (case sensitive) on character "charcter_id" and read the Action property of the ability. It will replace the text [REPL1], [REPL2]... and so forth with the parameters passed in param1, param2, etc. The sequence -_-_ will be replaced in the final macro, allowing you to potentially add lines to anything that uses -- to separate parameters, etc. Note that the calls are issued by the API, so there is no current player, so interactive scripts will not do anything (ie, targets, roll queries, etc.) but if the action you are using takes ids, you can pass them as [REPL] items. |
Examples:
This example uses a function in the turnorder category. There is no return value for the turnorder/addtoken function:
--~|turnorder;addtoken;@{selected|token_id};5
Information Request (--i)
An Information Request statement allows your script to pause and “ask” the user for additional input. The statement type is --i, and uses the Tag portion of the statement to define a prompt to the user and the caption of a button that will be displayed for the user to press to provide additional information. The content portion of the line is made up of a series of information request in the format type;VariableName;PromptText, with each request separate by double vertical bars.
--i<Text Prompt>|< Type;VariableName;Prompt >...
ScriptCards will use the display text and the button caption to whisper the script sender a message with a button to click that can ask for information via roll queries or ask for targets to be selected. Multiples of each type and combinations are allowed. The result of each information request will be stored in a string variable matching the VariableName parameter for that request.
After the user has clicked the button and responded to the requests, ScriptCards will resume processing the script from where it left off.
Here is an example “i” line:
--IScriptCards needs additional information to continue;Click to select a target and provide information|t;MyNewTarget;Missile1Target||q;MyNameIs;What is your name?
The sample above will whisper the user "ScriptCards needs additional information to continue" and provide a button labeled "Click to select a target and provide information". When the user clicks the button, they will be requested to select a target labeled Missile1Target and a prompt will appear asking that they enter their name into a text field.
Supported information request types are “t” for target token, and “q” for query.
For “t” types, specify the variable name to store the token ID in as the second parameter and the prompt text that will appear in the “Choose Target” window (i.e. Choose Target: Missile1Target above).
For “q” types, specify the variable name to store the response in as the second parameter, and the text of the roll query without the ?{} identifiers. You can specify values for dropdowns, etc. For example:
q;UserName;What is your name?|Fred|Bob|Sally|Nancy
Would have a dropdown menu with four choices.
Object Modification (--!)
ScriptCards supports direct manipulation of object properties within your script. While updating object properties is possible by utilizing the --@ command to call external Mod (API) scripts, the biggest advantage of doing this directly through ScriptCards is that the modifications to the objects take place immediately, so reading values back works as you would expect.
As of version 2.1.7, Object modification statements now support the ability to modify any type of object by specifying the object type and object id in the tag portion of the statement. Note that very little checking is done on this (if the property you are setting is imgsrc, the image source will be reformatted per Roll20 requirements).
General syntax for Modifying Objects:
--!<objectType>:<objectId>|[setting:value]|[setting:value]|[setting:value]...
objectType
You can fill in the objectType with anything in the following table. For any objectTypes with a shortcut, you can reference the shortcut instead of the complete objectType name.
Object Type Shortcut Object Type Shortcut Object Type Shortcut ability b attribute a campaign N/A card N/A character c custfx N/A deck N/A graphic N/A hand N/A handout N/A jukeboxtrack N/A macro N/A page N/A path N/A player N/A rollabletable # tableitem e text N/A token t
NOTE: As of version 2.1.0, any Roll20 object type is now supported as well. As of this writing, the Roll20 object types are: campaign, player, page, path, text, graphic, character, attribute, ability, handout, macro, rollabletable, tableitem, deck, card, hand, jukeboxtrack, custfx.
objectID
objectId can be a token id or a character id (or "S"/"T" for the Source/Target token/char defined with --#sourcetoken and --#targettoken)
NOTE: As of version 2.1.0, this can refer to any type of object, but will only function if the object is of the type specified by the objectType parameter.
Additionally, Setting and Value pairs can be chained in a single statement separated by | to impact more than one property/attribute with a single line
When using the "t", "c", and "a" object types, values can be prefixed with += or -= to add/subtract from the current value (no bounds checking is done). Using [*X] notation, the updated values can be read immediately. Using += or -= on non-numeric data will simply result in a string append.
NOTE: using the extended object types in 2.1.0 does not support += and -=. If you need this functionality, you will need to implement it manually in order to keep these commands as open and powerful as possible.
For "a" types, Setting names can be prefixed with a ! to create the attribute if it doesn't exist (by default, it will not be created), and postfixed with ^ to set the max value instead of the current value.
Note that there are VERY few attributes associated with a character object, and there are likely few cases where you would want to set anything on the character object, but it is still possible.
When setting values listed in the Roll20 Object API as boolean types, use the words true or false to indicate the desired value.
Ex: --!graphic:@{selected|token_id}|bar1_value:256
Will set the bar1_value property of the selected graphic object to 256. As with variable referencing, you are likely better off using the specific object type commands (ie, --!t: and --!a:, etc.) when they are available. Note that setting Bio, Notes, and GMNotes will actually make the setting, but it isn't immediate and will not necessarily be available if read back within the same script. It will also throw a console message about needing to pass a callback.
ℹ️ Note: Two token settings have additional information that must be specified for the settings to be set correctly.
1) night_vision_distance expects a number to be provided afterward, which represents the distance. Example: night_vision_distance:20
2) night_vision_effect when set to "Dimming" also expects the distance, which is entered as a percent in decimal form. This does not apply to the "Nocturnal" setting. Example, setting Dimming with 25%: night_vision_effect:Dimming_0.25.
Object Modification Examples
Example 1 (Update Token): Set the value of bar1_value for the selected token to 5:
--!t:@{selected|token_id}|bar1_value:5
Example 2 (Update Token): Add 1 to the bar3_value for the selected token:
--!t:@{selected|token_id}|bar3_value:+=1
Example 3 (Update Token): Set bar2_value to 5 and bar2_max to 10 for the selected token:
--!t:@{selected|token_id}|bar2_value:5|bar2_max:10
Example 4 (Update Attribute): For the character the selected token represents, set dndstyling attribute on, set size to enormous, and set attitude to epic. The attitude-attribute will be created if it doesn't exist on the character already. The same is not true for dndstyling and size:
--!a:@{selected|token_id}|dndstyling:on|size:enormous|!attitude:epic
Example 5 (Update Attribute): Adds 50 to the npc_xp attribute for the character represented by the selected token, displaying the value before and after the update:
  !script {{
    --+XP|[*@{selected|token_id}:npc_xp]
    --!a:@{selected|token_id}|npc_xp:+=50
    --+XP|[*@{selected|token_id}:npc_xp]
  }}
Note that asynchronous read/update fields (bio, notes, gmnotes) can be set by object modification statements, but the values of these fields cannot be read back into ScriptCards.
Abilities
New character sheet abilities can be created, and existing character sheet abilities can be modified using --!ability or by using the shortcut B (for aBilities) --!b.
Creating New Abilities
Syntax to create new abilities:
--!ob:ReturnVarName:CharacterID:AbilityName:IsTokenAction|Text of the Ability
❗ Important: There are no optional parameters in this command, so be sure not to leave anything out!
Let's take a look at each element of the syntax structure and what is expected:
--! ... This tells scriptcards that it's about to perform an object modification.
o ... This means that a new object/ entry is going to be created.
b ... This is the shortcut meaning "abilities" that we just learned about.
: ... When creating a new object/entry, generally speaking, colons separate the various parameters while pipes delineate the values, and are used throughout any particular modification command.
ReturnVarName ... This is the name of the string variable that will store the object ID of the newly created ability. You can use this to quickly view the ID or work with it later in the same script.
CharacterID ... The ID of the character sheet that the new ability should be added to.
AbilityName ... This is how the ability will appear in the Attributes and Abilities tab of the specified character sheet.
IsTokenAction ... This will determine if the "Token Action" checkbox is checked. Use "Y" / "Yes" if you want it checked, or "N" / "No" if you do not want it checked.
Text of the Ability ... This is the main block of text that will be sent any time this new ability is used.
ℹ️ Note: You will need to define string variables for special characters you would like to hide from the Roll20 chat server. The following example demonstrates this
Example:
Let's see ability creation in action! This example adds an ability (on the Attributes and Abilities tab of the character sheet) to the character sheet of the selected token. The ability will be called "SayHello" and it will activate the hypothetical "Lightning-Bolt" ability on the character sheet of a character called "Spell_Mule". This example also demonstrates how to pass special characters through the chat server with string variables.
!script {{
  --&obrac|{
  --&cbrac|}
  --&perc|%
  --!ob:AbilID:@{selected|character_id}:SayHello:y|[&perc][&obrac]Spell_Mule|Lightning-Bolt[&cbrac]
  --+AbilID|[&AbilID]
}}
To break down the way we passed the special characters through the chat server:
[&perc][&obrac]Spell_Mule|Lightning-Bolt[&cbrac] ... is the text inserted into the box that will be sent any time we activate this new ability. Since we want this ability to activate a different ability (in this case, the hypothetical 'Lightning-Bolt' ability from our 'Spell_Mule' character), we need our new ability to utilize the proper reference: %{Spell_Mule|Lightning-Bolt}. But if we enter this reference to our script as-is, the chat parser will activate the "Lightning-Bolt" ability on our Spell_Mule character sheet as soon as we send the Scriptcard to chat, instead of inserting the appropriate reference text into the field of the ability so the ability can activate the "Lightning-Bolt" ability later. This is why we've replaced the special characters %, {and } with variables to avoid having them processed by the chat server when we send this scriptcard to create the new ability.
ℹ️ Note: We did not make the same changes to the reference @{selected|character_ID}, because we actually want the chat parser to use the information about the currently selected token in assigning this new ability to the correct character sheet, which wouldn't be possible if we substituted the special characters of this reference now.
You could also include references to global macros by creating the variable --&hash|# and placing that before the global macro name in the ability text, Ex:
--!ob:AbilID:@{selected|character_id}:ActionMenu:y|[&hash]ActionMenu
Rollable Tables
Rollable Tables are created using two different syntax lines:
- To create the overall table (rollabletable):
--!o#:ReturnVarName|TableName
- ReturnVarName will be populated with the table_ID of the created table.
- ReturnVarName will be populated with the table_ID of the created table.
- To create individual entries in the table (tableitem):
--!oe:ReturnVarName|Table_ID|TableItemName;TableItemWeighting
- ReturnVarName will be populated with the tableitem_ID of the newly created table items. If you create multiple table items, the return var will be overwritten with each line, so be sure to display the tableitem ID between each tableitem creation or the tableitem IDs will not all be displayed.
For example, the following would create a sample rollable table with five entries. The first two entries in the table will have the default weighting of 1. The last three entries have the weighting specified. This script will not provide the tableitem IDs that are created.
!script {{
   --!o#:tableid|MySCTable
   --+Result|[&tableid]
   --!oe:entryid|[&tableid];Entry 1
   --!oe:entryid|[&tableid];Entry 2
   --!oe:entryid|[&tableid];Entry 3;2
   --!oe:entryid|[&tableid];Entry 4;6
   --!oe:entryid|[&tableid];Entry 5;10
}}
If you want to be given the tableitem IDs during the creation, you would use this method instead:
!script {{
   --!o#:tableid|MySCTable
   --+New Table ID|[&tableid]
   --!oe:entryid|[&tableid];Entry 1
   --+New Entry ID|[&entryid]
   --!oe:entryid|[&tableid];Entry 2
   --+New Entry ID|[&entryid]
   --!oe:entryid|[&tableid];Entry 3;2
   --+New Entry ID|[&entryid]
   --!oe:entryid|[&tableid];Entry 4;6
   --+New Entry ID|[&entryid]
   --!oe:entryid|[&tableid];Entry 5;10
   --+New Entry ID|[&entryid]
}}
TableItem images cannot be added directly through the creation syntax, so you would use the object modification syntax to modify the image (from blank to populated) which could follow this example:
!script {{
   --!o#:tableid|MySCTable
   --+New Table ID|[&tableid]
   --!oe:entryid|[&tableid];Entry 1
   --!tableitem:[&entryid]|avatar:https://s3.amazonaws.com/files.d20.io/images/301251426/y7xmdikPD6SLuY4u4E8odw/max.png?1661354880
   --+New Entry ID|[&entryid]
}}
Note: Images can only be used if they are uploaded to your library. The URL of an acceptable image must always begin with https://s3.amazonaws.com/files.d20.io/
Repeating Rows
Repeating Rows are created using the reference --!or. Items listed within repeating rows are modified using --!a (as Attributes of repeating row objects).
Creating New Repeating Row information
Repeating Rows are created using the syntax: --!or:character_id:sectionName|value:current:max|value:current:max...
General Syntax for creating new Repeating Row objects
<--!or>:<character_id>:<sectionName>|<value>:<current>[:max]|<value>:<current>[:max]
Required entries are shown inside <...>'s. Optional entries are shown inside [...]'s.
ℹ️ Note: Scriptcards assumes the "repeating_" part of the sectionName and automatically adds it, so our script will not include the "repeating_" part of the repeating rows naming convention.
Let's take a closer look at each element of the syntax structure:
--!or: Remember to think of this as three "sections" of script code combined:
First: --! represents object modification, generally.
The o directly after means we're creating a new object/entry rather than modifying an existing one.
The r directly after that means repeating rows telling the modification line that we're going to be targeting repeating rows.
When we put this all together it means: We're performing an object modification on a repeating row by creating a new entry (instead of modifying an existing one).
Value: This can be populated several times during the use of a single command. It's important to notice that this "value" truly references a field name instead of the information a field contains. Say you want to create a repeating inventory row with 10 arrows, this would be the "itemname" property, or the "itemweight" property, or the "equipped" property of the overall row data. Not "arrows", because "arrows" is data that goes inside a field such as "itemname"
Current: This is the data to populate the "value" field with. If you're creating the same repeating row with 10 arrows, this would represent the "arrows" label associated to the 10 arrows, or the "1" that goes in the "itemweight" value field (representing the 1 lbs of weight for 10 arrows) or the "0" that goes into the "equipped" value field (representing the fact that the equipped checkbox is not checked).
Max: This is the maximum data value associated with the "current" actual value, and is optional when using this command. If you wanted to create that same repeating row with 10 arrows, this would only come into play with certain value fields, such as the "itemcount" value field. "Itemcount" represents the quantity of arrows, so "max itemcount" would represent how many arrows could possibly fit in the quiver. But if the value field referenced is "itemname", "max itemname" doesn't exist, or make sense, so the max data attribute wouldn't be populated. The same would be true of the "equipped" value field, since "max equipped" doesn't make sense in light of the fact that "equipped" represents the checkmark identifying the equipped state of the item in the row as a boolean (true/false). You can't have "more equipped than equipped" in the context of a checkbox. Make sense? Right!
Let's take a look at a slightly less confusing version of adding a new repeating row object! Here's an example that shows how to create a repeating row in the Proficiencies section of the D&D 5e character sheet of the currently selected token's character:
--!or:@{selected|character_id}:proficiencies|prof_type:LANGUAGE|name:Abyssal
The max portion is optional and can be left out if it doesn't make sense. The "values" are prof_type and name, and the "current" components are LANGUAGE and Abyssal. That's why, for this new language proficiency example the "max" data point doesn't make sense to populate, since "max prof_type" and "max name" don't really make sense.
A bit more complicated example is below. This creates a repeating_npcaction on the currently selected character. While this is a 5E example, repeating sections on any sheet can be created as long as you know what attributes you need to specify and the repeating section name!
ℹ️ Note: ScriptCards doesn't have a way to check to see if the section exists, it will just create the appropriate attributes on the selected character sheet.
!script {{
  --!or:@{selected|character_id}:npcaction|
        name:Mega Bite|
        attack_flag:on|
        attack_type:melee|
        attack_target:one target|
        attack_range:5 ft.|
        attack_tohit:8|
        attack_damage:1d4 + 3|
        attack_damagetype:piercing|
        attack_tohitrange:+5, Reach 5ft., one target|
        attack_onhit:5 (1d4 + 3) piercing damage|
        attack_crit:1d4
}}
Remember that this is technically all one ScriptCards line, and could be written that way. Placing each attribute/value pair on its own line makes it a bit clearer to read, though!
ℹ️ Note: ScriptCards will assume that the "sectionName" starts with repeating_ so it should not be specified in the section parameter (hence ✔npcaction instead of ✘repeating_npcaction)
Modifying Repeating Row Information
⚠ Warning: The updates for this section are in process. Below are a few highlights worth exposing right away, while the rest of the updates are taking place.
General Syntax
<--!r>:<character_id>:<sectionName>|<value>:<current>[:max]|<value>:<current>[:max]...
Required entries are shown inside <...> brackets. Optional entries are shown inside [...] brackets.
How is this syntax structure different from creating new repeating row entries? The o after the --! has been removed, as it's the indicator for a "new object/entry". Omitting it tells the script we're going to modify an existing value field's current and/or max data. Everything else about the way to think of the components of the syntax is the same compared to creating a new repeating row entry, except that setting a non-existant repeating row field value will create the field if it does not exist, even without the ! prefix.
Syntax Shortcut
A HUGE shout-out to one of our Discord community members, Gravitas3k, for discovering and testing a short-cut method of making modifications to attributes of repeating row objects! It takes advantage of the Repeating Row command (--R) and its sub-commands to dramatically shorten the length of repeating row object modification lines in a script.
--!a:<character_ID>|<*R value field name>:<new value or math operation>
Examples of short-cut method to modify Inventory item values: Example 1: Reduce quantity of "Rations" object to represent the player eating one.
!script {{
    --#sourceToken|@{selected|character_id}
    --Rfind|[*S:character_id];Rations;repeating_inventory;itemname
    --*|[*S:character_name] has [*R:itemcount] rations
    --!a:[*S:character_id]|[*R>itemcount]:-=1
    --Rfind|[*S:character_id];Rations;repeating_inventory;itemname
    --*|[*S:character_name] eats a ration and now has [*R:itemcount] rations remaining.
    --+Meal time!| [*S:character_name] eats a ration.
    --X| End of Script
}}
Using Rfind, the "path" to the Rations "itemname" is quickly located by Scriptcards, rather than hunting for it yourself. Then, because we used Rfind successfully, we can now use the referencing method [*R:...] to call upon any other value field associated to the same repeating row object, which is why we can switch to [*R:itemcount] for the quantity present. [*R>itemcount] then provides the 'path' to the "itemcount" value field so we can deduct one ration from the quantity. We then query the itemcount value field again, to confirm the deduction took place correctly and display the "public" message that the player has eaten one of the rations.
Wait (--w)
The --w command, which has two related methods of use. --w#| (ie, --w5|) will sleep the sandbox for # seconds (up to 10)
Note that this has limited usefulness and multiple delays could crash the sandbox by Roll20 thinking it entered an infinite loop.
The second option is --w#:regularscriptcardsline, for example: --w5:a|CureLightWounds which would run the script normally and
trigger the system to run the ScriptCard line indicated 5 seconds later. This is done by generating a mini ScriptCard containing
that single line. Variable referencing is processed when this mini-card is generated. Example:
!script {{
  --&SoundToPlay|Spell_FireBurst
  --w3:a|[&SoundToPlay]
  --w4:vtoken|@{selected|token_id} nova-fire
  --w5:!t:@{selected|token_id}|left:250
}}
This script will run and output the ScriptCards title. Three seconds later, the Spell_FireBurst audio track will play. One second after that, a nova-fire VFX will play at the selected token location, and finally a second after that the token will be moved to x-position 250.
Note: If the delayed command is a direct output (--+) or GM output (--*) command, the mini-ScriptCard will display the line as a new card with the title hidden.
Inline Formatting
Inline formatting is processed on both Direct Output lines and GM Output lines and the following inline format markup is available:
Formatting Tags Description [b]..[/b] Bold the text between the markers [i]..[/i] Italicize the text between the markers [u]..[/u] Underline the text between the markers [s]..[/s] Strike-Thru the text between the markers [c]..[/c] Center alignment [l]..[/l] Left alignment [r]..[/r] Right alignment [j]..[/j] Full justification alignment [f#]..[/f] Set in-line font size to #px. (2.0.2e) [F:(font_name):(font_size)]..[/F] This formatting is case-sensitive. Set the Font Name and Font Size inline without forcing a New Line/ carriage return like [f]..[/f] will do.
Example: [F:Contrail One:24] Hello! [/F]
Technical info: [f] is processed as a div, which causes a new line each time it's ended. [F] is processed as a span, which does not cause a new line at all.[br] Line break (translates to <br>
in html)[hr] or [hr #xxxxxx] Insert a horizontal rule. If a 3 or 6 digit (or named) color code is specified after the # the rule will be colorized [#xxx]..[/#] or [#xxxxxx]..[/#] Use a 3 or 6 digit hex code to colorize the text between the markers [img]..[/img] Insert an image. The full URL of the image goes between the markers. You can include HTML attributes to be applied to the img tag in the opening marker (ie, [img width=128 height=128])[button]caption::action[/button] Create a button with the label "caption" that performs the action defined by "action".
*Note*: See notes below this table regarding the inline formatting options available to override the default values you used in the settings.[sheetbutton]caption::character::abilityname[/sheetbutton] Create a button that, when pressed, will run the "abilityname" macro on the "character" charactersheet. Useful for launching macros from a macro mule character sheet.
*Note*: See notes below this table regarding the inline formatting options available to override the default values you used in the settings.[rbutton]Caption::ReentryLabel;Parameter[/rbutton] Create a reentrant button which, when clicked by the user, will resume script execution at "ReentryLabel", passing "Parameter" to the [&reentryval] string variable.
*Note*: See notes below this table regarding the inline formatting options available to override the default values you used in the settings.[roll]...[/roll] Anything entered between [roll] and [/roll] will be formatted to appear as a roll. Use [roll:c]...[/roll] for critical success formatting. Use [roll:f]...[/roll] for critical failure formatting. If you specified settings for the appearance of the different roll outcomes they will be used, otherwise the default formatting will be applied.
Roll appears normal: [roll]15[/roll]
Roll appears as a critical success: [roll:c]18[/roll]
Roll appears as a critical failure: [roll:f]2[/roll]
Text appears as a roll: [roll]What is going on?[/roll]
Text appears as a critical success: [roll:c]You did it![/roll]
Text appears as a critical failure: [roll:f]Oh No! You didn't make it![/roll]
Settings for customization: See rollHilightcolorboth, rollHilightColorCrit, rollHilightColorFumble, rollHilightColorNormal[t] Converted to HTML table tag. Text after the "t" will be included inside the tag (width, border, etc)
*Note*: See notes below this table regarding the inline formatting options available.[/t] Converted to HTML close table tag. [tr] Converted to HTML table row tag. Text after the "tr" will be included inside the tag.
*Note*: See notes below this table regarding the inline formatting options available.[/tr] Converted to HTML close table row tag. [td] Converted to HTML table cell tag. Text after the "td" will be included inside the tag.
*Note*: See notes below this table regarding the inline formatting options available.[/td] Converted to HTML close table cell tag.
In-line formatting can be applied to buttons and to various levels of the table sections. The syntax is a little different depending on how directly supported the html/css is, but here are a couple examples.
Button formatting
The main default color formatting for buttons comes from the buttonBackground and buttonFontColor settings, and the default font size comes from the buttonFontSize setting. These can be overridden with inline formatting commands within the initial [button] tag. The formatting overrides can be mixed and matched depending on what you'd like to accomplish. You should note that, with buttons, you cannot change the background color of a button unless you specify the font color of the button. You can specify the font color as the same as the buttonFontColor setting if you don't want to change the font color, but want to change the background color. The formatting will only go inside the brackets with the opening command with the rest of the syntax remaining the same (e.g. [button(formatting goes here)]caption::action::[/button])
ScriptCard Item Formatting
SyntaxExample Description/ Results [button]
[sheetbutton]
[rbutton][button:(font color):(background color)] [button:#FFFFFF:#000000]... This updates the font color and background color of a button. In this example they've been updated to white font over a black button background. [button]
[sheetbutton]
[rbutton][sheetbutton:(font size)] [sheetbutton:20px]... This overrides the font size of the text within a button. [button]
[sheetbutton]
[rbutton][rbutton:(tool tip message)] [rbutton:This is a tooltip!]... This will add a tooltip to the button you've setup. There is not a default setting for tooltips, so this is the only way to add one. Note:Because the other formatting above can be added adhoc, it's important that your tooltip not being with a '#' symbol, or end in 'px', or the formatting will get misinterpreted resulting in undesirable results. [button]
[sheetbutton]
[rbutton][button:(text color):(background color):(font size):(tooltip for button)] [button:#FFFFFF:#000000:26px:Awesome tool tip for an awesome button!]... This example shows the combination of all the formatting overrides being used on a single button together.
Table formatting
Tables can also be formatted at the various levels (i.e. table, table row, table cell, etc) in order to refine the appearance of the table. The following are a few simple examples, but there are a lot more ways tables can be formatted than shown below. The formatting is done with CSS and html inline markup. Inline formatting can also be included between the opening and closing tags of table content as well.
Table Tag Formatting
SyntaxExample Description/ Results [t] [t width=(size)] [t width=100px This specifies the width of the entire table in pixels. [tr] [tr width=(size)] [tr width=25px This specifies the width of the specific table row in pixels. [td] [td style=(various commands)] [td style="width:10px; text-align:right;"] This specifies the width of the specific cell and aligns the text to the right within the same cell.
Code Example
Formatting Tags Description !script {{ --#title|Inline Formatting Examples --+|This text [b]is bolded[/b] --+|This text [i]is italicized[/i] --+|This text [u]is underlined[/u] --+Alignment|[l]Left[/l] --+|[c]Center[/c] --+|[r]Right[/r] --+|[j]This long bit of text is justified to fit smoothly into the display area for the card with justified wrapping.[/j] --+Colorized|[#f00]Red[/#] [#0f0]Green[/#] [#00f]Blue[/#] --+Button|[button]Do Something::DoOnClick[/button] --+Button Colors|[button:#000:#f00]Red::RedClick[/button] [button:#000:#0f0]Blue::BlueClick[/button] [button:#000:#00f]Blue::BlueClick[/button] --+Table:| --+|[t border=2 width=100%][tr][td]Cell1[/td][td]Cell2[/td][/tr][tr][td]Cell3[/td][td]Cell4[/td][/tr][/t] }}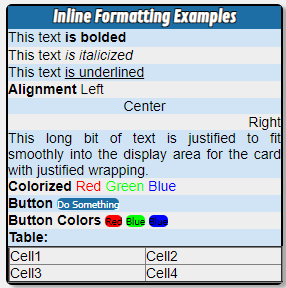

Variables
See the Referencing-section for information on referencing variable content
ScriptCards supports two types of variables : Roll Variables and String Variables. Either type can be used in a conditional statement, or use to substitute their value into the tag or content portion of other statements. For both types of variables, variable names are case sensitive. Roll Variables and String variables are completely separate internally, so it is possible to use the exact same name for both a Roll Variable and a String Variable; however, doing so will likely result in confusion when looking at the script later, so it is not a recommended practice.
Roll Variables
A roll variable is used to store the results of dice rolls or math calculations when more than just the final resultant value is important. Roll Variables are set via the {{{1}}} statement or the {{{1}}} referencing structure, and are processed by the ScriptCards roll parser.
--=AttackRoll|1d20 + @{selected|strength_mod} [STR] + @{selected|pb} [PROF]
--+Result|[$AttackRoll]
In this case, we are creating a roll variable called AttackRoll. The content portion of the roll will be passed to the ScriptCards roll processor, which will roll 1d20 and add two modifiers, storing the result in the AttackRoll variable. The roll parser will store extra information about the roll to various components of the AttackRoll variable, including the text passed to the parser, a formatted version of the result in a hover-over text box, and details on each die rolled.
A Roll Variable is referenced using the [$variablename] structure. See the Referencing-section for all of the additional information retrievable from a Roll Variable.
String Variables
String Variables are assigned with the --& statement and are referenced using [&variableName] notation. A string variable can contain just about any text, however there are some character sequences that will be misinterpreted by the Roll20 chat server. In that case, it is necessary to build the string variable in multiple pieces. This trick can also be useful when you want to use some character sequences in strings or output that would be clobbered by the chat server [[ for example, which the chat server will interpret as an Inline Roll.
This can be accomplished by splitting the string into pieces during its creation. For example:
  --&QB|? --&QB|+{ --&QE|}
  --&AB|@ --&AB|+{
  --&TB|& --&TB|+# --&TB|+64 --&TB|+; --&TB|+{
  --&BED|& --&BED|+# --&BED|+128719;
  --&CLOCK|& --&CLOCK|+# --&CLOCK|+128336;
  --&SPACE|X X --&SPACE|[&SPACE(1,1)]
  --&obrac|[ --&cbrac|]
The code above defines several string that are generally useful in scripts. &QB (build in two parts, ? and { can be used to initiate a roll query as part of a button without the chat server asking the question when the overall script is run. &AB is similarly used for attribute references, while &TB shows an example of escaping an HTML sequence that would be replaced by the chat server incorrectly.
The &BED and &CLOCK strings use HTML escaping to assign emojis to strings, while &SPACE uses a substring reference to create a variable that just includes a space (since a space at the end of a line, including a variable assignment will be stripped out by the parser). Finally, &obrac and &cbrac are opening and closing brackets to allow for [[ type structures.
Predefined String Variables
There are a handful of variables assigned automatically when a ScriptCard is executed that can be used in your script to retrieve information about some game conditions when the script was executed:
Variable Value SendingPlayerID Contains the object ID of the player that sent the macro SendingPlayerName Contains the display name of the player SendingPlayerColor Contains the color code associated with the player SendingPlayerSpeakingAs The contents of the "Speaking As" dropdown window SendingPlayerIsGM Contains 1 if the player is a GM, and 0 if the player is NOT a GM ScriptCards_Version Contains the current version of ScriptCards eg. 2.7.0a SC_VERSION_NUMERIC Contain the ScriptCards version number in the format 0X0Y0Zr, where X is the major version, Y is the minor version, Z is the update number, and r represents the occasional "a", "b", etc. versions. All components are numeric, so v2.7.0 will be represented as "207000" (2=2, 07=7, 00=0, and 0=no fix update), while a theoretical 2.7.0a would be "207001".
Arrays
Originally only usable with the --~ (function) command, arrays have been expanded and revamped to make them a more integrated part of the ScriptCards language. The information below has been updated to be current with the 2.1.12 release of ScriptCards available on the GitHub repository and will be included in the next pushy to OneClick
Intro to Arrays
An Array is a collection of string variables that are all associated with the same variable name and retrievable/settable by an index number into the array. For example, the following ScriptCards code can be used to create a simple array called Fruits that contains 4 elements:
--~|array;define;Fruits;Banana;Mango;Pineapple;Watermelon
Alternatively, an array can be created by directly assigning strings to array element references:
--&Fruits(0)|Banana
--&Fruits(1)|Mango
--&Fruits(2)|Pineapple
--&Fruits(3)|Watermelon
Functionally, these two blocks of code are identical and both results in the creation of a four element array called Fruits.
Array indexes start at 0
Adding Elements to an Existing Array
You can use the --& command to add elements to an array, even if you don't know the size of the array. If you specify an index number that already exists in the array, that element will be replaced, but if you specify an index number larger than the last index in the array, the element will be added to the end of the array at the next available index. For example,--&Fruits(9999)|Papaya will add Papaya as element 4 of the array, since that is the next available index number.
A more proper method, however, would be to use the length of the array to ensure that you will always use an index higher than the highest index:--&Fruits([@Fruits()])|Papaya functions identically, but will not break if your array already has 9999 items in it. See the Array Metadata section below for details on the [@ArrayName()] construct.
You can also add elements to the beginning of the array by specifying a negative index: --&Fruits(-1)|Lemon will insert Lemon as element 0 and push all of the exiting elements down one index, so element 1 will become Banana, 2 Mango, etc.
Changing Array Element Values
The same syntax used to assign array elements can be used to update the element values. Let's say we previously defined the following array:
--&Fruits(0)|Banana
--&Fruits(1)|Mango
--&Fruits(2)|Pineapple
--&Fruits(3)|Watermelon
If we want to replace the value "Pineapple" (in Index position 2) with the value "Grape" we'd simply use this: --&Fruits(2)|Grape.
Referencing Array Elements
When you wish to retrieve the value stored in array element, you can reference that element with the pattern [@ArrayName(index)]. For example: [@Fruits(2)] given the array defined above, will return "Pineapple" in place of the variable reference.
You can either use the index (getfirst, getnext, etc.) to traverse an array and work with the values, or you can use (new in 1.3.1) direct array element referencing.
!script {{
 --~dummy|array;pagetokens;myarray;@{selected|token_id}
 --~count|array;getcount;myarray
 --+Total:|There are [&count] graphical objects on the page
 --~testvar|array;getfirst;myarray
 --:loop|
 --+Value|[*[&testvar]:character_name]
 --~testvar|array;getnext;myarray
 --?[&testvar] -ne ArrayError|loop
 --+Loop1|Is Done!
}}
This example defines an array based on the tokens on the page and then loops through them, starting with a getfirst, displaying the character name, and using getnext until the result is ArrayError, at which point the loop exits. Here is the same routine, except it uses a For...Next loop and direct array referencing:
!script {{
 --~dummy|array;pagetokens;myarray;@{selected|token_id}
 --~count|array;getcount;myarray
 --+Total:|There are [&count] graphical objects on the page
 --%loopCounter|1;[&count]
   --+Value|[*[@myarray([&loopCounter])]:character_name]
 --%|
 --+Loop|Is Done!
}}
This line : --+Value|[*[@myarray([&loopCounter])]:character_name] uses [@arrayName(index)] format (inside a [*characterid:attribute] syntax) to perform the same task as running through the loop with the index.
Array Metadata
Some additional information about arrays is available using specialized element notation:
[@Array()] or [@Array(length)] will return the number of items in the array. Note that the number returned will always be one larger than the maximum index of the array since indexes start at 0.
[@Array(maxindex)] or [@Array(lastindex)] will return the index number of the last item in the array.
Note that using the length property will allow you to always add elements to the end of an array:
--&Fruits([@Fruits(length)])|Papaya will add Papaya to the Fruits array at the end of the array.
Traversing Arrays
The easiest method to traverse an array is to use the --% looping structure with the foreach modifier:
--%loop|foreach;Fruits
  --+Fruit|[&loop]
--%|
The code above will traverse each element in the Fruits array and print the value. It could also be written using a normal for loop and index numbers:
--%loop|0;[@Fruits(maxindex)]
  --+Fruit|[@Fruits([&loop])]
--%|
In this case the difference is that in the foreach structure, the loop variable is actually assigned the value of the element, while in the normal loop the loop variable is assigned the index number which then needs to be supplied to the [@Array(index)] structure to retrieve the element.
Additional information on looping is available in the --% loop command documentation.
Special Array Functions
There are a number of special options for the --~ (function) command that can be used to generate arrays based on information stored in Roll20. These are listed in the function table above under the array category, and include things like creating an array of all of the tokens on a page, or the entries in a repeating section on a character sheet. They are also functions to sort and otherwise manipulate the array (replacing elements, for example). Finally there are legacy functions (such as getfirst, getnext, getindex an the like) that were used for traversing arrays and iterating through the elements. While these still work, the ScriptCards language has evolved to make working with arrays quite a bit simpler using loops and array referencing.
NOTE: The documentation below remains for legacy array usage. It is still supported and will still work, but is not the currently preferred method
Each array keeps track of an internal index position (starting at 0). Several commands let you manage this index:
- getindex returns the current index value
- setindex sets the index to the specified location in the array
- getlength returns the number of elements in the array
- indexof returns the index location of the specified element
Other commands let you retrieve values from the array:
- getfirst sets the index to 0 and returns the value at that position
- getnext advances the index by 1 and returns the new current value
- getprevious reduces the index by 1 and returns the new current value
- getlast sets the index to the last elements in the array and returns the new current value
If/when you hit the end of the array, you will get a return value of ArrayError, which can be used to detect the end of the array when looping through by index. See Referencing Array Elements below for additional information.
Manipulating Array Elements
Several array commands deal with inserting, removing, and modifying elements:
- add works just like define, except that it takes an existing array and adds elements to it based on the passed parameters
- remove looks for items matching each passed parameter and removes them from the indicated array if they exist
- removeat allows you to specify an index location in the array and remove the element at that position
- replace searches an array for a value and replaces all occurrences of it with a new value (if found)
- sort sorts the elements in the array in ascending order
- stringify returns a string variable that includes each array element separated by the default semicolon (
;) or (new in 1.6.7) the current#parameterdelimeter
Predefined Arrays
As with string variables, there is an array created automatically by ScriptCards when a script executes if there are tokens selected in the VTT.
Array Value SC_SelectedTokens Array containing the Token IDs of any tokens selected by the user when the script is executed
Hashtables (--h)
Intro to Hashtables
In Scriptcards version 2.6.0 released on Jan-6-2024, new functionality was introduced to support Hash Tables (sometimes called Associative Arrays). While this feature is currently queued for inclusion into OneClick, you can use it now by getting the latest version of ScriptCards from the Scriptcards GitHub repository.
Hashtables vs Arrays
On the surface, hashtables and arrays may seem to be very similar entities. They both store groups of string items. The primary difference is that hashtables don't store this information in any particular order, but rather with an named key that allows you to retrieve the value using that key.
Consider an array that holds the movement speed values for each of your PCs. As an array, you would simply have 30,25,30,40 and would need some way to know what character each value is associated with. If we stored Fred's speed in the first element in the array, [@Speeds(0)] would return 30, but we don't have any useful information that references the associated character anywhere.
Storing the same data in a hash table, you would associate the speeds with the names of the characters, so [:CharSpeed("Daphne")] would return 30. [:CharSpeed("Fred")] would return 25, and so on. Taking this a step further, what if one of our characters leaves? In an array, if we remove an item in the middle of the array, the indexes of all of the subsequent items change. With a hashtable, the keys all still refer to the correct values, so adding and removing entries is non-disruptive.
Defining Hashtables, Keys and Values
You can define hashtable Names, Keys and Values with the --h command like this:
Syntax:--h:HashTableName("Key")|Value
❗ Important: The double-quotes around the Key are required.
Example: --h:FruitCost("Mango")|2sp
This will set the "Mango" entry for the "FruitCost" hashtable to 2sp (creating the hash table if necessary). You can also define a hashtable Name, Key and/or Value via variables, like this:
Example: --h:FruitCost("[&Fruit]")|[$fruitPrice.Raw]sp
Referencing Hashtable Keys and Values
You can reference the value of a hashtable Key like this:
Syntax: [:HashTableName("Key")]
Example: [:FruitCost("Mango")]
You can also reference hashtable Names, Keys and Values by variable as well, like this:
Example:--+[&Fruit]|costs [:FruitCost("[&Fruit]")]
Removing Keys from Hashtables
You can remove a Key from a hashtable by assigning it a blank value like this:
Example:--h:Fruits("Steak")|
Built-in Functions for Hashtables
As of ScriptCards version 2.6.2, released on Jan-20-2024, there are two Categorized Functions (--~) that can be applied to hashtables.
Clear: This will remove all of the entries in the provided hashtable name at one time.
Syntax:--~|hash;clear;HashTableName
Example:--~|hash;clear;MyHashTable
Set: This will assign the provided Values to the provided Keys.
Syntax:--~|hash;set;HashTableName;Key1==Value1;Key2==Value2;Key3==Value3;...
Example:--~|hash;set;Fruits;Mango-Cost==2sp;Mango-Size==Medium;Mango-Shape==Oblong;Mango-Avail-Spring==False;Mango-Avail-Summer==True;Mango-Avail-earlyAutumn==True;Mango-Avail-lateAutumn==False;Mango-Avail-Winter==False
Follow this link for more information on Built-in Categorized Functions
Practical Application Examples
Example 1: Using Delimiters
This example demonstrates using delimiters to store multiple pieces of information about an item in a hash table.
!script {{
  --h:Fruits("Mango-Cost")|2sp
  --h:Fruits("Mango-Size")|Medium
  --h:Fruits("Mango-Shape")|Oblong

  --h:Fruits("Apple-Cost")|2cp
  --h:Fruits("Apple-Size")|Medium
  --h:Fruits("Apple-Shape")|Round

  --h:Fruits("Watermelon-Cost")|1gp
  --h:Fruits("Watermelon-Size")|Large
  --h:Fruits("Watermelon-Shape")|Oblong

  --h:Fruits("Grape-Cost")|1cp
  --h:Fruits("Grape-Size")|Small
  --h:Fruits("Grape-Shape")|Round

  --~|array;define;fruits;Apple;Mango;Watermelon;Grape
  --~|array;define;fields;Cost;Size;Shape

  --%fruit|foreach;fruits
    --%field|foreach;fields
      --+[&fruit]-[&field]|[:Fruits("[&fruit]-[&field]")]
    --%|
  --%|
}}
This example demonstrates creating the hash table (Fruits) and storing it to persistent storage. It then creates two arrays (FruitNames and FruitFields) and stores them to persistent storage.
!script {{
  --h:Fruits("Mango-Cost")|2sp
  --h:Fruits("Mango-Size")|Medium
  --h:Fruits("Mango-Shape")|Oblong

  --h:Fruits("Apple-Cost")|2cp
  --h:Fruits("Apple-Size")|Medium
  --h:Fruits("Apple-Shape")|Round

  --h:Fruits("Watermelon-Cost")|1gp
  --h:Fruits("Watermelon-Size")|Large
  --h:Fruits("Watermelon-Shape")|Oblong

  --h:Fruits("Grape-Cost")|1cp
  --h:Fruits("Grape-Size")|Small
  --h:Fruits("Grape-Shape")|Round

  --~|array;define;FruitNames;Apple;Mango;Watermelon;Grape
  --~|array;define;FruitFields;Cost;Size;Shape

  --s:|Fruits
  --s@|FruitNames;FruitFields
}}
This script loads the table created in Example 2 and prompts for a choice:
!script {{
  --l:|Fruits
  --&Lookup|?{Fruit|Apple|Watermelon|Mango|Grape}
  --+|A [:Fruits("[&Lookup]-Size")], [:Fruits("[&Lookup]-Shape")] [&Lookup] costs [:Fruits("[&Lookup]-Cost")]
    }}
The output from this looks like this image.
Example 4: Using a hashtable with loops and arrays
A more advanced usage here... Continuing with the arrays from the previous examples, in this example they get loaded and then looped through to get all of the info from the table:
!script {{
  --l:|Fruits
  --l@|FruitNames;FruitFields

  --%fruit|foreach;FruitNames
    --%field|foreach;FruitFields
      --+[&fruit]-[&field]|[:Fruits("[&fruit]-[&field]")]
    --%|
  --%|
}}
The output from this looks like this image.
Looping Structures (--%)
--% statement. If you're not very familiar with loops, read on! We'll review the general structure, introduce you to the four kinds of loops that you can use in ScriptCards and some scenarios to help you better understand when choosing to use one kind of loop might make more sense than another. From there we'll take a deeper dive into each one.The following elements are used throughout each of the 4 different types of loops. There are additional settings that are used, but they vary between loop types, so we'll look at the additional settings within the sections of each loop type.
General Loop Syntax elements:
--%<NameOfLoopVariable>| This will initiate a loop with the loop variable named NameOfLoopVariable. Although a LoopVariable is used in each type of loop, the function of the Loop Variable will change from one loop type to another.
--%| This is used to mark the ending point of a loop iteration. If there are remaining iterations to run, execution will move back to the top of the looping structure. If not, the loop will end and execution will proceed on the next line.
--%!| This is used to break out of an executing loop. Regardless of the number of iterations remaining, execution will move to the statement after the end loop marker.
The Types of Loops in ScriptCards
ℹ️ Note: The key difference between While loops and Until loops is that an Until Loop will always execute at least one iteration. In contrast, it's possible for a While Loop to never execute a single loop, if the conditional statement starts off as False, and is always False after that. But! More on this as you read further into the loop structures below.
For...Next Loops
[Expand/Collapse Parameter Summary]
| Required | Optional |
|---|---|
| NameOfLoopVariable | Step |
| Start | |
| End |
A For...Next loop allows you to run a series of commands an arbitrary number of times, with the Loop Variable counting each iteration. The loop consists of two required components: A loop start line, and a loop end line. Both use thw --% command sequence. Everything between these two lines is considered part of the loop body, which is executed for each iteration of the loop.
Optionally, a step amount can be specified, so a loop from 1 to 10 with a step of 1 (the default) would count 1,2,3,4,5,6,7,8,9,10. A loop from 1 to 10 with a step of 2 would count 1,3,5,7,9. It is also valid for the step to be negative, so a loop from 10 to 1 with a step of -2 will count 10,8,6,4,2. The default step is 1.
Example of a For...Next Loop
--%LoopCounter|1;10;1
LoopCounter. Since this is a For...Next loop, the Loop Variable will act as a counter that will start at 1, increasing by 1 each iteration (the step) until it has completed 10 executions. The "Next" part of the For...Next statement is simply --%|, with no tag or parameters. This indicates to ScriptCards that it should increment the counter (LoopCounter, in this example) and go back to the beginning of the loop.
Knowing that, let's extend the example above to a complete loop structure:
!script {{
  --%LoopCounter|1;10;1
    --=Roll|1d20
    --+Loop|Counter is [&LoopCounter], roll was [$Roll]
  --%|
 }}

In the example above, the value of [&LoopCounter] will begin at 1, advancing by 1 each time through the loop to 10. For each execution of the loop body, the Roll variable will be set to the result of rolling 1d20, and the current value of the loop counter, along with the roll result, will be displayed.
Exiting a For...Next Loop or Loop Iteration Early
❗ Important: The --%!| sequence will break out of the loop, no matter how many iterations are remaining. Think of it like an abort sequence, or an "off" switch that will end the current looping.
The % and %! character sequences can also be used as part of a Conditional statement to indicate to ScriptCards that it should continue (%) or break (%!) the loop:
!script {{
  --%LoopCounter|1;10;1
    --=Roll|1d20
    --?[$Roll.Base] -eq 1|%
    --+Loop|Counter is [&LoopCounter], roll was [$Roll]
  --%|
 }}

In the example above, if the number rolled on the die [$Roll.Base] is a one, the output of the roll will be skipped and the loop will start back at the top to begin executing the next iteration. Alternatively:
!script {{
  --%LoopCounter|1;10;1
    --=Roll|1d20
    --+Loop|Counter is [&LoopCounter], roll was [$Roll]
    --?[$Roll.Base] -eq 20|%!
  --%|
 }}

Will check each roll (after the output) and, if the die roll was a 20, will stop executing the loop and proceed on to the next statement after the loop end (--%) statement. Learn more about Conditionals and the different Conditional Branch Types.
While Loops
While Loop Syntax:
--%<LoopVarName>|<while>;<conditional>;[step]
The loop will check before initiating an iteration of the code within the loop.
While the "conditional" is true: the loop will be executed until the conditional becomes false.
When the conditional statement becomes false the loop script will break out and resume execution after the loop code.
❗ Important: Keep in mind that if the conditional statement is initially false, the loop script will not execute at all.
The LoopVarName variable stores no useful data in the context of While loops, but it is still a required parameter when initiating a While Loop.
Example of While Loop:
!script {{
  --=Iteration|0
  --&MyString|[=1d10 - 1]
    --%loop|while;[&MyString(length)] -lt 12
    --=Iteration|[$Iteration] + 1
    --+Iteration [$Iteration.Raw]|[&MyString]
    --&MyString|[&MyString][=1d10 - 1]
  --%|
    --+Final|[&MyString], [&MyString(length)]
}}
The example above will generate a 12 digit number by starting with a string (&MyString) with a length of 1, and adding a digit each time through the loop while there are less than 12 digits in the string.
Until Loops
!script {{
  --=Iteration|0
  --&MyString|[=1d10 - 1]
    --%loop|until;[&MyString(length)] -ge 12
    --=Iteration|[$Iteration] + 1
    --+Iteration [$Iteration.Raw]|[&MyString]
    --&MyString|[&MyString][=1d10 - 1]
  --%|
    --+Final|[&MyString], [&MyString(length)]
}}
Just as in the While example, this loop will create a 12 digit number. Nowever, if &MyString already contained a 12 digit number, and additional digit would be added since the loop will always run at least once.
For Each Loops
The final type of looping structure is only used with arrays, and is called a For Each loop. A For Each loop will be run once for each item in the array, and the loop control variable will be set to the value of the array element that is currently being processed.
General Syntax of For Each loops
--%<NameOfLoopVariable>|foreach; <NameOfArray>
Each field listed is a required field and cannot be skipped. Here's a closer look at each element of the syntax structure:
NameOfLoopVariable: In the context of For..Each loops, the Loop Variable will store the name of each element of the specified array, one by one, until it reaches the end of list of elements in the array. The loop will repeat as many times as there are entries in the array. Referencing [&NameofLoopVariable] will allow you to use the value associated to the current element. foreach: This is entered as it appears, so it will always be foreach when doing this kind of loop. NameOfArray: This will match with the name of the array you are trying to work with. It will not refer to any index and will not have the symbol for a variable at the beginning. So if you named your array Fruits and stored in it the elements: Banana, Strawberry, Apple, Plum, Blueberry normally you would use [@Fruits(2)] to refer to Apple in the array. But for this loop you would simply reference "Fruits".
Let's look at an example that lists the attack names of an array of attacks listed in the repeating attacks section of the character sheet:
!script {{
  --~|array;fromrepeatingsection;Attacks;@{selected|character_id};repeating_attack;atkname
    --%loop|foreach;Attacks
    --+Attack|[&loop]
  --%|
}}
This code creates an array based on the "repeating_attack" repeating section's atkname field (in this case, from the 5E character sheet). It then loops through each entry in the array and displays the name of the attack through the [&loop] loop variable.
Referencing
Referencing Overview
Referencing allows you to substitute the values of variables, objects, attributes, settings, and the like someplace in a ScriptCards line. The table below gives an overview of the various referencing modes and what each one means. In general, references are enclosed in square brackets ([ and ]) and begin with a character indicating what kind of reference it is (such as $ or &), followed by a descriptor that indicates where the value should come from.
Character Type Example Notes $ Roll Variable [$AttackRoll] Roll variables support a number of modifiers (ie, [$AttackRoll.Base]). See the Roll Variables section below and Roll variable assignment above for more information.& String Variable [&PlayerName] See expanded string referencing below and String variable assignment above for more information. * Object Attributes [*S:character_name] See Attribute Referencing in the next table for details. % Subroutine Parameters [%1%] Only available when a subroutine is called with a -->or similar construct. Parameters are numbered beginning at 1.@ Array Elements [@Colors(5)] The name of the array follows the @symbol. The index (zero-based) is in parenthesis after the name.~ Card Settings [~title] Returns the value of the ScriptCards settings (set via --#lines)= Inline Rolls [=1d20] or [=Result:1d20] Rolls the die format specified at the time the reference is processed. If a name followed by a colon proceeds the roll specifier, the result of the roll will be saved to the named roll variable. The replacement value of the inline roll will be the raw roll value (same as .Raw when referencing a roll variable). Square brackets for flavor text are not supported inside inline rolls, and + an - are the only currently supported component separators (ie, 1d20 + 5 (STR) is fine, but 1d20 * 2 [Something] is not supported both because of the multiplication and because of the embedded square brackets. : Hash Tables [:Fruits("Mango")] Returns the value associated with a key from a hash table (set via --hlines)? Inline Conditional [?1 -eq 2|True|False] Will evaluate the conditional after the first | and return the value after that if the condition is true or the value after the last | if the condition is false
Roll Variables
Roll Variables can be referenced from the content portion of any line type, and from the tag portion of conditional statements. The referenced value is replaced when the line is executed.
Roll Modifiers
There are several modifiers that can be used to reference parts of a roll, or to display the roll results in different ways:
❗ Important Notes:
1) Roll modifiers are case-sensitive
2) Roll Modifiers will remove any flavor text that was included with the original roll assignment.
Modifier Meaning No modifier In a Direct Output Line (--+), GM Output Line (--*), or String Assignement (--&), will be replaced with a formatted roll display, including a mouseover with roll text details. In any other type of line, will display the same results as .Raw .Total The end result of the roll equation. Formatting rules for "No Modifier" apply based on line type. .Raw The total value of the roll variable without any formatting, no matter what kind of line the reference is used in. .Base The cumulative result of any dice rolled in the Roll Text (Numeric modifiers are not included) .Ones The number of dice in the roll that came up as 1s .Aces The number of dice in the roll that came up as the maximum number on the die .Odds The number of dice in the roll that came up with an odd number .Evens The number of dice in the roll that came up with an even number .RollText The raw text of the roll that was use to generate the results .Text A text representation of the results of the roll, including the numbers rolled for each die .tableEntryText The text portion of the result of a table roll .tableEntryImgURL The image source portion of the result of a table roll .tableEntryValue If the tableEntryText is purely numeric, will contain the numeric value
String Variables
To reference a string variable, use the notation [&variablename]. String variables can be referenced in direct output, roll variable assignment, and string variable assignment statements.
Expanded String Referencing
ScriptCards 2.1.7+ expands the syntax used to reference strings by including inline functions for things like substrings, find and replace, etc. None of these functions modify the original string variable.``` They simply return a string with the function applied.
The basic syntax for expanded string referencing is to include the string function you want to call and any parameters it expects inside of parentheses, which should be included inside the square brackets, but after the name of the string variable.
| Breaking it down: |
| Let's look at a simple example that will show how a string function is used while clarifying how to read the table of supported string referencing functions below. If you look at the 6th function, you should see the "Replace" function, which expects two parameters. The first parameter tells the replace function "what should be replaced", which is the word "quick". The second parameter tells the replace function "what to replace it with", which is the word "fast". So we're telling the replace function to get rid of the first instance of the word 'quick' and put the word 'fast' in its place. Note how the Function and its parameters are enclosed together in parentheses, with commas separating the function from each of its parameters, which looks like this: (replace, quick, fast).
But we haven't yet told the string function which string to perform it's actions on. As it turns out, we want to apply the actions to our example string variable named "MyString". Remember that string variables are referenced by putting it in square brackets with an ampersand before the variable name, like this: [&MyString]. Looking at the syntax information above, we see that the function should go inside the square brackets, but after the name of the string variable. When we do that, we end up with: [&MyString(replace,quick,fast)] |
Another huge benefit of expanded string referencing, is the ability to use the references inline, as mentioned in the opening info of this section. In many instances, instead of having to pull out a --~ function to get a value assigned to a variable and then reference it, you can go straight to the value you wanted.
| For example: |
Let's say in one of your scripts you have an array set up of various fruit that a vendor is selling and you want to expand the script so that the vendor can periodically offer one of the fruits, at random, for a discounted price:
e.g. --~|array;define;vendorFruits;Pumpkins;Lemons;Pineapples;Apples;</span> And let's say you've converted that array to a string for purposes with your script e.g. --~stringFruits|array;stringify;vendorFruits;! Thanks to the stringify function you have a string variable [&stringFruits] with the assigned value: Pumpkin!Lemon!Pineapple!Apple and let's pretend that you really want to automate referring to the fruit listed in the string because periodically one of them will be discounted. The complete script for this could look like: |
!script{{
    --~|array;define;vendorFruits;Pumpkins;Lemons;Pineapples;Apples
    --~stringFruits|array;stringify;vendorFruits;!
--/|  Get a random dynamic number based on how many fruit are listed in the array and
--/|  then make a roll of 1dX, where X equals the number of fruit in our example array "vendorFruits"
    --=randNum|1d[@vendorFruits(length)] - 1
    --+Fruit Clearance:| Now selling [&stringFruits(split,!,[$randNum.Raw])] at a discounted price!  Get them while they last!
    --X| End of script
}}
The table below lists the supported string referencing functions by showing the syntax to apply them to an example string variable, [&MyString], which contains the string: "The quick Brown Fox jumps over the Lazy Dog"
String Function applied to the
string variable [&MyString]Example results returned after
processing the functionExplanation and Notes on usage [&MyString] "The quick Brown Fox jumps over the Lazy Dog" Basic string referencing. This is our example string variable and its contents. Below are examples [&MyString(length)] 43 Returns the number of characters in the string [&MyString(tolowercase)] "the quick brown fox jumps over the lazy dog" Returns the string in all lower case [&MyString(touppercase)] "THE QUICK BROWN FOX JUMPS OVER THE LAZY DOG" Returns the substring in all upper case [&MyString(totitlecase)] "The Quick Brown Fox Jumps Over The Lazy Dog" Returns the string in Title case (first letter of every word capitalized) [&MyString(replace,quick,fast)] "The fast Brown Fox jumps over the Lazy Dog" Returns a string with the first occurrence of the second parameter with the third [&MyString(replaceall,o,i)] "The fast Briwn Fix jumps iver the Lazy Dig" Returns a string with all occurrences of the second parameter with the third [&MyString(contains,Dog)] 1 Returns 1 if the string contains the search text, or 0 if it does not (Case sensitive) [&MyString(icontains,dog)] 1 Returns 1 if the string contains the search text, or 0 if it does not (Case insensitive) [&MyString(indexof,Jumps)] -1 Returns the first position of the search string in the string, or -1 if it does not exist. Case sensitive [&MyString(iindexof,jumps)] 20 Returns the first position of the search string in the string, or -1 if it does not exist. Case insensitive [&MyString(lastindexof,o)] 41 Returns the first position of the search string in the string, or -1 if it does not exist. Case sensitive. [&MyString(lastindexof,o)] 41 Returns the first position of the search string in the string, or -1 if it does not exist. Case insensitive. [&MyString(before,Fox)] "The quick Brown " The text before the search value ("Fox") is returned. If the search value doesn't exist in the string, the whole string is returned. [&MyString(after,Fox)] " jumps over the Lazy Dog" The text after the search value ("Fox") is returned. If the search value doesn't exist in the string, the whole string is returned. [&MyString(4)] "Quick Brown Fox Jumps Over the Lazy Dog" Return a substring starting at character 4 and returning the rest of the string [&MyString(4,5)] "Quick" Return a substring 5 characters long, beginning at position 4 [&MyString(-3)] "Dog" Return a substring starting 3 characters before the end of the string [&MyString(-8,4)] "Lazy" Return a substring 4 characters long, starting 8 characters before the end of the string. [&MyString(word,3)] "Brown" Returns a substring containing the word corresponding to the number passed as an argument. Will be empty if there aren't enough words in the string. If the second parameter is negative, words will be counted from the end of the string instead of the beginning [&MyString(reverse)] "goD yzaL eht revo spmuj xoF nworB kciuq ehT" Returns a string that reverses each letter in the original string. [&MyString(replaceencoding)] N/A Returns a string that replace %xx codes in strings with their actual character equivalents. Currently supports angle, square, curly brackets, quotes, commas, percent, ampersand, parens, plus, minus, divide, and equals
Object Attribute Referencing
All object attribute referencing use the * prefix character, with the second (and sometimes third) character providing context).
Prefix Example Notes *S: [*S:character_name] Returns token or character attributes for the token/character specified for the sourcetokensetting. Token attributes are prefixed witht-(ex:[*S:t-bar3_value]).*T: [*T:character_name] Returns token or character attributes for the token/character specified for the targettokensetting. Token attributes are prefixed witht-(ex:[*T:t-bar3_value]).*id: [*-lkfne34mda4:character_name] when *is followed by an ID, the token/character will be queried for the attribute value requested.*C: [*C:playerpageid] Returns campaign attributes. *P: [*P:showgrid] Returns page attributes. If an activepagesetting has been set, theactivepagewill be referenced. If not, the currentplayerpage(where the ribbon is) for the campaign is referenced.*R: [*R:atkname] Used with --R(Repeating Section) commands to return the VALUE of the current repeating row item's attribute by name.*R> [*R>atkname] Used with --R(repeating section) commands to return the full attribute name for a repeating row attribute.*O: [*O:-lkfne34mda4:character:name] Return a property reference for any property on an object with a known ID and type. The syntax is [*O:ObjectID:ObjectType:PropertyName]. The object types match Roll20's object definition and are campaign, player, page, path, text, graphic, character, attribute, ability, handout, macro, rollabletable, tableitem, deck, card, hand, jukeboxtrack, custfx Version 2.1.0
Specifying a Default Value
As of ScriptCards 2.6.4, you can add ":::" to the end of a reference that refers to a character (ie, *T, *S, *id) and include a default value after it. If the attribute lookup on the sheet returns an empty string or null value, the default will be used instead. You can use multiple words for the default value, numeric entries or a combination of alpha-numeric entries. Some special characters do no work, so limit your usage
Example 1:
[*T:npc_condition_immunities:::None] will return the value of the "npc_condition_immunities" attribute or the default of "None".
Example 2:
[*T:npc_condition_resistances:::No Resistances] will return the value of the "npc_condition_resistances" attribute or the default of "No Resistances".
Nested References
Reference syntax can be nested, and will be resolved from inside to outside. For example, given a roll variable MishapRoll, and a series of strings (Mishap1, Mishap2, Mishap3, Mishap4), the following reference will begin by substituting [$MishapRoll.Raw] for the roll's numeric value, and then replace the resulting MishapX string with its value:
[&Mishap[$MishapRoll.Raw]]
Character/Token Attributes
A character or token attribute can be referenced from content portion of any type of line and is substituted when the line is executed. The general format for referencing a character attribute is [*ID:attribute]. ID can be a token ID or a character ID (these start with a dash). Additionally if you have specified a sourceToken or targetToken, you can substitute "S" or "T" for the ID (for example [*S:npc_type] will retrieve the npc_type attribute from the character sheet associated to the source token.
By default, all attribute references will be pulled from the character object that the ID represents (either directly or by being a Token ID that represents a character).
Keep in mind, that if you want to access the "max" of a character attribute (for example, the max hit points), then you cannot trust the name that your roll20 character sheet shows you when you hover your mouse over the max hit points. For example, this reference will not work: [*S:hp_max]. Instead, you need to use this reference: [*S:hp^].
If your ID refers to a token, token attributes can be accessed by preceding the attribute name with t-, for example [*S:t-aura1_radius]. Supported token attributes are:
(NOTE: As of version 1.6.1 of ScriptCards, the below list is no longer a limitation on the token attributes you can reference. All token attributes available in Roll20 can now be accessed and the need to update the internal list as new attributes are added has been eliminated.) For a complete list of token properties, please refer to the Roll20 API Objects site.
The default token can be updated as of 2.3.0 with the following syntax:
--!c:(character_id)|defaulttoken:(token_id)
Example of setting Default Token:
-!c:@{Macro_Mule|character_id}|defaulttoken:@{selected|token_id}
[Expand/Collapse
Token Attributes]
| General | |||||||
| Attribute Name | Data Returned | Attribute Name | Data Returned | Attribute Name | Data Returned | ||
|---|---|---|---|---|---|---|---|
| t-name | Name, as it appears on the token | t-showname | blank/ true | t-id | ID of the token (unique on each Page) | ||
| t-imgsrc | Avatar image is displayed | t-tooltip | cleanly lists the text from the tooltip | t-showtooltip | Show Tooltip checkbox status | ||
| t-showplayers_tooltip | t-gmnotes | shows GM notes but requires cleanup | t-controlledby | ID of the player(s) that have the ability to manipulate the token | |||
| t-represents | character ID number | t-_pageid | ID of the page the token is currently on | t-layer | map, background, objects, foreground, gmlayer, walls, weather | ||
| t-lastmove | Grid coordinates; origin of the target's most recent movements | t-isdrawing | (blank/ true) | ||||
| Bar values, links and statusmarkers | |||||||
| Attribute Name | Data Returned | Attribute Name | Data Returned | Attribute Name | Data Returned | ||
| t-bar1_value | ID of selected card (i.e. from a deck of cards) | t-bar2_value | numeric | t-bar3_max | numeric | ||
| t-bar1_max | numeric | t-bar2_max | numeric | t-bar3_value | numeric | ||
| t-bar1_link | ID of linked attribute | t-bar2_link | ID of linked attribute | t-bar3_link | ID of linked attribute | ||
| t-_cardid | ID of selected card (i.e. from a deck of cards) | t-statusmarkers | inside double quotes, comma separated, marker_name@number (green@5 when the green marker has a number on it) |
||||
| Location, Size and Orientation | |||||||
| Attribute Name | Data Returned | Attribute Name | Data Returned | Attribute Name | Data Returned | ||
| t-top | # of pixels from the left edge of the map | t-left | # of pixels from the top of the map | t-width | # of pixels wide the token is | ||
| t-height | # of pixels high the token is | t-rotation | Rotation degrees (0=handle is up; 90=Handle is right; 180=Handle is down; 270=Handle is left) | t-flipv | Vertically flipped image (blank/ true) | ||
| t-fliph | Horizontally flipped image (blank/ true) | t-tint_color | Token tinted color (transparent/ hex code of color) | ||||
| Aura Settings | |||||||
| Attribute Name | Data Returned | Attribute Name | Data Returned | Attribute Name | Data Returned | ||
| t-aura1_radius | # entered for radius size | t-aura1_color | Hex code of aura color | t-aura1_square | blank if circle; true if square | ||
| t-aura2_radius | # entered for radius size | t-aura2_color | Hex code of aura color | t-aura2_square | blank if circle; true if square | ||
| Light Settings | |||||||
| Attribute Name | Data Returned | Attribute Name | Data Returned | Attribute Name | Data Returned | ||
| t-light_radius | t-light_dimradius | t-light_angle | |||||
| t-light_losangle | t-light_multiplier | t-light_otherplayers | |||||
| t-light_hassight | t-lightColor | Transparent or hex of emitted light | t-emits_bright_light | ||||
| t-bright_light_distance | t-emits_low_light | t-low_light_distance | |||||
| t-has_directional_bright_light | t-directional_bright_light_center | t-directional_bright_light_total | |||||
| t-has_directional_dim_light | t-directional_dim_light_center | t-directional_dim_light_total | |||||
| Permissions-> See Settings | |||||||
| Attribute Name | Data Returned | Attribute Name | Data Returned | Attribute Name | Data Returned | ||
| t-showplayers_bar1 | t-showplayers_bar2 | t-showplayers_bar3 | |||||
| t-showplayers_name | t-showplayers_aura1 | t-showplayers_aura2 | |||||
| Permissions-> Edit Settings | |||||||
| Attribute Name | Data Returned | Attribute Name | Data Returned | Attribute Name | Data Returned | ||
| t-playersedit_bar1 | t-playersedit_bar2 | t-playersedit_bar3 | |||||
| t-playersedit_name | t-playersedit_aura1 | t-playersedit_aura2 | |||||
| Vision Settings | |||||||
| Attribute Name | Data Returned | Attribute Name | Data Returned | Attribute Name | Data Returned | ||
| t-adv_fow_view_distance | t-has_limit_field_of_vision | t-limit_field_of_vision_center | |||||
| t-limit_field_of_vision_total | t-has_night_vision | t-night_vision_distance | |||||
| t-has_limit_field_of_night_vision | t-limit_field_of_night_vision_center | t-limit_field_of_night_vision_total | |||||
| t-has_bright_light_vision | |||||||
It is important to note that some attributes names on tokens have corresponding attribute names on characters, which represent different values. For example, [*T:id] returns the character ID, while [*T:t-id] returns the token ID.
Subroutine Parameters
When using a gosub statement (-->) or a conditional marked as a gosub (prefixing the label with a > character), you can pass any number of parameters separated by semicolons (;) that the code in the subroutine can utilize.
Subroutine parameters are numbered starting at 1, and are accessed by using the notation [%number%], so the first parameter is [%1%], the second is [%2%], etc.
Parameter substitution happens on all line types, and happens prior to character attribute references or roll variable substitution.
Campaign Attribute
You can retrieve properties of the API's Campaign object with the [*C:attributename] syntax. For example, [*C:playerpageid] will retrieve the current player ribbon page from the Campaign object.
Page Attributes
If you have set the activepage parameter, you can retrieve page-related properties with the [*P:attributename] syntax, including the page's UDL parameters.
For example,
!script {{
  --#activepage|[*C:CurrentPageID]
  --+|[*P:name]
  --X|
}}
will return the name of the currently active page. [*C:PlayerPageID] is another possible setting for the #activepage parameter.
Repeating Section Values
You can reference repeating attribute data using the syntax [*R:attributename] syntax (similar to referencing standard character attributes). The currently active repeating row information will be used to retrieve attribute values. You can also retrieve the full attribute name for a repeating row attribute by using the [*R>attributename] notation. This is useful to pass to things like chatsetattr.
See the section named Repeating Section Access for more information.
ScriptCards Settings
It is now possible to reference ScriptCards settings (set with the --# command) using the [~settingname] syntax (ie, [~title] will be replaced with the title setting at the time the reference is interpreted.
Deferred Resolution for Meta Scripts
API:Meta-Toolbox
APIs to patch other API commands
Meta-Toolbox Scripts
created by Timmaugh
Related APIs
As of 1.2.9, ScriptCards supports a deferral character for use when calling another API script with via the --@ statement, to defer processing of meta script references so they get processed prior to the sub-API call instead of prior to ScriptCards execution. To defer this processing for meta script (SelectManager, Fetch) by inserting a deferral character into the meta call. For example, if I want to have ScriptCards call TokenMod as if the token for "Quej Gr'stra" (yes, I let Roll20 name my test NPCs) I could use something like this:
--@token-mod|{^& select Quej Gr'stra} _on showname
The ^ in between { and & will prevent SelectManager from seeing the call when the ScriptCard script is processed, but the --@ statement will remove the deferral character so the command that will be sent by ScriptCards is:
!token-mod {& select Quej Gr'stra} --on showname
With the deferral character removed, SelectManager will see the {& select ...} and do its magic.
While the default deferral character is ^, the deferral character is a setting that can be changed:
--#deferralcharacter|%
Will make % the deferral character for future --@ statements in the running script.
Supported Meta Script structures:
-
{^&...}- for SelectManager -
@^(...)and*^(...)for Fetch -
get^.andset^.for Muler ( v 1.4.5+ )
Arrays
Arrays are structures used to store multiple values in a single variable name. In ScriptCards, all arrays are a series of string values. You can think of an array as a numbered list of boxes with a single name. This might look something like this:
Example
| 0 | 1 | 2 | 3 | 4 | 5 |
|---|---|---|---|---|---|
| Apple | Banana | Pear | Grape | Watermelon | Lime |
Here, "Fruits" is the name of the array, and it has 6 boxes associated with it, numbered 0 through 5. These numbers are referred to as the index.
Therefore, index 3 in the Fruits array would be "Grape", while index 0 is "Apple". Referring to these values withing ScriptCards can be done in several ways, but the simplest using short-hand array notation like this: [@Fruits(3)] and [@Fruits(0)] for Grape and Apple respectively.
Array Elements
After an array has been declared, the elements can be referenced with [@arrayName(index)]. Array indices start at 0.
Defining Arrays
Arrays can be defined in one of two ways:
- The
--~series of built-in functions can be used (specifically the "define" subfunction)
Notes: using "define", an array will not be able to contain the ";" character, since it is used as the default parameter separator. You can redefine this separator (the #parameterDelimiter setting) to work around this limitation.
- An assignment to an array that does not exist via
--&MyArray(index)will create the array.
Notes: The index value above is a numeric index you wish to set the item value for. If the index number is larger than the number of items in the array, the item will be appended to the end of the array at the next valid index value (so specifying an index of 9999 in an array with 3 items (numbered 0 to 2) will add the item at index 3, resulting in an array with four items). If you specify an existing element index, the value at that index will be replaced with the new value. If you specify a negative number for the index, the value will be inserted at the front of the array (index 0) and the existing items in the array will be pushed one index value up.
Elements within an array can be directly refenced with the [@MyArray(index)] syntax.
Example:
The following code creates a simple array, adding values initially by defining the array and then by adding them with direct assignment to a value larger than the size of the array. A foreach loop is then used to output each item of the array (the loop operates in index order). The array is then sorted with the array sort function and output again:
!script {{
  --~|array;define;fruits;Mango;Banana;Peach;Apple
  --&fruits(999)|Watermelon
  --&fruits(999)|Lime
  --&fruits(999)|Kiwi

  --/|Output each array element
  --+Before sorting|
  --%loop|foreach;fruits --+Value|[&loop] --%|

  --/|Sort the array
  --~|array;sort;fruits
  --+[br][br]After sorting|
  --%loop|foreach;fruits --+Value|[&loop] --%|
}}
Interacting with the GM and Players
There are some severe limitations to what can be accomplished with the Roll20 API, and many of those limitations revolve around user interactivity. While the API can interact with objects in the campaign and generate output to the game chat window, it has exactly zero access to the user interface. You can't pop up a dialog box to get information from a player or prompt the someone to pick X number of targets, where X is only determined after your script has done some processing.
Method 1: The Information Request (--i) Command
While it is certainly possible to use roll queries to fake something similar to the above, the limitations here will soon become obvious when trying to do anything even a little complicated. This is because all roll query questions are asked of the user BEFORE the script is sent to the API for processing, meaning if you include a roll query in your code, even in a place that is completely inaccessible by the ScriptCards code, the user will still be prompted to input values for it. Consider this example:
!script {{
  --=Roll|1d4
  --?[$Roll.Raw] -eq 4|>RandomEncounter|>AllQuiet
  --X|

  --:AllQuiet|
  --+It's quiet...|Too quiet...
  --<|

  --:RandomEncounter|
  --+Random Encounter!|A group of ?{How many bugbears?|1|2|3|4|5|6|7} bugbears jump from the woods and attack!
  --<|
}}
What we really want to happen here is the random encounter roll to take place and only be asked to supply a number of bugbears if we rolled a 4. Unfortunately, because the chat server pre-processes the API command, the bugbears question will always be asked before anything else processes.
Getting around this limitation requires some creative thinking and a bit of extra work. Let's stick with the same simple random encounter concept but mix things up a bit.
!script {{
  --=Roll|1d4
  --?[$Roll.Raw] -eq 4|>RandomEncounter|>AllQuiet
  --X|

  --:AllQuiet|
  --+It's quiet...|Too quiet...
  --<|

  --:RandomEncounter|
  --iA Random Encounter has occurred and we need more information to continue;Click to provide details|q;bugbearcount;How many bugbears|1|2|3|4|5|6|7
  --+Random Encounter!|A group of [&bugbearcount] bugbears jump from the woods and attack!
  --<|
}}
This time, we won't be prompted for a number of bugbears unless a random encounter comes up on the 1d4. If it does, the script will pause execution and whisper the player running the script a message. The message will explain that additional information is needed, and provide a button for the player to click to answer the bugbear question. After they do, execution will be resumed on the following line with the new information in place.
In this case, the q;bugbearcount;How many bugbears|1|2|3|4|5|6|7 portion of the code is the encoded question:
q- meaning we are going to generate a Querybugbearcount- The string variable our result will be stored in when execution resumesHow many bugbears|1|2|3|4|5|6|7- This is the exact same roll query text above, without the surrounding?{and}structure.
The --i command can ask for multiple pieces of information, including targets and roll query responses. Requesting the player select a target would look something like:
t;detectingCharacter;Which character detects the bugbears?
In this case:
t- inidcates that we want the player to select a target tokendetectingCharacter- the string variable that will store the token ID of the selected tokenWhich character detects the bugbears?- The prompt that the target selection box will display
Any combination of t and q information can be included in the same --i command by separating the components with double vertical bars:
--iA Random Encounter has occurred and we need more information to continue;Click to provide details|q;bugbearcount;How many bugbears|1|2|3|4|5|6|7||t;detectingCharacter;Which character detects the bugbears?
would ask for a number of bugbears and for the player to select which character saw them coming.
Method 2: Buttons
Roll20's chat server has a built-in method for creating buttons in chat:
[Attack Roll](!attackroll)
This will create a button labeled "Attack Roll" that executes the !attackroll API command when the user clicks it. This is a basic API chat button using the Roll20 chat syntax.
Simple ScriptCards chat button
ScriptCards supports the creation of simple buttons in --+ and --* output lines with the following syntax: [button]caption::action[/button], so the same Attack Roll button from above could be created in ScriptCards with:
[button]Attack Roll::!attackroll[/button]
Things get a bit more tricky if you want to execute a macro as the result of clicking a button. You would think:
[Attack Roll](#attackmacro) or [button]Attack Roll::#attackmacro[/button] would work, but it just won't do anything at all when clicked. In order to execute a macro from a Roll20 button, you need to prefix it with !
#, which translates to an exclamation point (!) so Roll20 thinks it is an API call, followed by a carriage return (
) followed by the pound sign (#) that prefixes macro names: NOTE: copying the example strings above from this wiki page will result in non-printing characters being inserted into your macro because the Wiki can't display the string sequence above without them inserted into it. You will need to manually type the unicode character information (beginning at the ! and ending at the second #) into your macro.
[Attack Roll](!
#attackmacro) or [button]Attack Roll::!
#attackmacro[/button] will produce a button that executes the #attackmacro macro when clicked.
Additional examples of simple button usage:
Example 1: Replace Roll20 Ability Command Buttons
[button]Set Area of Effect::~[&Character]|[&AbilityName][/button]
- Set the
&Charactervariable to the name of a character and set the&AbilityNamevariable to the name of an ability macro in that character's abilities to generate a chat button that activates that ability, very similar to how sheetbuttons work and much more customizable than the default Ability Command Buttons.
Ability Macro Sheetbuttons
There is another button syntax that can be used with ScriptCards to make calling ability macros stored on a character sheet a bit easier. Sheetbuttons are pretty easy to remember when you consider they are chat buttons that activity abilities from (character)sheets! Let's take a look at how you incorporate one into your scripts!
Sheetbutton Syntax:
[sheetbutton]caption::character::ability[/sheetbutton]
This will look on the indicated character's sheet for a matching ability name and create a button that will execute the ability macro command(s) when clicked. The character parameter can be a character ID, a token ID, or a character name and ScriptCards will do its best to find a match.
Example of a Sheetbutton:
[sheetbutton]Fireball::Spell_Mule::Fireball[/sheetbutton]
Using this example, the script will look for an ability macro named "Fireball" on a character(sheet) named "Spell_Mule" and execute it when clicked. There is no need to specify the
# prefix when creating buttons with [sheetbutton]
Reentrant Buttons
Finally, a third type of button is available : [rbutton]. These buttons are used for reentrant scripts.
Button Colors
By default, the buttons ScriptCards will follow the color scheme from Roll20, resulting in pink buttons with white text on them. You can include hex color codes in the [button], [rbutton] and [sheetbutton] markers to change the colors associated with an individual button:
[button:#ffffff:#000000]Attack Roll::!attackroll[/button]
will create a button with white text (#ffffff) on a black background (#000000). It is possible to only specify a text color (the first color parameter) without the second, but to set the background color of the button you must also set the text color as well.
Alternatively, you can set the --#buttontextcolor and --#buttonbackground settings to change the color of all buttons the script creates from that point forward (see the --# command).
Reentrant Scripts
--#reentrant|somevalue), your setting and variable information will be preserved between executions. Reentrant script can be used to present menus or choices and then continue acting.Important: The value of the reentrant setting will be used to identify the appropriate section to resume when reentrancy is used. If more than one character can potentially run the same script at the same time, it is a good practice to include the character ID in the reentrant setting in order to maintain a separate list of variables. Something like:
--#reentrant|My Cool Script @{selected|character_id}
[rbutton]Caption::ReentryLabel;Parameter[/rbutton] construct. The caption will be displayed on the generated button. ReentryLabel is the name of a label in your script that the button will jump to when clicked, and Parameter will be passed in as a string variable called reentryval.reentryval is case-sensitive!Examples of Syntax
This example demonstrates the way several functions flow through the reentrant process.
!script {{
  --#reentrant|testing
  --=Roll|1d20
  --+Roll|[$Roll]
  --&String|That was a [$Roll.Raw]!
  --~x|array;define;MyArray;Apple;Banana;Orange
  --+Try it|[rbutton]Hello!::EXEC_PC_SPELL;9[/rbutton]
  --X|

  --:EXEC_PC_SPELL|
  --+ReentryVal|[&reentryval]
  --+The value of Roll is|[$Roll]
  --+Value of String|[&String]
  --+Array|[@MyArray(0)]
  --X|
}}
EXEC_PC_SPELL, which will display the content of the variables from the original execution.Practical Application Example
Sample Scenario: Setting up a simple interactive shop for the players
Reentrant scripts are very well suited to presenting menus or choices to the player, waiting for their input via "rbuttons" and then continuing based on what they've selected, as demonstrated in the sample script below. There are two versions of the same scriptcard. The first version is the simple script without explanatory comments. The second version has notes explaining what each line does in case you want help understanding what any part of the script does. Simply expand/collapse the sections to view or hide them.
- When a player runs the script, they will be greeted by the shop keeper and offered a set of initial choices in the form of buttons the individual player can click, like a "main menu".
- Note: This script only displays to the player who ran the script. All players can run the script for themselves concurrently though.
- If the player clicks the "Buy Potion" option the script will show them a list of buttons with potions and prices for the player to click.
- If the player clicks a potion to purchase the shop keeper will thank them and act out giving the player the potion they requested.
- If the player clicks cancel, they will return to the main menu.
- Note: No money is deducted from the player's character sheet, nor is a potion added to their character sheet. That can be added, but this script was intentionally kept more simple.
- The player can then continue buying potions or return to the main menu to leave the shop.
| [Expand] Reentrant Sample Script without Notes Expand/Collapse with the link to the right |
| [Expand] Reentrant Sample Script with Notes Expand/Collapse with the link to the right |
Libraries
You can now create handouts in your game in Roll 20 with the name format ScriptCards Library NAME, where NAME is a name you assign to the library. Library names are case sensitive. It is my hope that the more proficient ScriptCards scripters out there will provide procedure libraries (or procedures that can be included in libraries) for others to use to make their scripting life easier. Be they specific to a game system, or to a type of activity, I think a robust set of libraries that GMs could use to enhance their scripting capabilities would be very valuable to the community. Should such things begin to emerge, I’ll create a portion of the ScriptCards Wiki page to house them.
To include one or more libraries in a script, use the +++libname+++ directive (does not need a -- line associated with it). Multiple library names can be specified by separating them with semicolons (i.e., +++General;dnd5elib;Colorize+++ would include three libraries (General, dnd5elib, and Colorize).
Included libraries are separated from the main script code by the automatic inclusion of --X| before the first library is appended to the script, and all libraries are loaded at the end of the script before script processing takes place.
Procedures and labels in libraries can be used just as if they were included in the body of your script. Note that this DOES mean that you could, technically, jump into a library with a direct branch --^ or direct branch conditional, but I recommend using libraries to store reusable procedures.
The Notes section of the library handout stores the library code, and is written just like any other ScriptCards code except:
- They cannot use roll queries (
?{Some Prompt:}) to get information from the user at execution time. - They cannot use
@{}notation to access character and token information.
Both of these limitation stem from the fact that Procedure Libraries are not processed by the chat server, which is what handles these items.
Here is an example of handling damage modifications (resistance, vulnerability, and immunity) in D&D 5E by Roll20!script {{
+++dnd5elib+++
--#|Damage Modifiers Test
--#targettoken|@{target|token_id}
-->Lib5E_CheckDamageModifiers|ResistType;fire
--=DamageRoll|2d10 [&ResistType]
--+Test:|[$DamageRoll] fire damage
-->Lib5E_CheckDamageModifiers|ResistType;cold
--=DamageRoll|2d10 [&ResistType]
--+Test:|[$DamageRoll] cold damage
-->Lib5E_CheckDamageModifiers|ResistType;poison
--=DamageRoll|2d10 [&ResistType]
--+Test:|[$DamageRoll] poison damage
-->Lib5E_CheckDamageModifiers|ResistType;acid
--=DamageRoll|2d10 [&ResistType]
--+Test:|[$DamageRoll] acid damage
--X|
}}
Library content (In a handout called “ScriptCards Library dnd5elib” NOTE: Paste into Notepad first and then paste into the handout in Roll20 to avoid bringing over HTML formatting from the web site):
--/|ScriptCards Library: dnd5elib version 0.0.1
--/|Provides various utility procedures for D&D 5E games

--/|Lib5E_CheckDamageModifiers handle damage resistance, vulnerability, and immunity.
--/|Pass a string variable to be filled with a string to be appended to a dice roll and the damage type

--:Lib5E_CheckDamageModifiers|damageVariableName;damageType
--&[%1%]|
--?"[*T:npc_vulnerabilities]" -inc "[%2%]"|>_Lib5E_IsVulnerable;[%1%]
--?"[*T:npc_resistances]" -inc "[%2%]"|>_Lib5E_IsResistant;[%1%]
--?"[*T:npc_immunities]" -inc "[%2%]"|>_Lib5E_IsImmune;[%1%]
--<|

--:_Lib5E_IsVulnerable| --&[%1%]| * 2 [Vulnerable] --<|
--:_Lib5E_IsResistant| --&[%1%]| \ 2 [Resistant] --<|
--:_Lib5E_IsImmune| --&[%1%]| * 0 [Immune] --<|
The idea is that the functions in the library create a string that can be appended to a roll to modify the output based on resistances, so you pass Lib5E_CheckDamageModifiers the name of the string variable you want to use and the damage type. The variable (ResistType in this case) will include either nothing, * 2 [Vulnerable], \ 2 [Resistant], or * 0 [Immune] which can be included in a roll assignment (--=) to modify the damage as appropriate. The order here might be important if an NPC is misconfigured to be both resistant and immune to the same damage type. Since immune is an absolute, having it last ensures that it will override resistant or vulnerable. A creature that is both vulnerable and resistant (again, misconfigured) will come back as resistant since that condition is checked after vulnerable.
Some notes: I prefix my library labels with either Lib5E_ or _Lib5E_ as a clarity convention. This isn’t strictly necessary but you should be aware that if two libraries (or if your script and a library) define the same label, the last label defined will win. Since libraries are appended to the end of the script in the order you include them in the +++libname+++ directive, you can somewhat control this, but it is probably best to avoid re-declaring labels.
In my case, items beginning with Lib5E_ are intended to be called by scripts, while items beginning with _Lib5E_ are intended to be used as subroutines by the “public” procedures. Of course, there is no reason you couldn’t call them directly.
You might also note that I’ve included some library information in comment lines (--/|) at the top of the library. These are ignored by ScriptCards, and are a good way to convey requirements, parameters, usage information, etc.
Example Libraries
dnd5elib
Download the dnd5elib Library from the ScriptCards GitHub
The dnd5elib library provides a collection of utility procedures that help simplify dealing with the D&D 5E Official Sheet. Some of the procedures in this library require ChatSetAttr to be installed in your game. This is a growing library, and currently only has a handful of routines. They are:
Procedure Name Notes Lib5E_CheckDamageModifiers parameters, pass the Lib5E_CheckDamageModifiers procedure a variable name (no reference information) and a damage type (i.e., fire, cold, bludgeoning, etc.), and the procedure will then create a string variable with with a name equal to the first parameter that you passed into the procedure. This variable will contain a string that can be included in a roll line (--=), in order to modify the roll as appropriate. For example, -->Lib5E_CheckDamageModifiers|ResistType;fire will check the current target character's attributes for "fire" and will either return an empty string (no references), "* 0 [Immune]" if the creature is immune, "\ 2 [Resistant]" if the creature is resistant, or "* 2 [Vulnerable]" if the creature is vulnerable to fire damage. Lib5E_DeductSpellSlot Pass in a character_id and a slot level, and the script will expend one spell slot of that level, capping the value at 0 slots remaining. For Example -->Lib5E_DeductSpellSlot|@{selected|character_id};1 to deduct a first level spell slot from the selected character. Lib5E_FindResource Used to locate a resource value on a character. Pass in a character_id, a resource name, and two variable names. The procedure will check both repeating and non-repeating resources looking for a resource whose name matches what was passed in and return three variables. The first will be a string variable named for the 3rd parameter and contains the attribute name of the resource's "name" field. The second will be a string variable named after parameter 4 and contains the resource's value field attribute name, and the third variable is a Roll Variable, also named after the 4th parameter that contains the current resource value. Example: -->Lib5E_FindResource|@{selected|character_id};Crossbow bolts;ResName;ResValue will find "Crossbow bolts" as a resource on the character and return [&ResName] which is the name of the resource attribute, [&ResValue] which is the name of the attribute that stores the value and [$ResValue] which is the current numeric value of the resource. Lib5E_Active_Global_Attack_Modifiers Pass a character ID and a string variable to set the return value. This procedure will look through the Global Attack Modifiers (repeating_tohitmod_*) for rows that are active (checked on the character sheet) and return a string with the dice rolls and descriptions for each (for example, if I have "Bless" for 1d4 active and "Being Cool" for +2 active, I will get a return string " + 1d4 [Bless] + 2 [Being Cool]" that can be used in a dice roll. Lib5E_Active_Save_Modifiers Pass a character ID and a string variable to set the return value. This procedure will look through the Global Save Modifiers (repeating_savemod_*) for rows that are active (checked on the character sheet) and return a string with the dice rolls and descriptions for each (for example, if I have "Bless" for 1d4 active and "Being Cool" for +2 active, I will get a return string " + 1d4 [Bless] + 2 [Being Cool]" that can be used in a dice roll. Lib5E_Active_Skill_Modifiers Pass a character ID and a string variable to set the return value. This procedure will look through the Global Skill Modifiers (repeating_skillmod_*) for rows that are active (checked on the character sheet) and return a string with the dice rolls and descriptions for each (for example, if I have "Guidance" for 1d4 active and "Being Cool" for +2 active, I will get a return string " + 1d4 [Guidance] + 2 [Being Cool]" that can be used in a dice roll. Lib5E_Active_AC_Modifiers Pass a character ID and a string variable to set the return value. This procedure will look through the Global AC Modifiers (repeating_acmod_*) for rows that are active (checked on the character sheet) and return a string with the dice rolls and descriptions for each (for example, if I have "Shield of Faith" with a value of 2 active, I will get a return string " + 2 [Shield of Faith]" that can be used in a dice roll. Lib5E_Active_Damage_Modifiers Pass a character ID and TWO string variable to set the return value. The first string will be for normal damage, and the second will be the additional damage on a crit. This procedure will look through the Global Damage Modifiers (repeating_damagemod_*) for rows that are active (checked on the character sheet) and return two strings with the dice rolls and descriptions for them (for example, if I have "Sneak Attack" with a value of 1d6 normal and 1d6 critical damage active, I will get a return string " + 1d6 [Sneak Attack]" and another string of " + 1d6 [Sneak Attack CRIT]" that can be used in a dice rolls. Lib5E_DivineSmiteDice Used to calculate the number of dice to be rolled for a paladin's Divine Smite. Pass a target token id, a spell slot level, and a string variable to be set to the dice roll amount based on the NPC_TYPE attribute of the target token. The returned variable will contain a dice roll (like "3d8" that can be used in a --= line) Lib5E_Character_Summary Pass a character ID to outputs a mini character sheet, including clickable buttons for attacks, actions, legendary actions, etc. Will automatically detect a PC vs NPC and output the appropriate sections.
Due to formatting issues with the Wiki, the library code has been moved to a GITHUB GIT. Please view the GIST in raw mode and copy the text and paste it into a handout called "ScriptCards Library dnd5elib" in your Roll20 Game.
Triggers
Roll20's Mod system includes a number of in-game "events" that fire code that mod scripts can watch for. Normally, you would need to write your own Javascript-based mod to respond to these events. ScriptCards makes the ability to watch for and react to events accessible without the need to write Javascript code through the concept of ScriptCards Triggers.
A ScriptCards trigger is really simply an ability on a specially named character sheet that are named to correspond with the events you want to watch for. Internally, events have names that start with one of:
- add - A new item of a particular type has been created
- destroy - An item of a given type has been destroyed/deleted
- change - Some property of an item of a given type has changed.
There are several different types of objects that these events can be fired for. Not all potential events are currently supported by ScriptCards Triggers, but support can be added if they are needed. In some cases, to prevent unnecessary utilization, triggers include a third parameter that limits their activation to a certain use case.
For example, there is not a generic "change:attribute" event supported - even though Roll20 does fire such an event. Rather, the attribute being monitored is required as part of the event name for the trigger. If you wished to monitor an attribute called "hp", the event name would be "change:attribute:hp". In addition to preventing script runs whenever anything at all changes, this allows you to easily set up multiple triggers for different attributes without the need to determine which attribute changed as part of a massive trigger script.
ScriptCards supplies information about the event itself by replacing the text "--/|TRIGGER_REPLACEMENTS" in your trigger script with variable assignments based on the event. Generally, add events will have "XAddedY" variables, destroy events will have "XRemovedY" variables, and change events will have "XOldY" and "XNewY" variables. X in these cases indicates the object type, and Y is the name of the property of the object. The variable names will end with the field being conveyed. EX: [&CharAddedname] would contain the name of the added character. [&CharOldname] and [&CharNewname] would contain the "name" property before and after a character is renamed. The following objects and events are supported, including the ability names of the corresponding triggers:
Object Description Add Destroy Change Variable Prefix(s) attribute A data value on a character sheet (ie, HP, etc). add:attribute -- change:attribute:attrname AttributeAdded, AttributeOld, AttributeNew campaign:playerpageid The "ribbon" page in the Roll20 GM UI -- -- change:campaign:turnorder PreviousPageID, NewPageID (note: these are the actual variables. There are no suffixes) campaign:turnorder The Initiative/Turn Order tracker -- -- change:campaign:turnorder None character A Roll20 Character (NOT the character sheet data) add:character -- change:character CharAdded, CharOld, CharNew door A door marker in the walls layer add:door destroy:door change:door DoorAdded, DoorRemoved, DoorOld, DoorNew graphic A token, path, or other graphic object add:graphic destroy:graphic change:graphic GraphicAdded, GraphicRemoved, GraphicOld, GraphicNew page A Roll20 page add:page destroy:page change:page PageAdded, PageRemoved, PageOld, PageNew
Examples for using ScriptCards Triggers can be found on the GitHub Repo.
For a full list of the properties of each object type, refer to the Roll 20 API Objects documentation, but they are summarized below.
change:campaign:playerpageid
Object Properties: &PreviousPageID and &NewPageID
change:campaign:turnorder
Object Properties: Currently there are no object parameters for the turnorder change event
change:character
Object Properties: &CharacterOld and &CharacterNew followed by the property name (ex. CharacterOldavatar) - _id, _type, avatar, name, archived, inplayerjournals, controlledby, _defaulttoken.
change:attribute:*
Object Properties: &AttributeOld and &AttributeNew followed by the property name (ex. AttributeOldname) - _id, _type, _characterid, name, current, max
add:graphic
Object Properties: &GraphicAdded which is set to the _id property of the graphic that was just added.
destroy:graphic
Object Properties: &GraphicRemoved followed by the property name (ex. GraphicRemovedtop) - _id, _type, _subtype, _cardid, _pageid, imgsrc, represents, left, top, width, height, rotation, layer, isdrawing, flipv, fliph, name, gmnotes, tooltip, show_tooltip, controlledby, bar1_link, bar2_link, bar3_link, bar1_value, bar2_value, bar3_value, bar1_max, bar2_max, bar3_max, bar_location, compact_bar, aura11_radius, aura2_radius, aura1_color, aura2_color, aura1_square, aura2_square, tint_color, statusmarkers, showname, showplayers_name, showplayers_bar1, showplayers_bar2, showplayers_bar3, showplayers_aura1, showplayers_aura2, showplayers_aura3, playersedit_name, playersedit_bar1, playersedit_bar2, playersedit_bar3, playersedit_aura1, playersedit_aura2, lastmove, sides, currentSide, lockMovement
change:graphic:
Object Properties: &GraphicOld and &GraphicNew followed by the property name (ex. GraphicOldtop) - _id, _type, _subtype, _cardid, _pageid, imgsrc, represents, left, top, width, height, rotation, layer, isdrawing, flipv, fliph, name, gmnotes, tooltip, show_tooltip, controlledby, bar1_link, bar2_link, bar3_link, bar1_value, bar2_value, bar3_value, bar1_max, bar2_max, bar3_max, bar_location, compact_bar, aura11_radius, aura2_radius, aura1_color, aura2_color, aura1_square, aura2_square, tint_color, statusmarkers, showname, showplayers_name, showplayers_bar1, showplayers_bar2, showplayers_bar3, showplayers_aura1, showplayers_aura2, showplayers_aura3, playersedit_name, playersedit_bar1, playersedit_bar2, playersedit_bar3, playersedit_aura1, playersedit_aura2, lastmove, sides, currentSide, lockMovement
add:page
Object Properties: &PageAdded followed by the property name (ex. PageAddedwidth) - _id, _type, _zorder, name, width, height, background_color, archived, jukeboxtrigger, showdarkness, fog_opacity, showgrid, grid_opacity, gridcolor, grid_type, gridlabels, snapping_increment, scale_number, scale_units, diagonaltype, dynamic_lighting_enabled, daylight_mode_enabled, daylightModeOpacity, explorer_mode, force_lighting_refresh, fog_opacity, lightupdatedrop, showlighting, lightenforcelos, lightrestrictmovement, lightglobalillum
destroy:page
Object Properties: &PageRemoved followed by the property name (ex. PageRemovedwidth) - _id, _type, _zorder, name, width, height, background_color, archived, jukeboxtrigger, showdarkness, fog_opacity, showgrid, grid_opacity, gridcolor, grid_type, gridlabels, snapping_increment, scale_number, scale_units, diagonaltype, dynamic_lighting_enabled, daylight_mode_enabled, daylightModeOpacity, explorer_mode, force_lighting_refresh, fog_opacity, lightupdatedrop, showlighting, lightenforcelos, lightrestrictmovement, lightglobalillum
change:page
Object Properties: &PageOld and &PageNew followed by the property name (ex. PageOldwidth) - _id, _type, _zorder, name, width, height, background_color, archived, jukeboxtrigger, showdarkness, fog_opacity, showgrid, grid_opacity, gridcolor, grid_type, gridlabels, snapping_increment, scale_number, scale_units, diagonaltype, dynamic_lighting_enabled, daylight_mode_enabled, daylightModeOpacity, explorer_mode, force_lighting_refresh, fog_opacity, lightupdatedrop, showlighting, lightenforcelos, lightrestrictmovement, lightglobalillum
change:door
Object Properties: &OldDoor[property] and &NewDoor[property] followed by the property name (ex, NewDoorisOpen) - _id, _type_ color, x, y, isOpen, isLocked, isSecret, path
add:door
Object Properties: &DoorAdded, which will be the _id of the door that was added.
destroy:door Object Properties: &DoorRemoved[property] for each of the door object properties as it existed before destruction: _id, _type_ color, x, y, isOpen, isLocked, isSecret, path
Events marked with :* at the end require you to define the particular property of an object that you wish to be alerted to, as some changes can cascade into a huge number of event calls that can cause timing issues if you were to try to respond to them all. For example, you can watch for a particular attribute on a character sheet to change, such as “hp”, by using the event name “change:attribute:hp”, but you cannot watch ALL attributes (change:attribute is not supported).
Setting up for ScriptCard Triggers
In order to utilize ScriptCard Triggers, you will need to create a character in your game named exactly ScriptCards_Triggers. This name is case sensitive, and the character must exist in the game at the time the API sandbox starts for Triggers to be enabled. If you have a correctly named character, you will see a message in the API console similar to “ScriptCards Triggers Active. Trigger Character ID is -N1W93TIw0ofPHUglMV1” when the sandbox starts. If you add the character after the sandbox is running, just restart the sandbox from the API console to have the script re-detect the character.
Object Parameters are generated dynamically, so as Roll20 adds new object properties they will be automatically available to your triggers.
Setting up an Event Handler
In order to respond to events, you will need to create Abilities on the ScriptCards_Triggers character that are named after the event you wish to respond to. The content of the ability is the macro you wish to have execute when the event is triggered.
Note:There is no strict requirement that the executed event needs to be a ScriptCard – ScriptCards will simply sendChat whatever is in the ability – but if it is not a properly formed ScriptCard the object parameters that would be passed to a ScriptCard won’t be available.
Here is a sample ability, with the name “change:campaign:playerpageid”:
!script {{
  --/|TRIGGER_REPLACEMENTS
  --#title|The action moves to...
  --#activepage|[&NewPageID]
  --+|[b][c][*P:name][/c][/b]
}}
The most important component to notice here is the line --/ which will be replaced with the object parameters for
the object that triggered the event when it is called.
This simple script just displays a card letting the players know that the page has been changed and providing the name of the new page.
Object Parameters
All events include object parameters of some kind. For “change” events, there will be two sets of parameters: old values and new values. For “destroy” events, a full set of parameters for the item that was removed will be passed to the script. Finally, for “add” events, just the object ID of the new object will be provided.
For “change” events, a series of string variables will be created on the card that provide access to the object’s previous information with a name like “AttributeOldproperty” (such as AttributeOldcurrent for the value of the attribute before the change – as opposed to AttributeOldmax which would hold the maximum value). There is a similar set of variables for the new properties, named in the format AttributeNewproperty” (i.e., AttributeNewcurrent).
Note that ScriptCards variable names are case sensitive, and the property names are pulled from the objects themselves which can be referenced at API:Objects#Page. Note that there are some oddities in the way Roll20 names some properties by prefixing them with an underscore, so AttributeOld_characterid is correct, while AttributeOldcharacterid will return nothing.
API Generated Events
********Critical Note********: The Roll20 system only fires events in response to changes made through the UI. It does not fire events for changes made to objects through the API, so setting an attribute value in API commands will not cause your triggers to fire. ScriptCards does register itself as an observer for changes from TokenMod, and allows other mods to register as observers for ScriptCards token changes.
Override Templates
Introduced with version 2.2.0, Override Templates make use of a new feature of Keithcurtis' Supernotes 0.2.0 Mod that exposes a set of 10 (as of this writing) HTML templates that can be used to theme ScriptCards output.
To utilize one of these templates, include the #overridetemplate setting in your ScriptCards code (I recommend it be near the top of the code). Using an override template causes ScriptCards to ignore most of the visual output settings you may have included in your script in favor of the template.
Ex: --#overridetemplate|steam
The image below shows the same ScriptCards script run with different #overridetemplate values, which are case sensitive. All of Keith's templates are named with lowercase names. Included in the lower-left is the script run without an Override Template.

Defining Custom Templates
A template consists of six sections of CSS code (Keith defines two more that aren't used by ScriptCards): boxcode, titlecode, textcode, buttonwrapper, buttonstyle, and footer. Note that in ScriptCards case, the button wrapper is output right before the end of the card, and doesn't actually do anything with buttons - it simply allows for the footer to be in the right spot. It should still be included to match the div counts, however.
If you wish to define your own templates, create a character called "ScriptCards_TemplateMule" (case sensitive) and create an ability with the name of your template. The text of the ability MUST be constructed carefully, and I'll include a sample below. Essentially, you need one line for each of the six sections, with all "<" and ">" characters replaed with "{" and "}". Note that this means you won't be able to use curly braces inside the template. Each line begins with the name of the section (ie, boxcode) followed by two colons (::). Each line ends with two vertical bars (||). Leading spaces in the line will be removed automatically, as will line breaks. I suggest working on your styles in something like Notepad++ and pasting them over.
You can refresh the available templates by running !sc-reloadtemplates from the chat window.
Here is a simple example: (I'm not saying it *looks* good :))
boxcode::{div style='background-color: #18769c; box-shadow: 0 0 3px #fff; display: block; text-align: left; font-size: 13px; padding: 5px; margin-bottom: 2px; color: black; font-family: sans-serif; white-space: pre-wrap; line-height:1.3em; font-style:normal'}||
titlecode::{div style='margin: 0.5em 1em 0.25em 1em; font-size: 16px; font-variant: small-caps; font-family: "Goblin One", sans-serif; color: #000; display: block; margin-block-start: 1em; margin-block-end: 0; margin-inline-start: 0px; margin-inline-end: 0px; font-weight: bold;'}||
textcode::{/div}{div}{div style='font-weight: normal; display: block; margin: 0 1em 0 1em;'}||
buttonwrapper::{div style='display:block;'}||
buttonstyle::style='display:inline-block; font-size: 10px; color:#000; padding: 2px 0px 2px 0px; background-color: transparent; border: 1px solid black; text-align: center; border-radius: 0px;'||
footer::
Additional Notes:
In 2.2.0e, some additional style line options were added. These are slightly different than the Supernotes style lines, but expand on them by allowing you to define style information for the subtitle, table components, and the h1..h5 HTML constructs (now parsed from [h1]...[/h1] thru [h5]...[/h5] by ScriptCards' inline formatting processor). These style lines are added to a templatemule ability as before except that they should only include the options that would go inside a style='...' block and not use single quotes (the are used to wrap the style block). The piece keys for these styles are:
subtitlestyle, tablestyle, trstyle, thstyle, tdstyle, h1style, h2style, h3style, h4style, and h5style.
Example: subtitlestyle::font-size:24pt; font-family:Impact; color:red;
[For script writers] Registering your token change events to ScriptCards
Script writers can now register their token change events to ScriptCards!
For example, the Aura/Tint HealthColor(Forum) script looks for changes in token bar values to set the aura color. However, changes made by the api don't normally trigger this event, so it would remain idle when ScriptCards --!t commands are used to modify token properties. By registering your token change event handler function, ScriptCards will notify your script to trigger your function after it changes any token properties.
Add something like this line to your script where you would normally register your events:
            if('undefined' !== typeof ScriptCards && ScriptCards.ObserveTokenChange){
                ScriptCards.ObserveTokenChange(function(obj,prev){
                    myEventHandlerFunction(obj, prev);
                });
            };
So, extending the example of Aura/Tint HealthColor(Forum), the new registerEventHandlers function in that script would read as follows:
    //REGISTER TRIGGERS------------
        registerEventHandlers = function () {
            on('chat:message', handleInput);
            on("change:token", handleToken);
            on('add:token', function (t) {
                _.delay(() => {
                    let token = getObj('graphic', t.id),
                    prev = JSON.parse(JSON.stringify(token));
                    handleToken(token, prev, "YES");
                }, 400);
            });
            //register this script to ScriptCards to handle linked bar hp changes
            if('undefined' !== typeof ScriptCards && ScriptCards.ObserveTokenChange){
                ScriptCards.ObserveTokenChange(function(obj,prev){
                    handleToken(obj, prev, "NO");
                });
            };
        };
This should look familiar to those that have done the same thing with TokenMod or SmartAoE, as I stole the concept, code, and most of this Wiki text form Aaron and David M. :)
What to Know if you are Coming from PowerCards
While ScriptCards and PowerCard have very similar output goals, their internals and use are quite different. The table below summarizes some of the major differences between the scripts. With its built in roll parser and true variable support, ScriptCards allows for much more powerful and flexible macro creation than what is possible in PowerCards simply because of its design.
PowerCards ScriptCards With a handful of exceptions, all lines in a PowerCard macro are intended to produce a line of output on the final card. With ScriptCards, ONLY the --+and--*statement types produces outputPowerCards lines begin with two dashes ( --) followed by a unique tag name for the line, followed by a vertical bar and the content for the line.ScriptCards lines begin with two dashes ( --) followed by a statement type identifier, which is a single character that identifies the type of line to the interpreter. This is followed by a tag (frequently optional), a vertical bar, and the parameters for the statement being executed.PowerCard macros are always processed top to bottom. Lines can be hidden so they don't output anything, but there is no looping or branching ( --SkipTolooks like a branch, but it just hides all of the lines until the referenced label.)ScriptCards scripts support true branching, including direct branching ( --^) and procedure branching (-->) and (--<). Procedures support parameters and a call stack so procedures can be nested to call other procedures. In addition, the --% statement type can be used to create for...next loops.All lines in a PowerCards macro need to have unique tags because PowerCards builds the card as a single JavaScript object using the tag names to store what will be displayed. This is why repeated tag names always result in the last one being shown. ScriptCards tags do not need to be unique, and in the case of many line types are optional. PowerCards conditionals result in either showing or hiding the line they are on. ScriptCards conditionals support branching, variable setting, loop control, and statement block initiation. Because conditional lines do not produce output on their own, the true/false value doesn't impact the display directly. PowerCards relies on the Roll20 Quantum Roll server and inline rolls for all dice functions ScriptCards includes its own dice roll parser, and does not parse inline rolls. If an inline roll is passed to ScriptCards, it will insert the final value of the roll in the place of the roll in the macro, but they are not part of or parsed by the built-in roll parser and cannot reference ScriptCards variables or updated while the script is running. PowerCards RollIDs (often mistaken for variables) are assigned by analyzing the results of an inline roll, and cannot be referenced in other rolls, so you can't roll a 1d4and then roll a1d20and add the1d4result because all of the rolls happen on the chat server before PowerCards gets the macro text.ScriptCards supports two types of variables: Roll VariablesandString Variables. Because ScriptCards uses its own roll parser and is not dependent upon the chat server, rolls and their results can be used in other rolls, math functions, output, etc.
Example Scripts
⚠ Caution: The features available in ScriptCards have changed drastically since these examples were written.
While the cards below should still work, there are, in many cases, better ways to do things using language features introduced after these were constructed. Please see the Script Examples section of the official ScriptCards GitHub repository for more current script examples.
The examples listed below are being updated to the current recommended methods. Each example card below will have a clear note rather it's in older syntax that still works, or if it's been updated to current recommended syntax, until all updates are completed and this caution statement is removed.
Below are some sample scripts that utilize the various statement types in ScriptCards:
Divine Smite
This script will prompt the user for a spell slot level to expend on a divine smite. It will check the target's npc_type to see if it is an Undead or Fiend, which adds an additional d8 to the smite roll.

!scriptcard  {{
  --#title|Divine Smite
  --=DiceCount|?{Spell Slot Level?|1|2|3|4|5|6|7|8|9} + 1
  --=IsFiendOrUndead|0
  --?"@{target|npc_type}" -inc fiend|>IsBoosted
  --?"@{target|npc_type}" -inc undead|>IsBoosted
  --=TotalDice|[$DiceCount] + [$IsFiendOrUndead]
  --=SmiteRoll|[$TotalDice]d8
  --#emoteText|@{selected|token_name} smites @{target|token_name}
  --#sourceToken|@{selected|token_id}
  --#targetToken|@{target|token_id}
  --+Smite|deals [$SmiteRoll] radiant damage.
  --X|

  --:IsBoosted|
  --=IsFiendOrUndead|1
  --<|
}}
How It Works
The first line sets the "title" card parameter to "Divine Smite".
Line 2 Shows a query to the user asking for the spell slot level, adds one and stores the value in the "DiceCount" Roll Variable. The query/dropdown is generated by the chat server prior to the script being executed.
Line 3 defaults the "IsFiendOrUndead" Roll Variable to 0.
Lines 4 and 5 compare the target's "npc_type" attribute (passed by the chat server as text) to see if they include either "undead" or "fiend". If true, the IsBoosted subroutine will be called. No parameters are passed to this subroutine.
Line 6 sets the "TotalDice" variable to the base (DiceCount) number plus the IsFiendOrUndead number, which will be a 0 or a 1.
Line 7 calculates "SmiteRoll" by rolling a number of d8 equal to the "TotalDice" value.
Lines 8-10 set the parameters for the emote, which appears above the card content. By setting the sourceToken and the targetToken, their icons will appear in the emote surrounding the text describing the action.
Line 11 is the only line that actually produces output on the card. It results in "Smite deals # radiant damage".
Line 12 ends the script execution, preventing the script from continuing and running the subroutines out of context.
Lines 14-16 are the IsBoosted subroutine, starting with the :IsBoosted label. The IsFiendOrUndead variable is set to 1, and a return from subroutine is executed.
Alternative Script
!scriptcard  {{
  --#title|Divine Smite
  --#sourceToken|@{selected|token_id}
  --#targetToken|@{target|token_id}
  --=DiceCount|?{Spell Slot Level?|1|2|3|4|5|6|7|8|9} + 1
  --?"@{target|npc_type}" -inc fiend -or "@{target|npc_type}" -inc undead|=DiceCount;[$DiceCount.Raw] + 1
  --=SmiteRoll|[$DiceCount]d8
  --#emoteText|@{selected|token_name} smites @{target|token_name}
  --+Smite|deals [$SmiteRoll] radiant damage.
}}
This version of the Divine Smite script has identical output to the script above, but is greatly simplified by using language features introduced later in the ScriptCards development cycle. Instead of a subroutine that is called based on the undead or fiend values as separate checks, a single conditional is used joined by an -or. The expanded capability of conditionals to set variables is then used to add one to the DiceCount if the conditional statement is true.
Magic Missile
This script demonstrates using a loop and calling a subroutine to fire a number of missiles determine by the spell slot level used to cast the spell.

!scriptcard  {{
  --#title|Magic Missile
  --#sourceToken|@{selected|token_id}
  --#targetToken|@{target|token_id}
  --=MissileCount|?{Spell Slot Level?|1|2|3|4|5|6|7|8|9} + 2
  --=DisplayCount|1
  --=MissileDamage|0
  --#leftsub|Slot level ?{Spell Slot Level?}
  --#rightsub|Ranged Attack
  --#emoteText|Fred uses a level ?{Spell Slot Level?} spell slot to fire [$MissileCount.Total] missiles of magical force!
  --:MissileLoop|
  -->FireMissile|
  --=DisplayCount|[$DisplayCount] + 1
  --?[$DisplayCount] -le [$MissileCount]|MissileLoop
  --+Total|Total damage is [$MissileDamage]
  --X|

  --:FireMissile|
  --=ThisMissile|1d4 + 1
  --=MissileDamage|[$MissileDamage] + [$ThisMissile]
  --+Missile|[$DisplayCount.Total] Hits for [$ThisMissile] [b]force[/b] damage
  --<|
}}
How It Works
Lines 1 - 3 set the card title, the source token and the target token. Setting these tokens causes their icons/avatars to appear in the Emote section of the card.
Line 4 asks the user what spell slot level they wish to use to cast magic missile. The number of missiles fired is equal to 2 plus the spell level, and this is stored in the MissileCount variable.
Line 5 stores a 1 in the DisplayCount variable. This will be used to control the loop to determine the number of missiles fired and the missile number when displaying damage rolls.
Line 6 initializes MissileDamage to 0
Line 7 sets the left subtitle to the text "Slot Level #", where # is the spell slot level being used.
Line 8 sets the right subtitle to the text "Ranged Attack".
Line 9 sets the emoteText parameter with a description of the action, including the slot level and number of missiles fired.
Line 10 is a label for the missile firing loop
Line 11 Calls the "FireMissile" subroutine
Line 12 increases the DisplayCount variable by 1
Line 13 Checks to see if there are still missles to fire (DisplayCount <= MissileCount) and if so branches to MissileLoop
Line 14 Displays the total damage dealt by the spell.
Line 15 stops execution of the script to prevent out of context execution of the subroutine.
Lines 16-21 are the FireMissile subroutine, beginning with the FireMissile label. The 1d4+1 is rolled and assigned to "ThisMissile". The result is added to the existing MissileDamage total, and a line for the current missile is displayed with the missile number and the damage for the missile.
Longsword Attack
This script demonstrates a standard 5E D&D melee weapon attack, including detection of misses, fumbles, hits, and critical hits. If installed, alterbars is used to decrement the target's BAR3 value by the damage dealt.

!scriptcard  {{
  --#title|Longsword
  --#leftsub|Melee Attack
  --#sourceToken|@{selected|token_id}
  --#targetToken|@{target|token_id}
  --#emoteText|@{selected|token_name} attacks @{target|token_name}
  --=TargetAC|@{target|npc_ac}
  --?[$TargetAC.Total] -gt 0|DoneWithAC
  --=TargetAC|@{target|ac}
  --:DoneWithAC|
  --=AttackRoll|1d20 + @{selected|strength_mod} [STR] + @{selected|pb} [PROF]
  --+Attack|@{selected|token_name} rolls [$AttackRoll] vs AC [$TargetAC].
  --?[$AttackRoll.Base] -eq 20|Crit
  --?[$AttackRoll.Base] -eq 1|Fumble
  --?[$AttackRoll.Total] -ge [$TargetAC.Total]|Hit
  --+Miss|The attack missed.
  --^Final|

  --:Fumble|
  --+Fumble!|The attack went horribly wrong.
  --^Final|

  --:Hit|
  --=Damage|1d8 + @{selected|strength_mod} [STR]
  --+Hit!|The attack hit @{target|token_name} for [$Damage] slashing damage.
  --@alter|_target|@{target|token_id} _bar|3 _amount|-[$Damage]
  --^Final|

  --:Crit|
  --=Damage|1d8 + @{selected|strength_mod} [STR] + 1d8 [CRIT]
  --+Critical Hit!|The attack hit @{target|token_name} for [$Damage] slashing damage.
  --@alter|_target|@{target|token_id} _bar|3 _amount|-[$Damage]

  --:Final|
}}
How it Works
In lines 1-5, we set the title, subtitle, and emote text along with the tokens for the emote area.
Lines 6-9 allow us to determine the AC of the target. On the 5E Roll20 sheet, NPCs armor class is stored in npc_ac, while PCs armor class is in ac. First we grab npc_ac and if it is zero, we check ac.
Line 10 rolls the attack roll, rolling 1d20 and adding the attacker's strength modifier and proficiency bonus
Line 11 displays the result of the attack roll on the card
Lines 12-14 determine what kind of result the attack had. If the .Base value of the roll was 20, we branch to "Crit". If it was 1, we branch to "Fumble". If the .Total value of the roll was greater than or equal to the AC that was determined in Lines 6-9, we branch to Hit.
Assuming we didn't branc anywhere, the result of the attack was a miss, so we display that on line 15 and then branch to "Final"
This is followed by three branch segments, :Fumble, :Hit, and :Crit. A fumble displays a text message and branches to :Final.
On a hit or a crit, we roll Damage (adding additional damage dice on a crit). We display a "Hit!" or "Critical Hit!" message and then make an API call to AlterBars, passing it the token id, bar we want to modify (3 in this case), and the amount we want to modify by the Damage value.
Party Health Status
This example calculates the current Hit Points remaining and HP percentage for each character and creates a color-coded display with the current party status.

!scriptcard  {{
  --#title|Party Status
  --#titleCardBackground|#33CC33
  --#oddrowbackground|#bfee90
  --#evenrowbackground|#90eebf
  -->HealthCheck|@{Quej Grastra|character_id}
  -->HealthCheck|@{Brim Cheuto|character_id}
  -->HealthCheck|@{Odug Ututees|character_id}
  --X|End of card Execution

  --:HealthCheck|
  --=HealthPerc|[*[%1%]:hp] / [*[%1%]:hp^] * 100 \ 1
  --=HealthColor|000000
  --?[$HealthPerc.Total] -gt 50|HealthSkip
  --=HealthColor|FF0000
  --:HealthSkip|
  --+[*[%1%]:character_name]|has [#[$HealthColor.RollText]][*[%1%]:hp] of [*[%1%]:hp^][/#] HP [R]([$HealthPerc.Total]%)[/R]
  --<|End of HealthCheck
}}
How it Works
Lines 1-4, we set the card title, and set the title background and row background colors to shades of green.
Lines 5-7 make gosub calls the the "HealthCheck" subroutine, passing in the character ID of each of the named characters (these are the names of the characters in my test game)
Line 8 terminates the script execution.
The remaining lines of the script are the HealthCheck subroutine, which works like this:
Line 10 is the subroutine label (:HealthCheck)
Line 11 uses the character id passed as a parameter and combines it with character attribute lookup *(...) to retrieve the value of hp and hp^ for the character. The ^ character is used to specify that we want the MAX value for this attribute for the second call. We divide these two numbers and multiple by 100 to get a percentage. Finally, we use integer division by 1 to round the percentage and drop the decimals. The end result gets stored in the HealthPerc roll variable.
Line 12 defaults to color of the health text to black
Line 13 check to see if the health percentage is greater than 50. If so, it branches to HealthSkip, preventing the script from executing line 13.
Line 14 sets the color of the health text to red
Line 15 is the label that will be branched to from Line 13 to skip the red coloring
Line 16 again uses character attribute substitution and the passed parameter value to output a display line containing the character name, the colorized health total, and the percentage value. The percentage is right-justified.
Line 17 returns from the HealthCheck subroutine.
Expanded Magic Missile Script
This is the expanded and enhanced version of the Magic Missile script covered in this video. It includes visual and audio effects, checking and deducting spell slots, and applying damage using either Token-Mod or Alterbars.
!scriptcard {{
  --#title|Magic Missile
  --#sourceToken|@{selected|token_id}
  --#targetToken|@{target|token_id}

  -->GetAndCheckSlotInformation|

  --=MissileCount|[$SlotLevel] + 2
  --=DisplayCount|1
  --=MissileDamage|0
  --#leftsub|Slot level [$SlotLevel]
  --#rightsub|Ranged Attack
  --#emoteText|@{selected|character_name} uses a level [$SlotLevel.Total] spell slot to fire [$MissileCount.Total] missiles of magical force!

  --:MissileLoop|
  -->FireMissile|
  --=DisplayCount|[$DisplayCount] + 1
  --?[$DisplayCount] -le [$MissileCount]|MissileLoop
  --+Total|Total damage is [$MissileDamage]
  -->DeductSpellSlot|
  --#rightsub|Level [$SlotLevel] Left: [$SlotsRemaining]
  -->PlayEffects|none;burst-smoke;beam-magic;spell_01
  -->ApplyDamageTokenmod|@{target|token_id};3;-[$MissileDamage]
  -->ApplyDamageAlterbars|@{target|token_id};3;-[$MissileDamage]
  --X|

  --:FireMissile|
  --=ThisMissile|1d4 + 1
  --=MissileDamage|[$MissileDamage] + [$ThisMissile]
  --+Missile|[$DisplayCount.Total] Hits for [$ThisMissile] [b]force[/b] damage
  --<|

  --:GetAndCheckSlotInformation|
  --=SlotLevel|?{Spell Slot Level?|1|2|3|4|5|6|7|8|9}
  --=SlotsTotal|[*S:lvl[$SlotLevel]_slots_total]
  --=SlotsExpended|[*S:lvl[$SlotLevel]_slots_expended]
  --?[$SlotsExpended.Total] -ge [$SlotsTotal.Total]|NoSlotsLeft
  --<|

  --:NoSlotsLeft|
  --+|[*S:character_name] has no level [$SlotLevel.Total] spell slots available.
  --X|

  --:DeductSpellSlot|
  --=SlotsExpended|[$SlotsExpended] + 1
  --@setattr|_charid [*S:character_id] _lvl[$SlotLevel]_slots_expended|[$SlotsExpended] _silent
  --=SlotsRemaining|[$SlotsTotal] - [$SlotsExpended]
  --<|

  --:PlayEffects|Parameters are : source effect; target effect; line effect; sound effect
  --vtoken|@{selected|token_id} [%1%]
  --vtoken|@{target|token_id} [%2%]
  --vbetweentokens|@{selected|token_id} @{target|token_id} [%3%]
  --@roll20AM|_audio,play,nomenu|[%4%]
  --<|

  --:ApplyDamageTokenmod|Parameters are tokenid;bar#;amount
  --@token-mod|_ignore-selected _ids [%1%] _set bar[%2%]_value|[%3%]
  --<|

  --:ApplyDamageAlterbars|
  --@alter|_target|[%1%] _bar|[%2%] _amount|[%3%]
  --<|
}}
Hidden Roll
A roll where only the GM sees the result of the roll.

!script {{
  --#title|Stealth Check
  --=Roll|1d20 + @{selected|stealth}
  --+|@{selected|token_name} attempts to move undetected...
  --*GMLine|@{selected|token_name} rolled a [$Roll]
}}


