Difference between revisions of "Live Stream and Record Game Sessions"
From Roll20 Wiki
Andreas J. (Talk | contribs) m |
Andreas J. (Talk | contribs) m (overlay links) |
||
| (One intermediate revision by one user not shown) | |||
| Line 4: | Line 4: | ||
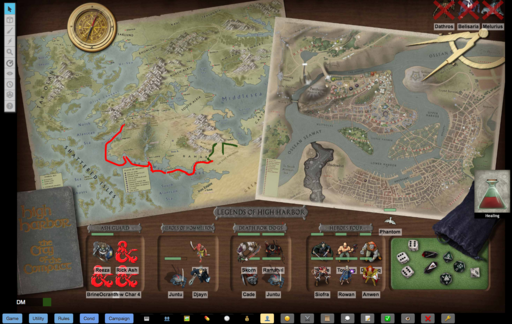
There are many different ways to stream and record content, but this wiki will focus the method used on by Roll20 on our [http://www.twitch.tv/roll20app Twitch page]. In fact, you can see {{yt|Roll20app previous recordings}} if you want a preview of what the final product will look like. | There are many different ways to stream and record content, but this wiki will focus the method used on by Roll20 on our [http://www.twitch.tv/roll20app Twitch page]. In fact, you can see {{yt|Roll20app previous recordings}} if you want a preview of what the final product will look like. | ||
| + | |||
| + | =Resources= | ||
| + | Art Packs, stream overlays and more | ||
| + | * [https://www.dropbox.com/sh/g4ybtvmy6kq8yam/AABunKj6wHhtmNkJs4c4-bkea?dl=0 some Twitch overlays] made by Roll20 to help you kick things off Streaming | ||
| + | |||
=Tools= | =Tools= | ||
* '''[https://obsproject.com/ Open Broadcaster Software](OBS)''' is a popular free tool for streaming/recording, and is what most guides use. Available for Windows, Mac & Linux. | * '''[https://obsproject.com/ Open Broadcaster Software](OBS)''' is a popular free tool for streaming/recording, and is what most guides use. Available for Windows, Mac & Linux. | ||
| Line 14: | Line 19: | ||
There are many different ways to stream and record content, but this wiki will focus the method used on by Roll20 on our [http://www.twitch.tv/roll20app Twitch]-page. In fact, you can see {{yt|Roll20app previous recordings}} if you want a preview of what the final product will look like. | There are many different ways to stream and record content, but this wiki will focus the method used on by Roll20 on our [http://www.twitch.tv/roll20app Twitch]-page. In fact, you can see {{yt|Roll20app previous recordings}} if you want a preview of what the final product will look like. | ||
=Tips= | =Tips= | ||
| + | |||
| + | * {{blogs|3-steps-for-streaming-on-roll20/ 3 Steps For Streaming On Roll20}} by Danny Quach - Apr 11, 2022 | ||
| + | |||
==Dummy Account== | ==Dummy Account== | ||
{{main|Dummy Account}} | {{main|Dummy Account}} | ||
| Line 221: | Line 229: | ||
* [[Game Management]] | * [[Game Management]] | ||
* [[Forum Submitted Tricks]] | * [[Forum Submitted Tricks]] | ||
| − | + | * [[Roll20 Ambassador]] | |
| + | |||
[[Category:Guides]] | [[Category:Guides]] | ||
[[Category:Tagged for Cleanup]] | [[Category:Tagged for Cleanup]] | ||
Latest revision as of 14:03, 23 April 2022
Page Updated: 2022-04-23 |
Open Broadcaster Software(OBS) is a popular tool for this and is what most guides use. It's available for Windows, Mac & Linux.
There are many different ways to stream and record content, but this wiki will focus the method used on by Roll20 on our Twitch page. In fact, you can see previous recordings if you want a preview of what the final product will look like.
Contents |
[edit] Resources
Art Packs, stream overlays and more
- some Twitch overlays made by Roll20 to help you kick things off Streaming
[edit] Tools
- Open Broadcaster Software(OBS) is a popular free tool for streaming/recording, and is what most guides use. Available for Windows, Mac & Linux.
- Bandicam - Windows, Trial/Paid
- Vidmore Screen Recorder - Windows/Mac, free/Paid
- XSplit Broadcaster & Capture - Monthly Subscription, or buy for lifetime
- Stream Deck XL -
- Stream Deck XL Setup For Roll20 by Jon (Sept 2021)
There are many different ways to stream and record content, but this wiki will focus the method used on by Roll20 on our Twitch-page. In fact, you can see previous recordings if you want a preview of what the final product will look like.
[edit] Tips
- 3 Steps For Streaming On Roll20(Blog) by Danny Quach - Apr 11, 2022
[edit] Dummy Account
Main Page: Dummy Account
To separate the GM's view from a streaming/recording that likely shows something like the players view of the map and chat, it's recommended to use a separate Dummy Account for this, separate from the GM or any of the specific players' account.
[edit] Recording in an External Window
(tips by Elvin)
If you record your sessions for your group's enjoyment/nostalgia, instead of creating multiple accounts simply duplicate the tab. On the second tab "Rejoin as Player" and move that tab over to your 2nd monitor for recording. Now you have a "player safe" window that you can record for your videos without having to edit videos for spoilers.
If you're using Chrome you will have to install the Mute Tab-addon and then mute the "Player Tab" so you're not recording double layers of audio from Roll20. Make sure to hit F11 (Windows Chrome) to go into full screen mode on the "Player Tab" in order to maximize table top real estate.
[edit] Landing Page
Main Page: Landing Page
Have a good looking Landing Page that shows campaign info can be great to show at the start/end of your games, and you can have it on Roll20 so players can interact with it if needed.
Players can be moved to this page to wait, while the GM makes any last preparations or changes to maps, or just any situation when a specific battlemap isn't shown. Having a separate Landing Page and World Map could also be smart.
[edit] More screen real estate
For streams/recordings it can be useful to maximize screen real estate, and have menus and such hidden in the window you're recording Roll20 in.
[edit] Using Tokens to show dynamic data
Original trick(Forum) by Martijn s.
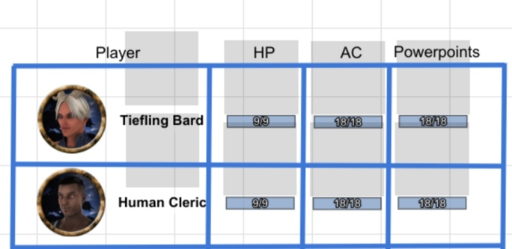
Sometime as GM or for a streamed/recorded game, you want a table with an overview of key character data for the full party, without having to click tokens (to see the three values) or open character sheets. Or as a GM you want to have that overview during a theatre of the mind combat, without the players seeing their tokens.
You can make a separate page with a drawn table and use multiple, transparent tokens to display the key character data.
Example:
[edit] Chroma Key
https://app.roll20.net/forum/post/10599003/anyone-have-ideas-for-how-to-chromakey-roll20-chat
[edit] Video Guides
Here is a list of relatively recent guides for streaming/recording Roll20. When using these other software, remember to check general guides for them as they will likely be more up-to-date than any Roll20-specific guide.
- Roll20 Stream Deck 6+ short videos, by Jon Molnar (Sept. 2021)
- How to record Roll20 in OBS - 4min, 2019
- How to Record on Roll20, using Discord for voice - 8min, 2019
- Using OBS + OBS-Virtualcam (in Windows) with Roll20 - 7min, 2018
- Streaming Your Tabletop Games (Gen Con 2019) - 50min
[edit] API
Useful API for streaming/recording.
- Observer(Forum) -- Manages observer players, who are given the visiblilty (and control) of all player characters. This is useful for both podcasting views and local play on a single player screen.
- See Also: API:Script Index for a curated list of Roll20 APIs
- Player API-page lists APIs that can give players more access than normal
- some could be useful for streaming, like if one person manages the streaming from the players perspective, or if one user/computer manages several person's characters and tokens.
[edit] Old Guides from 2015
| This part of the guide haven't been updated since 2015, and could likely do with some update. |
| Note: Beyond Twitch, you can also broadcast to YouTube via Google+'s Hangouts On Air. See Broadcasting From Google+ Hangouts On Air for a walkthrough of that method. |
A Twitch page is required to follow this tutorial - to create an account head over to Twitch to sign up. Please refer to their support site if you have any questions outside the scope of this wiki. We’ll do our best to get you up and running with the basics, but there are features like sharing you previous broadcasts to YouTube, creating highlights, and chat that you might consider exploring further.
[edit] PC - XSplit
Note: The following instructions have been verified to work on Windows 7 only.
Download and install XSplit. There are several licensing options available, including a free version, a Personal License for $4.95 per month, and even a premium package at $8.95 per month for Professional Broadcasters. This software takes a screencast of your Roll20 session, both audio and video, and broadcasts it to your Twitch channel.
Setting up XSplit
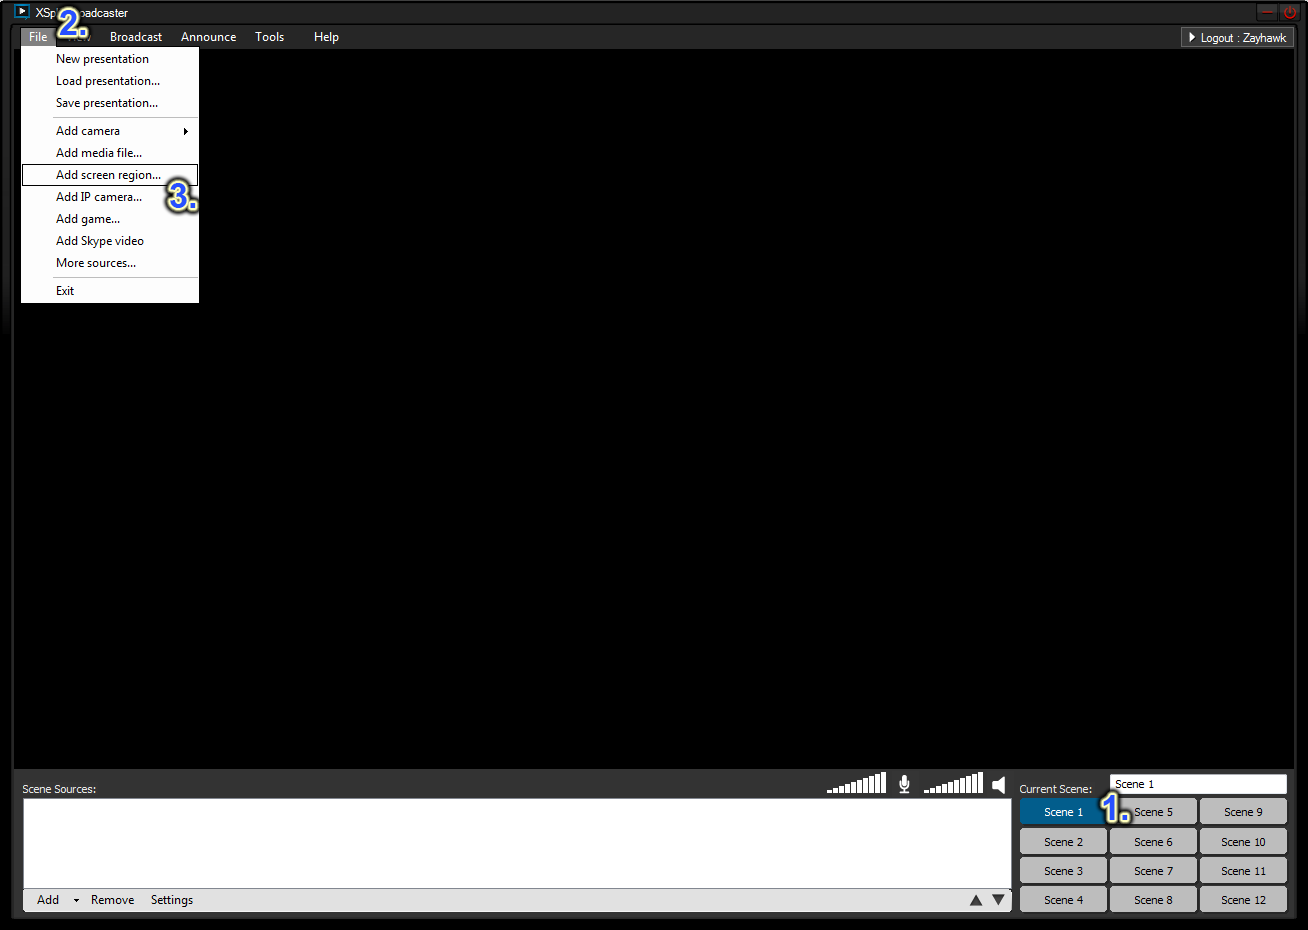
Now that XSplit is installed, you need to setup and configure it. Launch the program, You'll want to (1.) select “Scene 1”, then (2.) click on "File" and then (3.) select the "Add screen region" option.
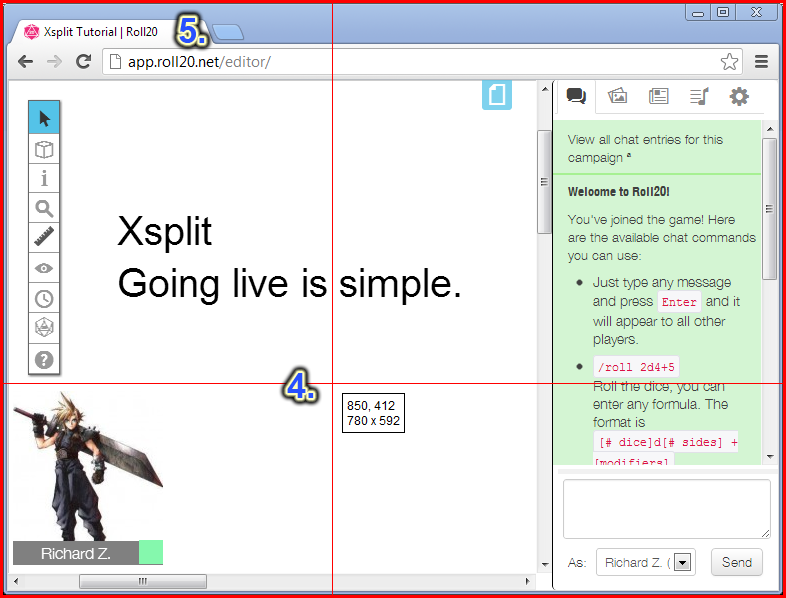
Then (4.) Red crosshairs will appear simply select the region you wish to screencast in this case (5.) the web browser you are using for Roll20.
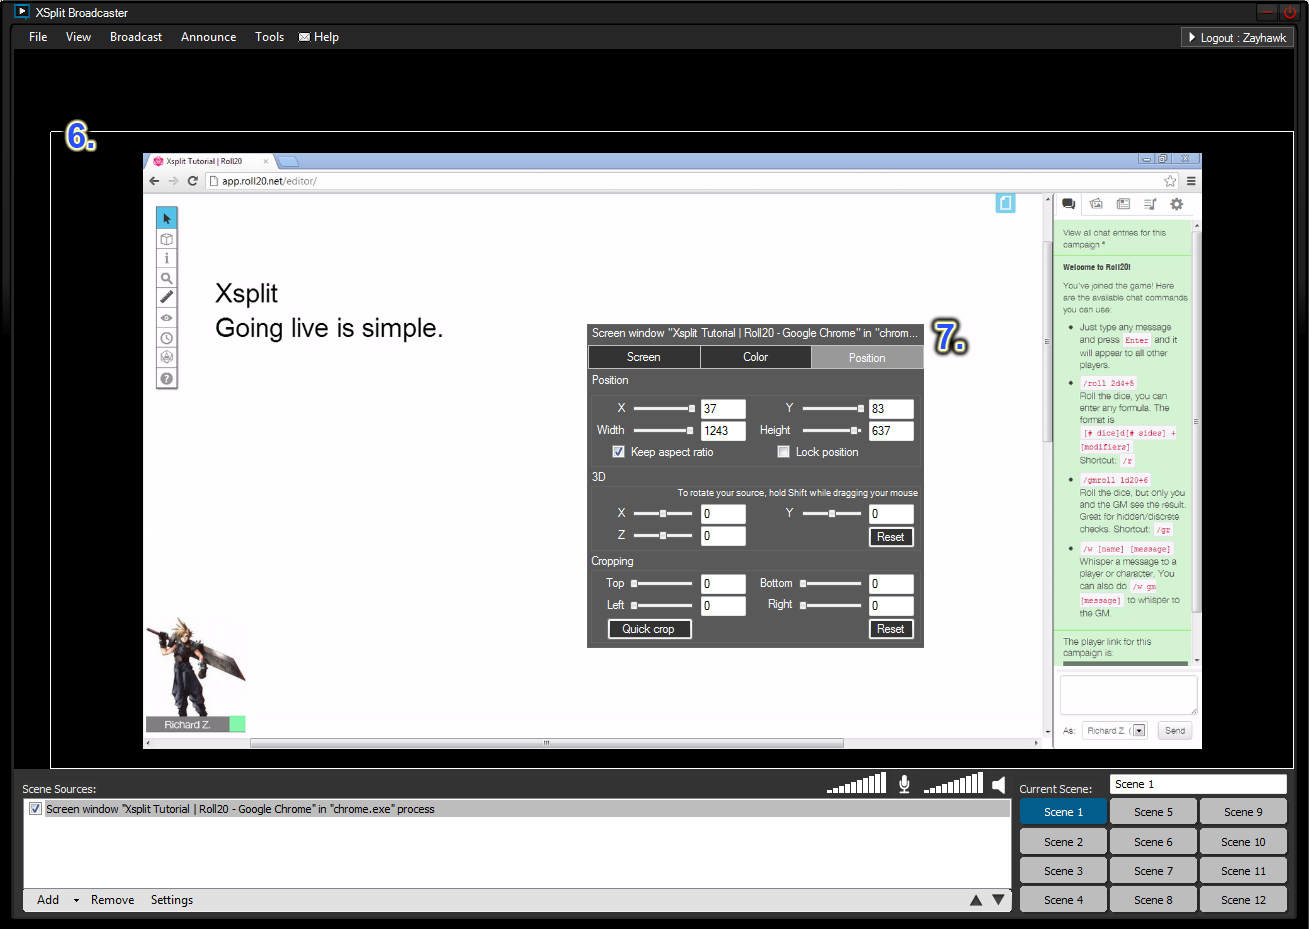
Now that proper screen region has been selected for Scene 1 (6.) You can easily resize the scene by simply dragging or (7.) right click on the scene for more advanced tools( such as screen position, color, or cropping)
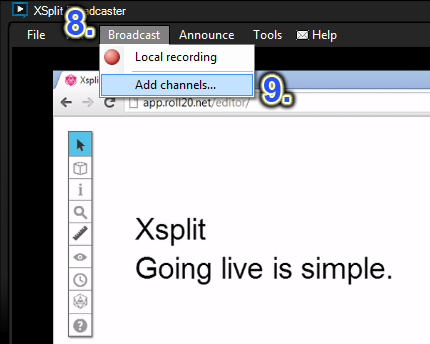
Once your Scene looks just how you want it to you are almost ready to broadcast. (8.) Click on “Broadcast” and then (9.) select the “Add channels” option.
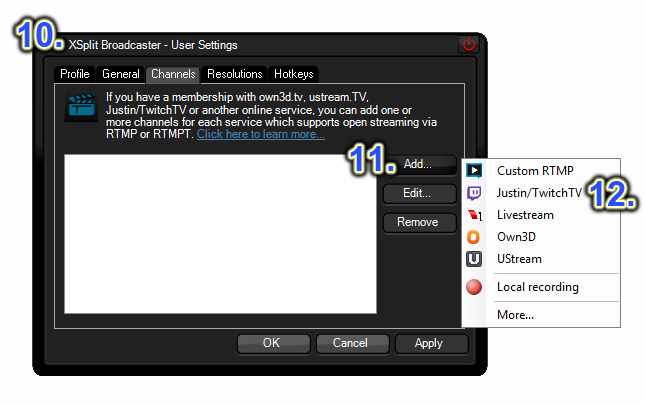
(10.)The XSplit Broadcaster window will open, from here (11.) click the “Add” button and then (12.) select Justin/TwitchTV.
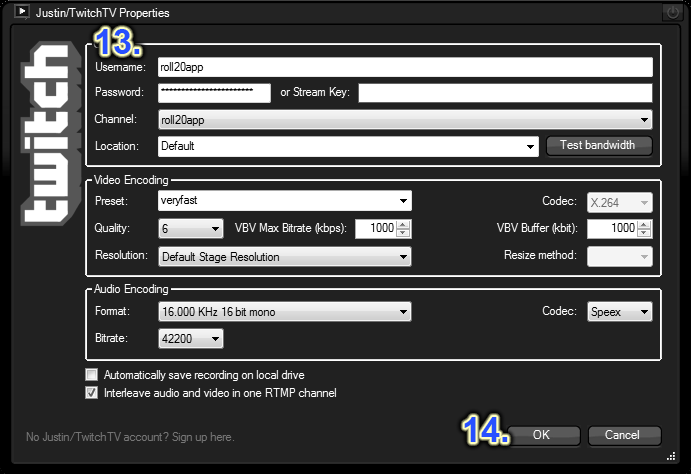
The Justin/TwitchTV properties window will open, from here (13.) enter all your Twitch Channel username and password , then (14.) click the “OK” button. Click “Ok” again on the Xsplit Broadcaster window to close it.
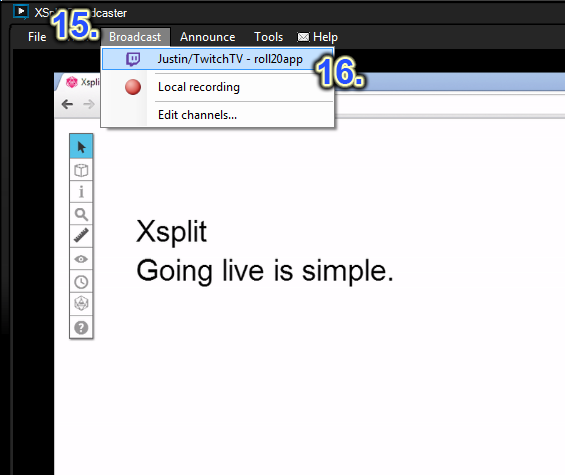
You are now ready to broadcast your Roll20 session via Xsplit to TwitchTV. Simply (15.) click on “Broadcast” and then (16.) select your Justin/TwitchTV Channel.
To let others view your live stream while you're broadcasting, just send them to http://twitch.tv/your_twitch_username, for example http://twitch.tv/roll20app.
[edit] PC - OBS
Open Broadcaster Software (OBS) for Twitch:
OBS is a free live streaming program that can be downloaded for Windows or Apple operating systems here: https://obsproject.com/
When you first download the program, this is what you will see by default: empty scenes and sources.
Before we get to adding scenes and sources to OBS, there are some settings to take care of first.
Click the Settings button at the top of the program, then Settings again to open up a menu with various streaming preferences and features. The default settings will be perfect for most users right away, so don’t change any values that you’re not familiar with.
The first thing you’ll need to do is create an account on Twitch.tv. Once you’ve done that, log in to your Twitch account and go to your Dashboard, found at http://www.twitch.tv/dashboard
Click on Stream Key, then Show Key. A string of letters and numbers known as your stream key will be revealed. This is a sort of address that tells OBS where to send your stream on Twitch.tv. Do not let anyone see your stream key, or they will be able to broadcast to your channel as well!
Now that you have your stream key, go back into your OBS settings and click on the Broadcast Settings tab. You’ll want to set Mode to “Live Stream” and Streaming Service to “Twitch.” Once you do this, OBS will create an Optimize button at the bottom that optimizes your settings for use on Twitch.tv. Click Optimize and OBS will automatically change a few settings for you.
Now just copy your stream key over from Twitch.tv and apply your changes. Your OBS is now “connected” to your Twitch channel and you will be able to broadcast to it whenever you like.
The last thing that we will do in OBS Settings is to change your Max Bitrate (kb/s) in the Encoding tab. If you have an upload speed higher than 5 Mbps, your Max Bitrate should be set to 3300 for optimal streaming. You can check your upload speed with the website http://www.speedtest.net If your upload speed is below 5 Mbps, lower your Max Bitrate accordingly.
For more information on what all of the remaining Settings are for, check out this complete guide on Twitch.tv: http://help.twitch.tv/customer/portal/articles/1262922-open-broadcaster-software
Now that we are done with our Settings, it’s time to add some content to our scenes! Make sure you’re logged into Roll20 and looking at the game board that you would like to stream, so that we can make sure it looks correct in our Preview Stream.
In OBS, there is one empty Scene already created by default. Right-click in the white box under the word Sources, then Add, then Window Capture. You can name this Source “Game.”
The drop-down menu labeled “Window” will allow you to select the correct internet browser that you have Roll20 open in. Click “OK” and you will see “Game” appear as a Source. You won’t see the actual window until you click “Preview Stream” near the bottom right corner. Click “Preview Stream” to see your Window appear, then click “Game” and “Edit Scene” to resize and reposition your window to your liking.
OBS allows you to add multiple windows, Images, and Text as scenes. Let’s add one of the Roll20 standard overlays by once again right-clicking the white box under Sources, Add, Image. Name the source “Overlay” and click OK. Browse for the overlay .png and use Edit Scene on either Source to get your Preview Stream looking just how you want it!
Sources are listed from top to bottom in the “Order” that they appear. Think of Order as what should be displayed on top. For us, the Overlay should be on top of the Game, like so:
Now that you’ve got the game and overlay looking the way you like it, click “Stop Preview.” Once you’re ready to actually go live with your stream on Twitch.tv, simply click “Start Streaming” and after a few seconds, your stream should appear as Live on Twitch! When it’s time to bring your broadcast to an end, simply click “Stop Streaming.” Be sure to practice before going online for a show for the first time. There are lots of moving pieces with streaming software and a large number of issues could come up. Take the time to be certain that your broadcast will look and sound like you intend it to before asking people to come watch!
OBS allows users to customize their stream to their heart’s content. For more guides on how to make the most of OBS, check out their official forums: https://obsproject.com/forum/list/guides.25/
[edit] Mac - CamTwist
Note: The following instructions have been verified to work on Mac OS X 10.7.x (Lion). They will probably work on older versions of Mac OS X as well, but for best results, you should upgrade to the latest version.
There are several pieces of software that you will need to download and install. Follow the installation instructions for each before continuing.
- CamTwist (Free). This is the software that captures your screen so that you can broadcast it.
- a) Wiretap Anywhere ($129/Free 30 Day Trial). This software takes the audio from your Roll20 session and your microphone and mixes them together so you can use both in your live stream. Without it, you would only hear yourself talking, not your players or the music from your game. We know this is expensive, and are looking to see if there are any other options that work better, but right now this is by far the best way to record the audio necessary to live stream on a Mac.
- Quicktime Broadcaster (Free). This software (from Apple) takes the video from CamTwist and the audio from Wiretap and broadcasts it to the Twitch servers so that others can view it.
Set up CamTwist
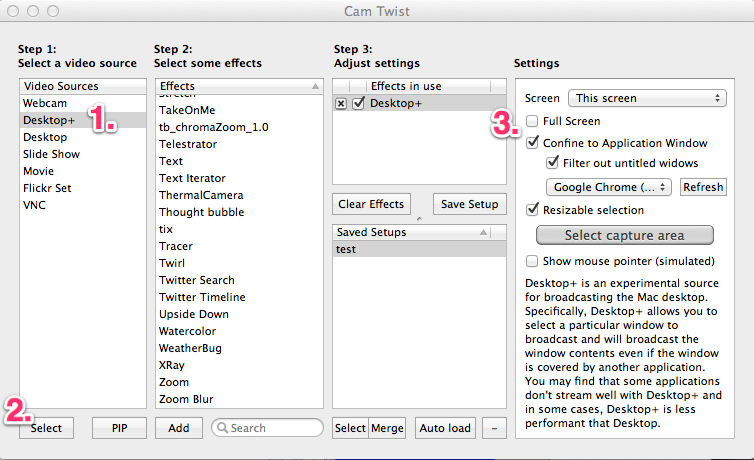
Now that all 3 pieces are installed, you need to set them up and configure them. First up is CamTwist. Launch the program, and you'll be presented with a simple options dialog. You'll want to (1.) click on "Desktop+" and then (2.) click the "Select" button. Then in the far-right pane additional options will appear. You can choose to broadcast your whole screen (the default), or (3.) check the "Confine to Application Window" box to only stream your browser window (recommended).
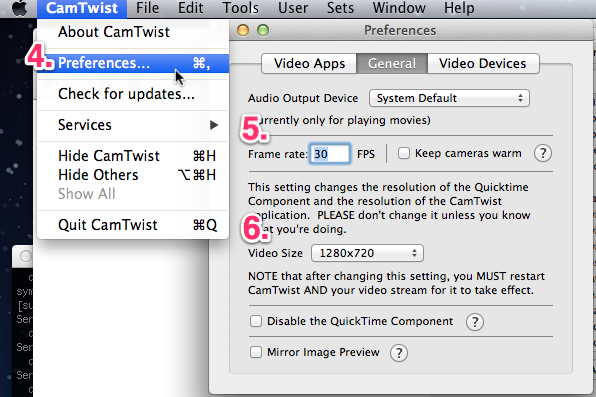
Finally, (4.) select the "Preferences…" menu from the CamTwist menu bar at the very top of your screen (next to the Apple menu). Choose the "General" tab in the settings dialog that appears. You'll want to (5.) enter 30 FPS in the Frame Rate settings box, and for (6.) Video Size choose the size you want to broadcast at (we recommend 1280x720 if your computer can handle it). You may need to fiddle with these options later if your broadcast is laggy. You'll also want to restart CamTwist after making these changes (being sure that all settings are correct after it restarts again.) You only need to change the Preferences… settings this first time.
Set up Wiretap Anywhere
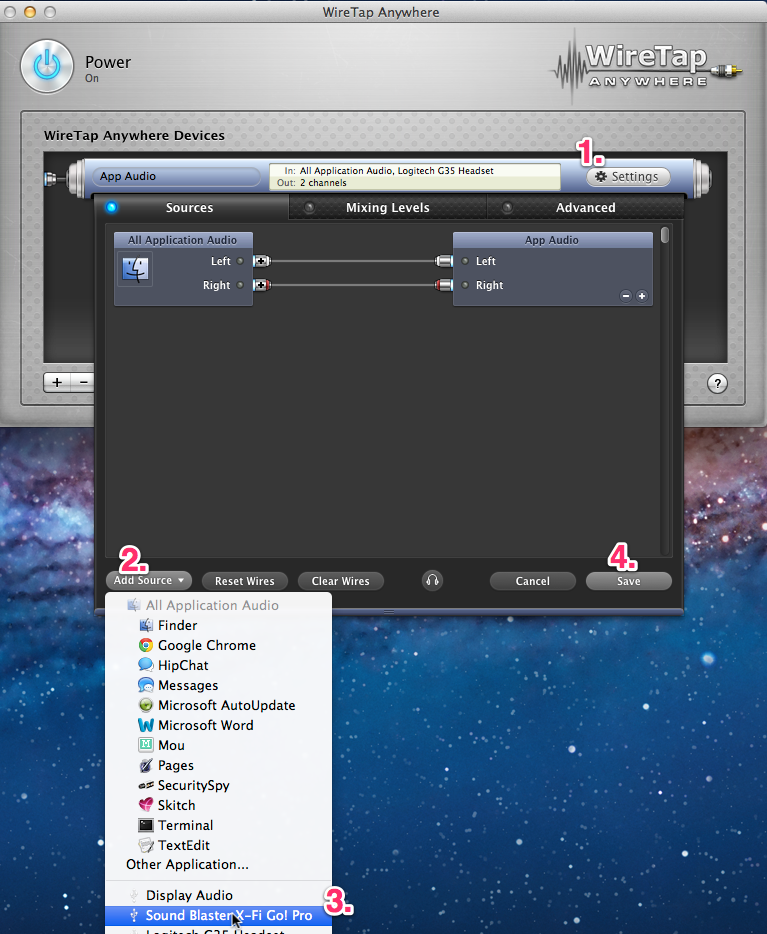
Launch Wiretap Anywhere. You should see a screen similar to the one below, with a virtual device already added. Click on (1.) the Settings button. Choose (2.) Add Source. Select (3.) the microphone that is attached to your computer. Click (4.) Save. Now when you speak or play any audio on your computer, you should see the meters in the "Preview Levels" box on the bottom of the window rising and falling to indicate that sound is being processed by the app.
Quicktime Broadcaster
Set up Quicktime Broadcaster
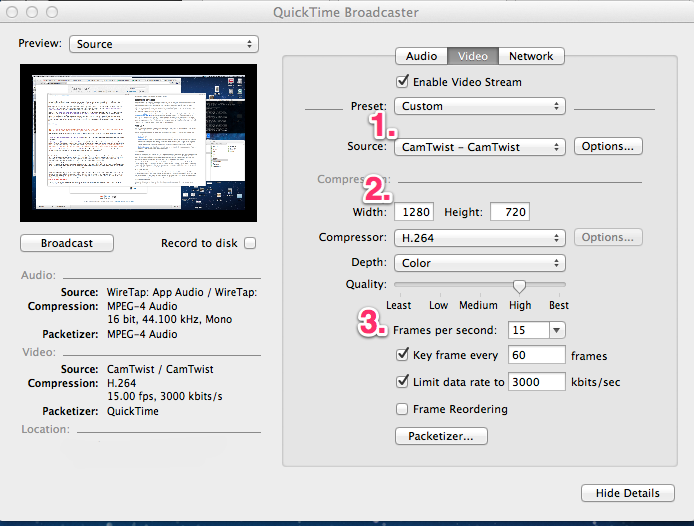
At this point both CamTwist and Wiretap Anywhere should be running and configured properly on your computer. Launch Quicktime Broadcaster (it may take a minute or two to start up!) On the Video tab, you'll want to be sure to set up (1.) the source to CamTwist, (2.) the resolution to match the resolution you have CamTwist recording at (again, we recommend 1280x720), and (3.) set the FPS to 15 or 30 FPS, the keyframes to 60, and the bitrate limit to 3,000 kbps (or less if your connection can't handle that speed).
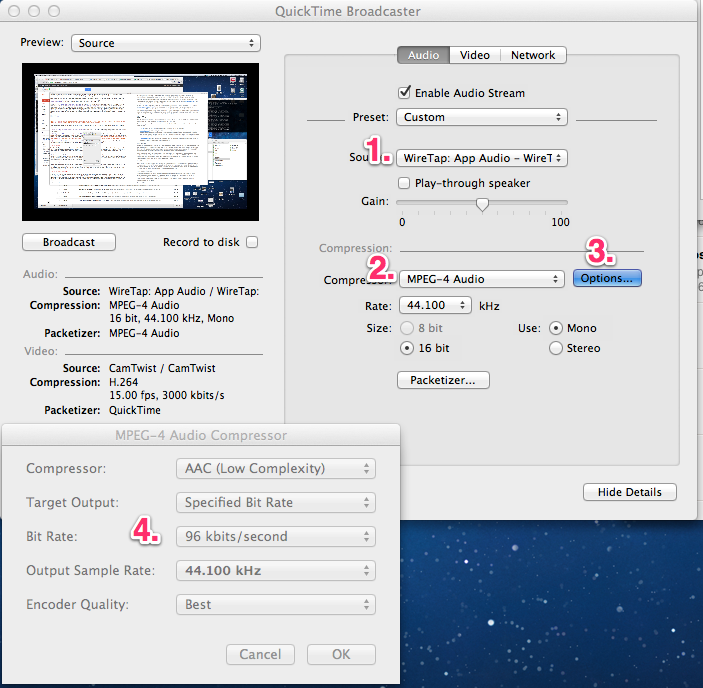
On the Audio tab, you'll want to (1.) make sure that WireTap is the Source, (2.) be sure that MPEG-4 Audio is the Compressor and the rate is 44.100 kHz (Mono). Click (3.) the Options… button, and in the settings dialog that appears, (4.) be sure to choose a decently high bit rate (we recommend 96 kbits/second). The Output Sample Rate should also be set to 44.100 kHz, and Encoder Quality to Best.
Finally, on the Network tab, make sure that (1.) Transmission is set to "Automatic Unicast (Announce)". The Host Name should be "live.twitch.tv:1935/app". The File should be "live_user_your_twitch_username". So for example for us it's "live_user_roll20app". The Username you need to get from your Twitch.tv Broadcast page by clicking on the "Show Key" button. It should be something like "live_123456789_yfdsdfTESdfkDFsERRSLLFJ". The Password is always "jtv".
When you're ready to begin your live stream, just click (2.) the Broadcast button! You don't need to have the Record to disk box checked, as Twitch.tv will automatically record the stream for you as your broadcast it on their servers. Finally, you may want to change (3.) the Preview box from "Source" to "None" during the broadcast, it makes it a little easier on your computer. During the broadcast you will see some information telling you the current bitrate and FPS that you are broadcasting at. If the bit rate is too high for your connection or the FPS is low (less than 10), you may need to adjust some of your settings, such as the recording resolution in CamTwist and the broadcast resolution in the Video tab in Quicktime Broadcaster.
To let others view your live stream while you're broadcasting, just send them to http://twitch.tv/your_twitch_username, for example http://twitch.tv/roll20app.


